The ability to run virtual reality within a mobile browser is empowering and exciting. Google Cardboard and other similar VR devices make it unbelievably simple, just place your phone into the holder and go! I previously covered Bringing VR to the Web with Google Cardboard and Three.js, where I discussed the basics of building a VR environment that pulls in web data. People really enjoyed that article (and I really enjoyed building that demo) so I thought I’d expand on it with a different idea. Rather than bringing in web APIs, why not bring in your phone’s camera and turn this into an Augmented Reality experience?
In this article, I’m going to explore how we can pull in camera data, filter it and display it back using HTML5 and JavaScript. We’ll do this all through a stereoscopic vision effect to create an Augmented Reality experience for Google Cardboard and other VR devices. We’ll apply a few different filters to our camera stream – a cartoonish greyscale filter, a sepia film style filter, a pixelated filter (my favorite) and an inverse color filter.
If you are completely new to filtering images with HTML5, the canvas tag and JavaScript, I have a whole course on the topic over at Learnable called JavaScript in Motion! I’ll be approaching this article with the assumption that you understand the canvas and video tags, along with how to stream videos into the canvas tag. Or with the assumption that you’re confident enough to work it out as you go!
Demo code
If you’re keen to get straight into the code and try it out, you can find it here on GitHub.
Want to try it in action? I’ve got a running version hosted here: Reality Filter.
Note: A recent change in the way Chrome handles camera input requires the page to be run via HTTPS for this to work!
How This Will Work
We’ll be taking the same initial set up from the previous Google Cardboard article – a Three.js scene that we display through a stereoscopic effect. That effect allows us to have a display for each eye, making things look wonderfully 3D in VR. However, rather than floating particles and such from the previous article, we remove most elements and place one simple Three.js mesh in front of the camera that plays our camera feed.
Our Code Explained
Looking at our variable declarations, most of the variables here will look familiar to those who’ve gone through the previous demo. The variables for preparing our Three.js scene, camera, renderer, element for our canvas output, container to place that element in and a variable to store our stereoscopic effect are all the same.
var scene,
      camera,
      renderer,
      element,
      container,
      effect,
Our three new variables related to our camera feed are video, canvas and context.
video,
      canvas,
context,video– Our actual HTML5<video>element. That will have our camera feed playing within it.canvas– A virtualcanvaselement that will have the contents of ourvideoelement. We will read in the video data from this canvas and then add our theme filters back onto it, before placing its contents into our Three.js scene.context– Ourcanvas‘ 2D context which we use to perform most functions against it.
We have a few other variables under those which relate to our filter functionality.
themes = ['blackandwhite', 'sepia', 'arcade', 'inverse'],
      currentTheme = 0,
lookingAtGround = false;themes– An array of the names of our filters.currentTheme– The index we’re currently viewing within thethemesarray.lookingAtGround– Whether or not we’ve looked at the ground (this one will make more sense soon).
We start with our init() function setting up our scene, camera and so forth as before:
init();

  function init() {
    scene = new THREE.Scene();
    camera = new THREE.PerspectiveCamera(90, window.innerWidth / window.innerHeight, 0.001, 700);
    camera.position.set(0, 15, 0);
    scene.add(camera);

    renderer = new THREE.WebGLRenderer();
    element = renderer.domElement;
    container = document.getElementById('webglviewer');
    container.appendChild(element);

    effect = new THREE.StereoEffect(renderer);

    element.addEventListener('click', fullscreen, false);
We do not have any camera movement functionality via the DeviceOrientation event this time around. Compared to a VR experience, we won’t need to change the actual camera position in this Three.js scene. We’re keeping the scene in the same spot – the camera feed is what will be moving when the user looks around.
One listener we have kept from the previous example is an event listener to go fullscreen if we tap the scene. This removes the Chrome address bar from our view.
A Different Use For DeviceOrientationEvent
There is a new use for the DeviceOrientationEvent in this demo. We set it to watch for changes in the orientation of our device and use that as a trigger for switching our filter. We don’t really have any physical controls to trigger events, so we control things by where the user is looking. In particular, we change the filter any time the user looks at the ground.
if (window.DeviceOrientationEvent) {
    window.addEventListener('deviceorientation', function(evt) {
      if (evt.gamma > -1 && evt.gamma < 1 && !lookingAtGround) {
        lookingAtGround = true;
        currentTheme = (themes.length > currentTheme+1) ? currentTheme+1 : 0;

        setTimeout(function() {
          lookingAtGround = false;
        }, 4000);
      }
    }.bind(this));
  }
In this code, we watch for whether the evt.gamma is between -1 and 1. If so, they’re looking at the ground. This is quite a precise spot on the ground, if you find it too small and difficult to trigger, you can increase the range to between -1.5 and 1.5… etc.
When they are looking in this range and when lookingAtGround is false, we run our theme switcher code. This adjusts currentTheme to the next index number of our themes array. We set lookingAtGround to true and set it back after 4 seconds. This ensures we only change the filter once every four seconds at most.
Retrieving Our Primary Camera Feed
In order to filter the world around us, we need access to the “environment” facing camera on our smartphone. We start by creating a <video> element, setting autoplay to true (as we’ll want the camera to play straight away) and then setting options for our stream. In the options, we set the facingMode to "environment", which uses that camera if it is available. If not, it’ll use the selfie style camera instead. This is helpful when you’re testing on a laptop that doesn’t have an environment camera! (Note, your laptop might constantly switch filters, if so, you’ll need to turn this off before testing!)
video = document.createElement('video');
  video.setAttribute('autoplay', true);

  var options = {
    video: {
      optional: [{facingMode: "environment"}]
    }
  };
Our next step is to actually pull in our camera feed using these options. For this, we use the MediaStream API. This is a set of JavaScript APIs that allow us to pull in data from local audio and video streams – perfect for getting our phone’s camera stream. In particular, we’ll be using the getUserMedia function. The MediaStream API is still in “W3C Editor’s Draft” and is implemented slightly differently browser to browser. This demo is focused mainly on Google Chrome for mobile but for future compatibility sake, we get the one that works with our user’s current browser and assign it to navigator.getUserMedia:
navigator.getUserMedia = navigator.getUserMedia ||
  navigator.webkitGetUserMedia || navigator.mozGetUserMedia;
Then, as long as our browser understands MediaStreamTrack from the MediaStream API and successfully found a compatible getUserMedia function in our browser, we’ll begin our search for the camera data.
if (typeof MediaStreamTrack === 'undefined' && navigator.getUserMedia) {
    alert('This browser doesn\'t support this demo :(');
  } else {
    // Get our camera data!
Within the MediaStream API, we’ve got a function within MediaStreamTrack.getSources() that retrieves all audio and video sources available to the browser from its device. It can retrieve microphone data from each microphone connected to your device, along with video data from each camera.
The returned values from this function are available to us within an array called sources. We loop through each source and look for ones whose kind is equal to "video". Each source will either have a kind of "audio" or "video". We then see whether the video found has a facing property equal to "environment", if so, this is the camera we’d prefer to use. We retrieve its ID within the API and then update our options object from earlier to also include this source ID as our preferred video stream to use.
MediaStreamTrack.getSources(function(sources) {
      for (var i = 0; i !== sources.length; ++i) {
        var source = sources[i];
        if (source.kind === 'video') {
          if (source.facing && source.facing == "environment") {
            options.video.optional.push({'sourceId': source.id});
          }
        }
      }
The options object would now look like so behind the scenes:
{
    video: {
      optional: [{facingMode: "environment"}, {sourceId: "thatSourceIDWeRetrieved"}]
    }
  }
Finally, we pass in those options to our navigator.getUserMedia function along with a success and error callback. That will do the retrieving of our video data.
navigator.getUserMedia(options, streamFound, streamError);
    });
  }
Putting Our Camera Feed Onto Our Scene
Once we have our video stream, we put it into our scene within our success callback, streamFound(). We start by adding our video element to the DOM, setting its contents to our returned video stream and making it the full width and height of the window (as we’ll want a high resolution to read into our canvas).
function streamFound(stream) {
    document.body.appendChild(video);
    video.src = URL.createObjectURL(stream);
    video.style.width = '100%';
    video.style.height = '100%';
    video.play();
After we’ve got our camera stream playing in the page, we create a canvas element in JavaScript that we use to do the manipulation of our video data. The canvas element itself is never added into the page itself, it remains just within our JavaScript.
We set our canvas to the same width and height as the video, rounded up to the nearest power of two. The reason for this is that Three.js textures work best as powers of 2. If you pass in other widths and heights that do not conform to this, that’s totally fine, but you’ve got to use specific minFilter and magFilter options. I preferred to adjust it to the power of two to keep things simple here.
canvas = document.createElement('canvas');
  canvas.width = video.clientWidth;
  canvas.height = video.clientHeight;
  canvas.width = nextPowerOf2(canvas.width);
  canvas.height = nextPowerOf2(canvas.height);

  function nextPowerOf2(x) {
      return Math.pow(2, Math.ceil(Math.log(x) / Math.log(2)));
  }
Next, we create our Three.js texture that will contain our streaming video footage, passing our canvas element into it. We set our context variable to the context of our created canvas element, and assign our texture’s context to our canva’s context. Keeping it all in sync.
context = canvas.getContext('2d');
    texture = new THREE.Texture(canvas);
    texture.context = context;
We then create the Three.js plane we’ll be putting our feed onto using THREE.PlaneGeometry. I set it to 1920×1280 as a base size for our video.
var cameraPlane = new THREE.PlaneGeometry(1920, 1280);Then, we create a THREE.Mesh object using our plane and our texture with our video feed. We position it -600 on the z axis, moving it away from our field of view and adding it into our Three.js scene. If you’ve got a different sized video feed, you may need to adjust the z position to ensure the shape fills the viewport.
cameraMesh = new THREE.Mesh(cameraPlane, new THREE.MeshBasicMaterial({
      color: 0xffffff, opacity: 1, map: texture
    }));
    cameraMesh.position.z = -600;

    scene.add(cameraMesh);
  }
After that, we have our error callback function which will run a console.log if something is wrong with our video stream retrieval.
function streamError(error) {
    console.log('Stream error: ', error);
  }
At the end of our init() function, you’ll see our animate() function. This is where we’ll do our processing of the video image:
animate();Applying Filters
Our animate() function starts by drawing the latest frame from our camera onto our canvas using context.drawImage():
function animate() {
if (context) {
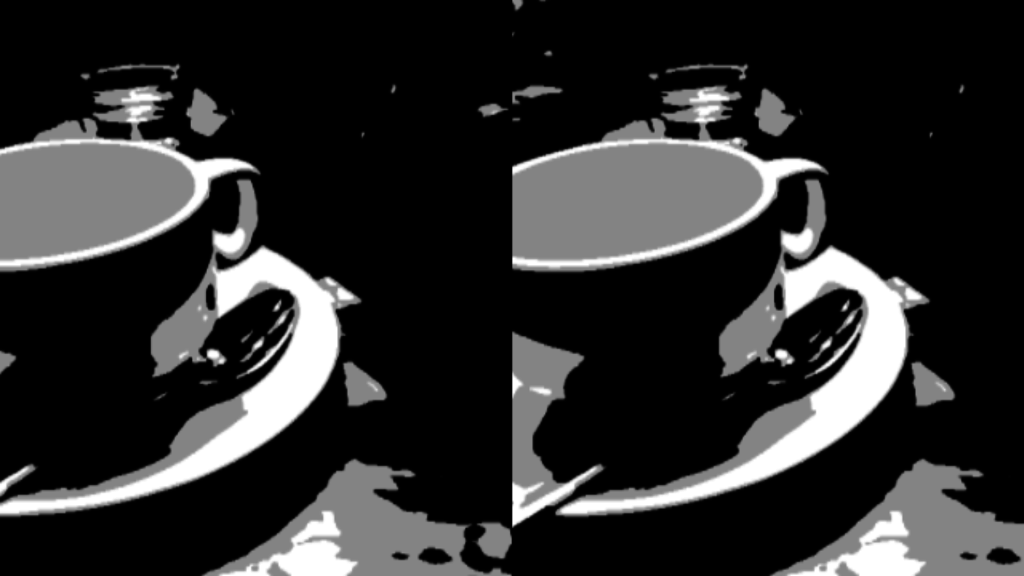
context.drawImage(video, 0, 0, canvas.width, canvas.height);From there, we can read back our canvas using context.getImageData() and apply filters to the data it holds depending on the theme we’re set to. The code below starts with the settings for our black and white filter which reads in our data, gets the general luminance of each pixel in the image and then filters each pixel to be either black, grey or white depending on the scale of luminance it holds. This gives a cartoony/old style newspaper feel to the image.
if (themes[currentTheme] == 'blackandwhite') {
        var imageData = context.getImageData(0, 0, canvas.width, canvas.height);
        var data = imageData.data;

        for (var i = 0; i < data.length; i+=4) {
          var red = data[i],
              green = data[i+1],
              blue = data[i+2],
              luminance = ((red * 299) + (green * 587) + (blue * 114)) / 1000; // Gives a value from 0 - 255
          if (luminance > 175) {
            red = 255;
            green = 255;
            blue = 255;
          } else if (luminance >= 100 && luminance <= 175) {
            red = 190;
            green = 190;
            blue = 190;
          } else if (luminance < 100) {
            red = 0;
            green = 0;
            blue = 0;
          }

          data[i] = red;
          data[i+1] = green;
          data[i+2] = blue;
        }

        imageData.data = data;

        context.putImageData(imageData, 0, 0);
      }
That looks like so:
The next theme inverts our pixels, so white is black and so forth. It gives an X-Ray style to the image:
else if (themes[currentTheme] == 'inverse') {
        var imageData = context.getImageData(0, 0, canvas.width, canvas.height);
        var data = imageData.data;

        for (var i = 0; i < data.length; i+=4) {
          var red = 255 - data[i],
              green = 255 - data[i+1],
              blue = 255 - data[i+2];

          data[i] = red;
          data[i+1] = green;
          data[i+2] = blue;
        }

        imageData.data = data;

        context.putImageData(imageData, 0, 0);
      }
That looks like so:
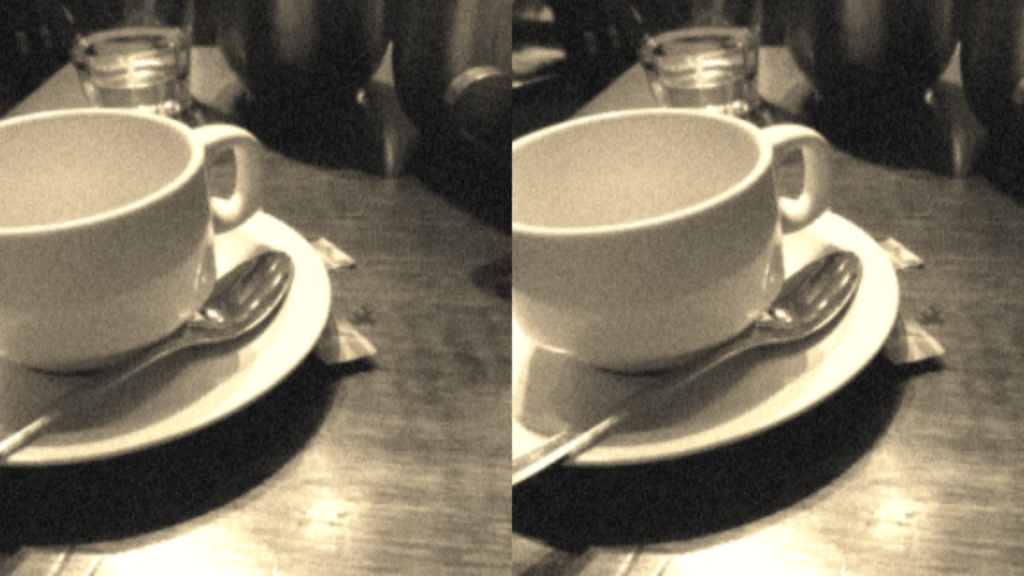
Our sepia theme uses a formula I’ve seen on various places on the web to give the image a sepia, old school colored feel. I also add noise to the image by adding a random level of red, green and blue to each pixel. If the pixels via sepia are going to be greater color levels than 255, I cap it at 255.
else if (themes[currentTheme] == 'sepia') {
        var imageData = context.getImageData(0, 0, canvas.width, canvas.height);
        var data = imageData.data;

        for (var i = 0; i < data.length; i+=4) {
          var red = data[i],
              green = data[i+1],
              blue = data[i+2];

          var sepiaRed = (red * 0.393) + (green * 0.769) + (blue * 0.189);
          var sepiaGreen = (red * 0.349) + (green * 0.686) + (blue * 0.168);
          var sepiaBlue = (red * 0.272) + (green * 0.534) + (blue * 0.131);

          var randomNoise = Math.random() * 50;

          sepiaRed += randomNoise;
          sepiaGreen += randomNoise;
          sepiaBlue += randomNoise;

          sepiaRed = sepiaRed > 255 ? 255 : sepiaRed;
          sepiaGreen = sepiaGreen > 255 ? 255 : sepiaGreen;
          sepiaBlue = sepiaBlue > 255 ? 255 : sepiaBlue;

          data[i] = sepiaRed;
          data[i+1] = sepiaGreen;
          data[i+2] = sepiaBlue;
        }

        imageData.data = data;

        context.putImageData(imageData, 0, 0);
      }
That looks like so:
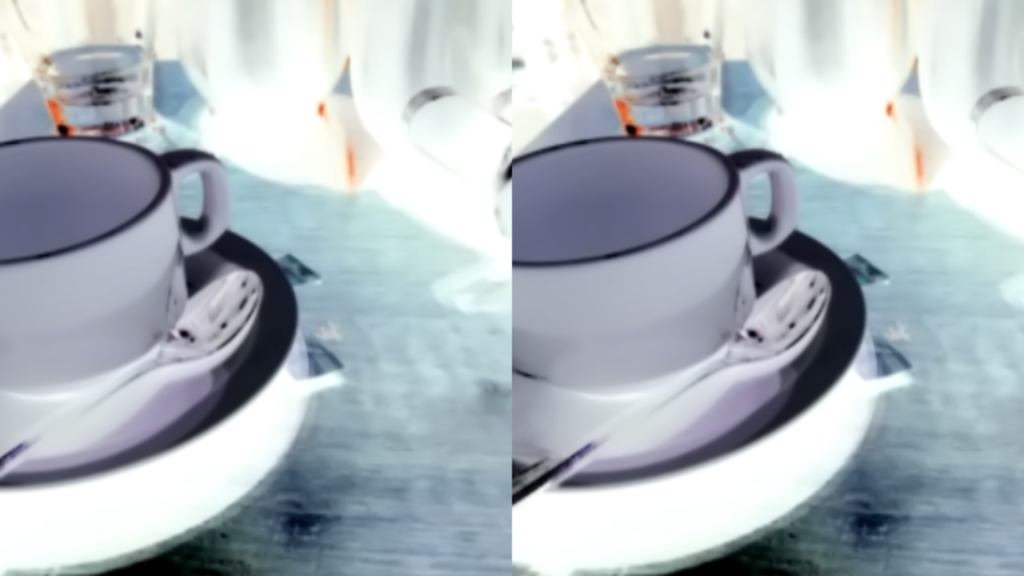
Finally, my favorite of all the effects! The “arcade” style one which pixelates the image to make it look like a retro world. To achieve this effect, I’ve adjusted the Close Pixelate plugin by David DeSandro and John Schulz. The original version of the plugin converts an inline image and replaces it with a pixelated canvas version. My version instead takes canvas data and places it back into the same canvas and context, so we can use it for live video. My adjusted version still accepts all the same parameters as the one on their plugin page. It is a bit slower than the other filters above and could potentially be optimised if I get time to look into it. For now, I’m okay with a bit of lag, makes it feel more retro! A note for anyone who looks to apply new options into that filter (e.g. turning the world into diamonds instead) – it can make it lag even more!
else if (themes[currentTheme] == 'arcade') {
        ClosePixelation(canvas, context, [
          {
            resolution: 6
          }
        ]);
      }
That looks like so:
Finally, we set the texture to update on next frame for Three.js (as we’ve definitely altered it in some way) and run animate() again on the next requestAnimationFrame(). We also run code to update and rerender our Three.js scene.
if (video.readyState === video.HAVE_ENOUGH_DATA) {
        texture.needsUpdate = true;
      }
    }

    requestAnimationFrame(animate);

    update();
    render();
  }
It is HTTPS Time
Update as of late 2015 – I’m jumping back into this article to add a new bit of rather important info – Chrome now requires that webpages using the camera are served over HTTPS. So before attempting to run this, you’ll need to find a way to run your service over HTTPS. One method I’ve used so far for testing is ngrok, which can provide a HTTPS tunnel to your localhost. We have a guide over at Accessing Localhost From Anywhere here at SitePoint which can help get you started.
In Action
In order to be able to access the webcam and all, it appears you need to have it hosted on a server rather than running it locally. For testing purposes, I used ngrok to test from my Mac on my phone. Otherwise, FTP your stuff onto a web server somewhere and test away!
Run it inside your Google Cardboard or other VR headset and you should see the environment around you with our black and white filter to start with. If you look down at the ground, it should switch filters. It is a lot of fun! Here is a small animated gif to show it in action (outside of the headset so you can see what it is displaying):

Conclusion
Combining the power of Google Cardboard, HTML5, JavaScript and Three.js brings some really neat possibilities that aren’t solely restricted to virtual reality. Using the camera input, you can bring the world around you into the scene too! There are plenty of other areas this initial idea can be developed into. It is also possible to filter the image via Three.js itself using shaders and possible to add augmented reality objects onto your scene – two ideas I’ll be covering in future articles.
If you make some really neat AR experiences based upon this demo, leave a note in the comments or get in touch with me on Twitter (@thatpatrickguy), I’m always very keen to take a look!
Frequently Asked Questions (FAQs) about JavaScript and Google Cardboard
How can I integrate HTML5 with AR for my web development project?
Integrating HTML5 with Augmented Reality (AR) can be achieved using libraries such as AR.js. This library allows you to create AR experiences that can be accessed directly from a web browser, without the need for a specific app. You can create 3D models using A-Frame or other 3D modeling software, then use AR.js to overlay these models onto the real world when viewed through a device’s camera. This can be done with just a few lines of code, making it accessible even for beginners.
What is the role of JavaScript in creating AR experiences?
JavaScript plays a crucial role in creating AR experiences. It is used to control the behavior of the AR elements, such as how they move, react to user input, or change over time. JavaScript can also be used to handle more complex tasks, such as tracking the user’s position and orientation, or managing the interaction between multiple AR objects.
How can I use JavaScript to filter reality with Google Cardboard?
Google Cardboard is a virtual reality (VR) platform that uses a fold-out cardboard viewer and a smartphone. You can use JavaScript along with the WebVR API to create immersive VR experiences for Google Cardboard. The WebVR API provides the necessary tools to render 3D scenes to the headset, handle user input, and manage the VR display.
Can I create a web-based AR application with just HTML?
While HTML is crucial for structuring the content of a web page, it alone cannot create an AR application. You will need to use JavaScript and potentially other libraries to handle the AR functionality. However, libraries like AR.js can make this process much simpler, allowing you to create AR experiences with just a few lines of code.
What are some use cases for integrating HTML5 with AR?
There are many potential use cases for integrating HTML5 with AR. For example, you could create an AR shopping app that allows users to see how furniture would look in their home before buying. Or, you could create an educational app that overlays information onto real-world objects, helping students learn in a more interactive way.
How can I create an AR web app using only HTML?
While HTML is crucial for structuring the content of a web page, it alone cannot create an AR application. You will need to use JavaScript and potentially other libraries to handle the AR functionality. However, libraries like AR.js can make this process much simpler, allowing you to create AR experiences with just a few lines of code.
What is the role of the ‘filter’ property in JavaScript?
The ‘filter’ property in JavaScript is used to set or return the filters applied to an element. This can include things like blur, brightness, contrast, grayscale, hue-rotate, invert, opacity, saturate, sepia, and more. It can be used to create various visual effects on your web page.
How can I use JavaScript to create AR experiences?
JavaScript can be used to create AR experiences by controlling the behavior of the AR elements, such as how they move, react to user input, or change over time. Libraries like AR.js can simplify this process, allowing you to create AR experiences with just a few lines of code.
Can I use Google Cardboard for AR experiences?
Google Cardboard is primarily designed for VR experiences, but it can also be used for AR with the right software. You can use JavaScript along with the WebVR API to create AR experiences for Google Cardboard.
What are some examples of AR experiences created with JavaScript?
There are many examples of AR experiences created with JavaScript. For example, you could create an AR shopping app that allows users to see how furniture would look in their home before buying. Or, you could create an educational app that overlays information onto real-world objects, helping students learn in a more interactive way.
 Patrick Catanzariti
PatCat is the founder of Dev Diner, a site that explores developing for emerging tech such as virtual and augmented reality, the Internet of Things, artificial intelligence and wearables. He is a SitePoint contributing editor for emerging tech, an instructor at SitePoint Premium and O'Reilly, a Meta Pioneer and freelance developer who loves every opportunity to tinker with something new in a tech demo.