If you can’t wait to build your own custom WordPress theme, using a well coded, solid theme framework is a great way to start. Frameworks provide WordPress themes with common functionality and components for you to then create your own unique designs. This speeds up development time enormously.
In this post I’m going to experiment with one of the newer kids on the WordPress frameworks block, Beans, created by Thierry Muller. James George has also previously covered this topic on SitePoint in his article Introducing Beans.
More about the Beans Theme Framework
Beans is an Open Source, free WordPress theme framework boasting a lot of awesome features, which make it a great fit for both budding and experienced developers. Here are the main features below:
- Beans is mobile-first, fully responsive, and smart enough to create and serve images at the resolution most appropriate to the device in use.
- Lean code, caching, selective loading of assets, and minification techniques make Beans an amazingly light-weight and fast loading theme. This is great when it comes to Google page ranking and your website visitors’ happiness.
- The UIkit front end framework lends the theme its clean and modern appearance. However, if you’re wondering whether developing with Beans will tie you to UIkit, fear not. Beans is highly flexible and lets you load assets as you need them.
It’s time to get your copy of Beans and take it for a test drive.
Installing Beans
You can grab the latest version of Beans from the Bean’s website. Extract the archived .zip files, next copy the tm-beans folder into the themes directory of your WordPress install.
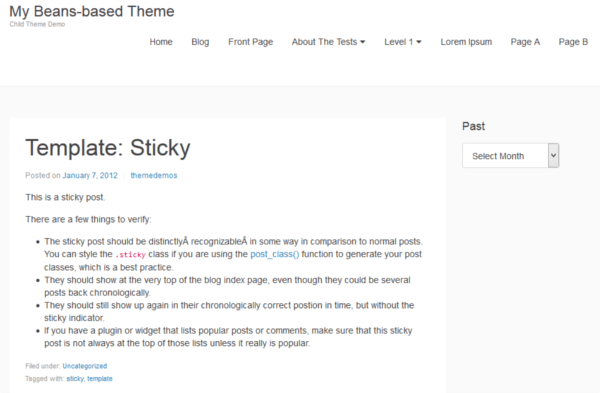
Finally, activate Beans from the Themes panel and take a peek. Here’s what Beans looks like out of the box.
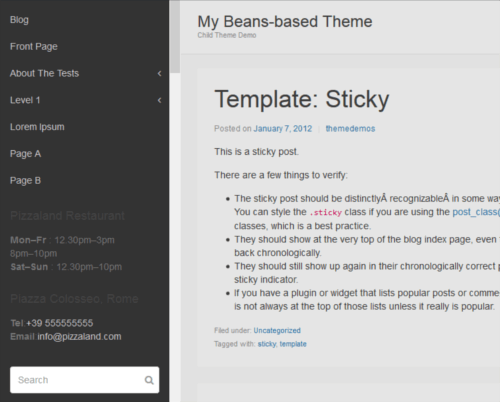
Viewed on a smaller screen, the theme comes with a nice built in off-canvas sidebar.
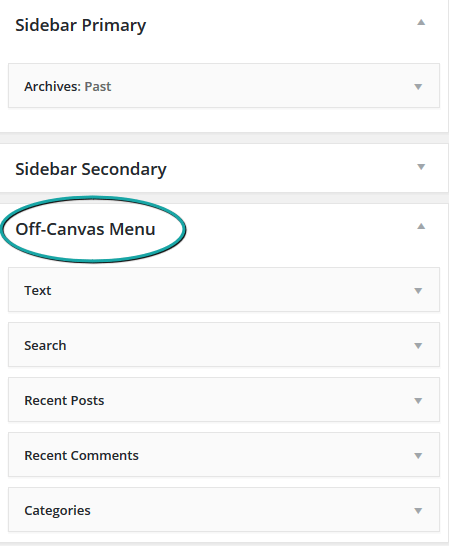
You can add widgets to this area from the Appearance > Widgets panel of your WordPress install.
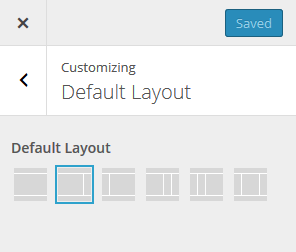
Without even touching a line of code, from the Customizer panel you can quickly add a logo and a site icon, change the background color or add a background image, add a header image, and choose from the following six page layout options:
- Full width – no sidebar.
- Two columns – main content to the left, sidebar to the right.
- Two columns – main content to the right, sidebar to the left.
- Three columns – main column to the left, two sidebars to the right.
- Three columns – main column to the right, two sidebars to the left.
- Three columns – main column in the middle, one sidebar to the left and one to the right.
On the other hand, if you’re like me and can’t resist the urge to take control of every nook and cranny of your theme, diving into the code is your next step.
Using a Child Theme with Beans
The best way to use Beans is as parent theme. Adding modifications to a child theme preserves them when you install an updated version of Beans.
Download a copy of the Beans Starter Child Theme and extract the archived .zip files.
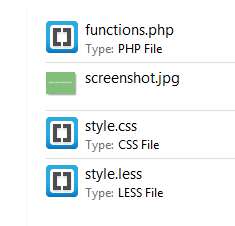
Here’s what you find inside the Beans child folder:
To get started, follow the steps below.
1. Rename the Child Theme
Most likely your theme won’t be called Beans Child. It’s a good idea to rename the child theme’s folder with your theme’s name.
2. Customize WordPress Header Comments in the Stylesheet
Open style.css in a code editor. To make the child theme your own, add your theme’s details to the Theme Name, Description, Author, and Author URI fields. Save and close the document.
3. Customize functions.php
Open functions.php in your code editor. The first line of code inside this document makes available the Beans framework to the child theme:
require_once( get_template_directory() . '/lib/init.php' );
It’s important you don’t delete this line of code.
Next, you’ll find the code necessary to enqueue the UIKit framework Less files:
add_action(
  'beans_uikit_enqueue_scripts',
  'beans_child_enqueue_uikit_assets'
);

function beans_child_enqueue_uikit_assets() {

  beans_compiler_add_fragment(
    'uikit',
    get_stylesheet_directory_uri() . '/style.less',
    'less'
  );

}
The code above allows you to quickly overwrite UIKit Less variables to your heart’s content from the child theme. If you don’t want to work with Less, simply delete this code.
Finally, the snippet below enqueues the child theme’s style.css file:
add_action(
  'wp_enqueue_scripts',
  'beans_child_enqueue_assets'
);

function beans_child_enqueue_assets() {
  wp_enqueue_style(
    'child-style',
    get_stylesheet_directory_uri() . '/style.css'
  );
}
If you plan on using Less rather than plain old CSS, go ahead and delete the code above.
Save your work and close the file.
4. Activate the Theme and Adjust the Beans Settings
Now, copy your child theme directory into the themes folder of your WordPress installation and activate it from the Appearance > Themes panel.
Just one last thing: access Appearance > Beans Settings and make sure the Enable development mode option is checked.
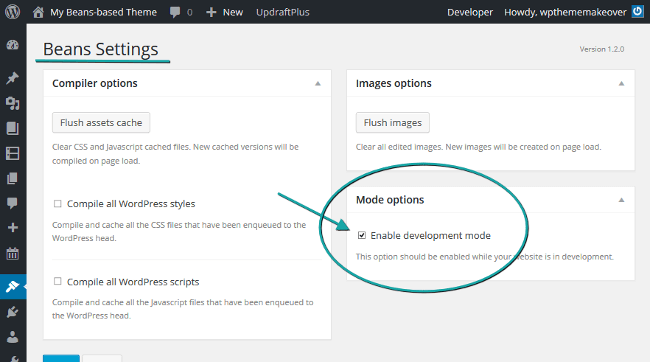
Doing so enables Beans to compile your Less code on the fly.
You’re all set, now get coding your Beans-powered child theme!
Modifying the Look and Feel with Less
Customizing the look and feel of your child theme is easily done from style.less. Open it in your editor and start overriding some of the UIKit Less variables to suit your design. You’ll find the UIKit Less code inside lib/assets/less/uikit-overwrite in the Beans parent theme.
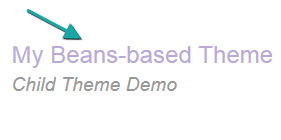
For instance, to change the heading color, overwrite the original variable’s value as follows:
@base-heading-color : #baa8da;
Now, save and refresh your page. Does the site look the same? The color of your theme’s headings should look something like this:
Beans automatically compiles Less into CSS without any effort on your part.
Customizing the Template Files
If you open any of the Beans template files, you’ll soon notice that all they contain is one line of code. For instance, here’s what you find in index.php:
<?php
  beans_load_document();
In fact, you customize Beans template files via action hooks in functions.php. This sounds intimidating at first, but once you get familiar with the theme’s APIs, you’ll be glad that modifying a short line of markup doesn’t require overriding an entire template file.
Here are a few examples to get you started.
Removing CSS Classes
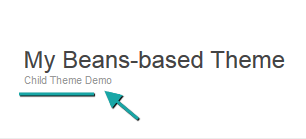
Let’s say you’d like to bump up the size of the tagline.
Here’s what you need to write in functions.php:
beans_remove_attribute(
  'beans_site_title_tag',
  'class',
  'uk-text-small'
);
Save and refresh. Now the tagline should look bigger.
What just happened?
The size of the tagline is constrained by the UIKit class .uk-text-small. Removing this class, achieves the desired goal. To do so, you use the beans_remove_attribute() function.
This function has three parameters:
$id. You can easily locate the value for this parameter by inspecting the element you’re targeting in the source document. When in development mode, Beans injects adata-markup-idattribute into each HTML element. You use the value of this attribute to get hold of the element in your code and manipulate it using the APIs. For the tagline the value of thedata-markup-idisbeans_site_title_tag, which you added as the first argument in the function above.
$attribute. This is the name of the HTML attribute you intend to manipulate. In this case, you want to remove the element’sclassattribute.$value. This is the value of the attribute you’d like to remove. For this example, it’s the.uk-text-smallclass.
Check out the other HTML-related functions for ways to add and replace CSS classes and more with just one line of code.
Adding Markup
Here’s how you can quickly add a snippet of HTML markup using action hooks.
UIKit comes bundled with great looking icons from Font Awesome. Try adding a clock icon before each post date meta information. Here’s the code to put in your functions.php file.
beans_add_action(
  'beans_post_meta_item_date_prepend_markup',
  'beans_child_add_post_meta_date_icon'
);

            function beans_child_add_post_meta_date_icon() {
        ?><i class="uk-icon-clock-o uk-margin-small-right uk-text-muted"></i><?php
            }
The sample code above uses beans_post_meta_item_date_prepend_markup. The first part — beans_post_meta_item_date — is the value of the Beans data-markup-id (you can find this out using a browser developer tool to inspect the source code). The second part — prepend_markup — is the action your markup-injecting function hooks up to do its job.
To learn more about all the action hooks that let you manipulate HTML markup, head over to the Markup and attributes documentation page. Here, you’ll find that each piece of markup with a Beans data-markup-id has the following action hooks attached to it:
{$markup_id}_before_markup, fires before the opening markup;{$markup_id}_prepend_markup, fires after the opening markup (not available for selfclosed markup);{$markup_id}_append_markup, fires before the closing markup (not available for selfclosed markup);{$markup_id}_afer_markup, fires after the closing markup.
Finally, your beans_child_add_post_meta_date_icon() function prints the markup needed to display the icon.
If you’re a super WordPress dev working on a theme for distribution, you can also take advantage of Beans Actions and HTML API. Doing so will make your theme more extensible in a way that is consistent with the Beans framework.
For instance, you can add a clock icon before the post date meta information, like you did in the example above, using this code:
            beans_add_smart_action(
  'beans_post_meta_item_date_prepend_markup',
  'beans_child_super_dev_meta_date_icon'
);

function beans_child_super_dev_meta_date_icon() {
  echo beans_open_markup(
    'beans_child_date_icon',
    'i',
    'class=uk-icon-clock-o uk-margin-small-right uk-text-muted'
    );
  echo beans_close_markup( 'beans_child_date_icon', 'i' );
}
beans_add_smart_action() needs the following parameters:
$hook. This is the name of the action to which the callback function is hooked.$callback. This is the name of the callback function you wish to execute.
The custom beans_child_super_dev_meta_date_icon() function uses beans_open_markup() and beans_close_markup() to spew out the UIKit clock icon where you want it.
Demo Theme: Building the Home Page Grid Layout
The downloadable demo theme for this article illustrates one way in which you can totally change the default appearance of the blog index page in Beans.
The final result should look something like this.
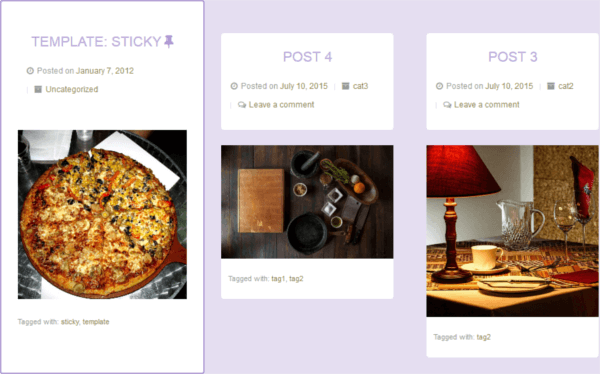
The heavy lifting is all done by Beans and the UIKit CSS classes. You just change the default layout option for the blog index page and add the right UIKit CSS classes to the markup.
Because this layout only applies to the blog index page, you can take your pick between:
- Adding your code for the layout to
functions.php. Just wrap the snippet inside a conditional statement, i.e.,if( is_home() ) //Your code here; or - Adding a
home.phppage template to the child theme.
My demo theme has quite a few lines of code specific to the blog index page, therefore I’ve opted for the second option. In fact, in this specific case, adding a page template is preferable to having to write the same conditional statement several times.
You’re free to go with whatever option best suits your design. However, if you choose to create a template file for your child theme, don’t forget to add the following line of code at the bottom of the document:
// Load Beans document.
beans_load_document();
Change the Default Page Layout to be Full Width
The default site-wide layout for the theme is a two-column layout. Therefore, the first step is to turn the default layout for the blog index page into a full width layout.
Make page fullwidth as default layout in home page
    add_filter( 'beans_layout', 'beans_child_default_home_layout' );

                function beans_child_default_home_layout() {
                    return 'c';
                }
The code above uses the `beans_layout` filter hook. The hooked function simply returns the ID for the full width layout, which is c.
You can get the ID of all the layout options available in your theme on the Beans layout code snippets page.
Build the Grid
One way you can achieve a tiled layout is by adding this code.
//Adjust the UKIt grid for the index posts page
beans_add_attribute(
  'beans_content',
  'class',
  'uk-grid uk-container-center'
);

beans_add_attribute(
  'beans_post',
  'class',
  'uk-width-large-1-3 uk-width-medium-1-2 uk-width-small-1-1'
);
The snippet above performs the following two tasks:
- It targets the markup with the
data-markup-idvalue ofbeans_content. It then turns this element into a grid container by adding the.uk-gridclass to it; - Finally, it targets all the elements with the
data-markup-idvalue ofbeans_post. It turns these elements into responsive grid items by adding the following classes:.uk-width-large-1-3 .uk-width-medium-1-2 .uk-width-small-1-1. Translating UIKit grid classes into plain English, this means: display a three-column layout on large screens, a two-column layout on medium screeens, and just a one-column layout on small screens.
That’s it, congrats! Most of the remaining code is just a bit of CSS to make it look nice.
Conclusion
You should now have a good sense of the Beans Framework capabilities and features. Where to next?
You can:
- Dive into the Beans documentation and code reference;
- Get your hands dirty on the ever growing library of code snippets;
- Reverse engineer some of the free Beans Child Themes. Start with the downloadable demo theme for this article, then head over to ThemeButler to grab some more.
Beans is a relatively new WordPress theme framework, so if you do happen to come across any bugs, or have any specific feature requests, leave your message on GitHub. If you’d like to join the growing community around the theme, follow Beans on Twitter.
Why not give Beans a try and let me know what you think? I look forward to your themes and your feedback!
Frequently Asked Questions about Faster WordPress Theme Development with Beans Framework
What makes Beans Framework a good choice for WordPress theme development?
Beans Framework is a powerful and flexible WordPress theme framework that makes it easier for developers to create robust and efficient themes. It uses a unique grid system that allows for easy layout customization, and it also includes a variety of pre-built UI components that can be used to add functionality to your theme. Additionally, Beans Framework is built with performance in mind, so themes created with it are typically faster and more efficient than those built with other frameworks.
How does Beans Framework compare to other WordPress theme frameworks?
Beans Framework stands out from other WordPress theme frameworks due to its focus on performance and flexibility. It uses a unique grid system that allows for easy layout customization, and it also includes a variety of pre-built UI components that can be used to add functionality to your theme. Additionally, Beans Framework is built with performance in mind, so themes created with it are typically faster and more efficient than those built with other frameworks.
Can I use Beans Framework for e-commerce websites?
Yes, Beans Framework is a versatile tool that can be used for a variety of website types, including e-commerce websites. It includes a variety of pre-built UI components that can be used to add functionality to your theme, including components that are useful for e-commerce websites. Additionally, Beans Framework is compatible with popular WordPress plugins, including WooCommerce, which can be used to add e-commerce functionality to your website.
How can I customize the layout of my theme using Beans Framework?
Beans Framework uses a unique grid system that allows for easy layout customization. You can use the Beans API to customize the layout of your theme, including the header, footer, and sidebar areas. Additionally, Beans Framework includes a variety of pre-built UI components that can be used to add functionality to your theme, allowing for further customization.
Is Beans Framework compatible with popular WordPress plugins?
Yes, Beans Framework is compatible with a wide range of popular WordPress plugins. This includes plugins for SEO, security, performance optimization, and more. Additionally, Beans Framework is compatible with WooCommerce, a popular plugin for adding e-commerce functionality to WordPress websites.
How does Beans Framework improve the performance of WordPress themes?
Beans Framework is built with performance in mind. It uses a unique grid system that allows for efficient layout customization, and it also includes a variety of pre-built UI components that are optimized for performance. Additionally, Beans Framework includes built-in performance optimization features, such as automatic image compression and script minification, which can help to improve the speed and efficiency of your website.
Can I use Beans Framework to create responsive WordPress themes?
Yes, Beans Framework includes built-in support for responsive design. This means that themes created with Beans Framework will automatically adapt to different screen sizes and devices, providing a good user experience on both desktop and mobile devices.
Is Beans Framework suitable for beginners?
While Beans Framework does require some knowledge of WordPress theme development, it is designed to be user-friendly and accessible to developers of all skill levels. It includes a variety of pre-built UI components that can be used to add functionality to your theme, and it also includes comprehensive documentation to help you get started.
How can I add functionality to my theme using Beans Framework?
Beans Framework includes a variety of pre-built UI components that can be used to add functionality to your theme. These components include things like buttons, forms, navigation menus, and more. You can use the Beans API to add these components to your theme, and you can also customize them to suit your needs.
What kind of support is available for Beans Framework?
Beans Framework includes comprehensive documentation that covers all aspects of using the framework. Additionally, there is a community of Beans Framework users who can provide support and advice. There are also numerous tutorials and guides available online that can help you get started with Beans Framework.
 Maria Antonietta Perna
Maria Antonietta Perna is a teacher and technical writer. She enjoys tinkering with cool CSS standards and is curious about teaching approaches to front-end code. When not coding or writing for the web, she enjoys reading philosophy books, taking long walks, and appreciating good food.