One thing WordPress users have grown accustomed to, is easy, no code required theme customization options. The idea is: download a theme, activate it in the Themes panel, access the Customize panel, and start tweaking the theme’s colors, layout, fonts, etc., with just a mouse click.
WordPress offers theme developers the Customizer API. This is a clean, object-oriented set of methods that facilitate the creation of a consistent customization interface. On the Customize panel, users can easily make changes and live-preview them without having to mess with PHP or CSS code.
Developing theme options using the Customizer API, while being a straightforward and logical process, involves writing a certain amount of repetitive code. To cut down on some of the steps required to build functioning and safe Customizer options, Aristeides Stathopoulos has been developing a free and open-source plugin, Kirki.
In this post I’m going to show how to integrate Kirki into your WordPress theme and how to use it to build a few Customizer options.
What is Kirki?
Let’s hear what Kirki is about from the developer behind it:
Kirki is not a framework. It’s a toolkit allowing WordPress developers to use the Customizer and take advantage of its advanced features and flexibility by abstracting the code and making it easier for everyone to create beautiful and meaningful user experiences.
I’d like to drive home two points about this toolkit.
- Kirki does not replace the WordPress Customizer API. It creates a “wrapper for the default WordPress methods, simplifying the syntax and allowing you to write more with less code”. You can still use native Customizer methods alongside the Kirki API. Even better, you’re warmly advised to familiarize yourself with the Customizer API before approaching Kirki. If you’re looking for a useful introduction to the Customizer object, head over to Getting Started with the WordPress Theme Customization API by Narayan Prusty.
- Kirki is in a state of constant evolution and improvement, not unlike the WordPress Customizer itself. Therefore, any bug reports, or requests for new features, have their place in the GitHub repo, where you can download the development version of the plugin and contribute to its development.
It’s time to see Kirki in action. If you want to follow along, have a WordPress theme ready or grab the Superminimal demo theme that contains all the code discussed in this post.
How to Include Kirki in Your Theme
Kirki is packaged as a WordPress plugin. As such, you can download it from the WordPress.org plugins repository, or directly from the backend of your WordPress installation, unzip it and activate it.
If you prefer to include Kirki in your theme as a library, follow the steps outlined below.
Copy the kirki directory into your theme’s folder.

In the demo theme for this article, the Kirki files are located inside a directory calledinc.Make your theme ‘talk’ with Kirki by adding this line to
functions.php(make sure you adjust the path to the kirki folder to match your theme’s file structure).
if ( ! class_exists( 'Kirki' ) ) {
    include_once( dirname( __FILE__ ) . '/inc/kirki/kirki.php' );
}
Add a function to include the Kirki configuration options and hook it to the
kirki/configfilter. It’s up to you what you want to add to this function. For this post, let’s keep it to a minimum by adding the code Kirki needs in order to be ‘made aware’ of its new location, i.e. the theme’s folder rather than the plugin’s folder.
function superminimal_customizer_config() {
         $args = array(
        // Only use this if you are bundling the plugin with your theme
        'url_path'     => get_stylesheet_directory_uri() . '/inc/kirki/',

       );
       return $args;
       }
       add_filter( 'kirki/config', 'superminimal_customizer_config' );
It’s inside this configuration function that you can control the look and feel of the WordPress Customizer to match your theme. Most importantly, it’s here that you add the code necessary to make all strings used by the plugin translatable from within your theme. Have a look inside the Superminimal demo theme or the Kirki documentation page for some guidance on how to accomplish this.
Let’s Start Adding Options
Kirki is now ready to help us build some Customizer options. You can use functions.php or create a dedicated file for the task, it’s up to you.
Customizer options live inside Sections, which are optionally located inside Panels. In this article’s demo project I group all Sections inside a dedicated Panel using native Customizer methods, like so.
function superminimal_demo_panels_sections( $wp_customize ) {
     /**
     * Add Panel
     */
     $wp_customize->add_panel( 'sitepoint_demo_panel', array(
      'priority'    => 10,
      'title'       => __( 'SitePoint Demo Panel', 'superminimal' ),
      'description' => __( 'Kirki integration for SitePoint demo', 'superminimal' ),
     ) );

     //More code to come
    }
    add_action( 'customize_register', 'superminimal_demo_panels_sections' );
Next, add Sections for the site text colors, the site layout, and the footer text options respectively by placing this code just below the previous add_panel Customizer method.
/**
     * Add a Section for Site Text Colors
     */
     $wp_customize->add_section( 'superminimal_text_colors', array(
      'title'       => __( 'Site Text Colors', 'superminimal' ),
      'priority'    => 10,
      'panel'       => 'sitepoint_demo_panel',
      'description' => __( 'Section description.', 'superminimal' ),
     ) );

     /**
     * Add a Section for Site Layout
     */
     $wp_customize->add_section( 'superminimal_site_layout', array(
      'title'       => __( 'Site Layout', 'superminimal' ),
      'priority'    => 10,
      'panel'       => 'sitepoint_demo_panel',
      'description' => __( 'Section description.', 'superminimal' ),
     ) );

     /**
     * Add a Section for Footer Text
     */
     $wp_customize->add_section( 'superminimal_footer_text', array(
      'title'       => __( 'Footer Text', 'superminimal' ),
      'priority'    => 10,
      'panel'       => 'sitepoint_demo_panel',
      'description' => __( 'Section description.', 'superminimal' ),
     ) );
Now you’re ready to add the first Kirki-powered option.
Text Color Option
All your options-related code is to be placed inside a function. This function is then filtered through the kirki/fields filter.
function superminimal_demo_fields( $fields ) {
      //Add code here

      return $fields;
    }
    add_filter( 'kirki/fields', 'superminimal_demo_fields' );
Let’s give your WordPress theme users an easy way to change text color. This is quickly done with Kirki. Add the following code snippet inside the superminimal_demo_fields() function, just above the return $fields; statement.
/**
    * Add a Field to change the body text color in the Text Colors Section
    */
    $fields[] = array(
      'type'        => 'color',
      'setting'     => 'superminimal_body_color',
      'label'       => __( 'Body Color', 'superminimal' ),
      'description' => __( 'Description here', 'superminimal' ),
      'section'     => 'superminimal_text_colors',
      'priority'    => 10,
      'default'     => '#555555',
      'output'      => array(
        array(
          'element'  => 'body, p',
          'property' => 'color'
        ),
    );
Kirki offers a condensed syntax to add both a setting and a related control in one go.
Let’s break down the $fields[] array.
typerefers to the specific control where users enter the value of their chosen option, in this case the Color control.settingrefers to theidof the Customizer setting that handles live-previewing, saving, and sanitization of the Customizer objects.labelanddescriptionare there to communicate with users. The label displays a title for the option and the description offers some indication of what the option does.sectionrefers to theidof the Section that hosts this specific Color control.priorityrefers to the position of this specific Color control with respect to other controls inside the same Section.defaultis set to the default CSS color value.- Finally,
outputis the awesome Kirki way of applying the setting’s value. Just feed it the CSS selector and property, and Kirki handles all the necessary operations.
Following the example above, you could go ahead and add a color option for links as well.
Next, let’s give users of your theme the option to customize the site layout.
Site Layout Option
Kirki offers a bunch of sophisticated Customizer controls. My favorite one is the radio image control.
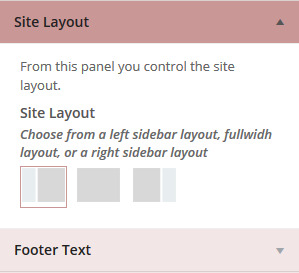
Here’s how you can add it to your theme to offer users the option of changing the layout of their site.
/**
    * Add a Field to change the site layout
    */
    $fields[] = array(
        'type'        => 'radio-image',
        'setting'     => 'superminimal_layout',
        'label'       => __( 'Site Layout', 'superminimal' ),
        'description' => __( 'Description here', 'superminimal' ),
        'section'     => 'superminimal_site_layout',
        'default'     => 'fullwidth',
        'priority'    => 10,
        'choices'     => array(
          'sidebar-left' => trailingslashit( get_template_directory_uri() ) . 'inc/kirki/assets/images/2cl.png',
          'fullwidth' => trailingslashit( get_template_directory_uri() ) . 'inc/kirki/assets/images/1c.png',
          'sidebar-right' => trailingslashit( get_template_directory_uri() ) . 'inc/kirki/assets/images/2cr.png',
        ),
    );
Place the code above just after the previous $fields[] array snippet. Notice how no output parameter has been added to the code. This is so because the value of each radio image input is not a CSS property value.
The way you can extract the value from the superminimal_layout setting is by the native Customizer get_theme_mod method. You then use that value as a class attribute’s value of a suitable HTML element in the template file. Finally, it’s just a matter of writing the appropriate CSS to achieve the desired layout for the .fullwidth, .sidebar-left, and .sidebar-right classes in your stylesheet.
Check out the details of how to implement the layout option in the Superminimal demo theme.
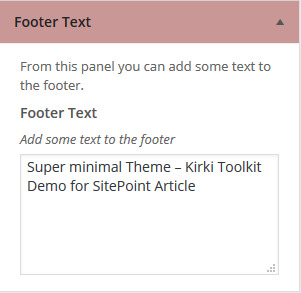
Footer Text Option
How many times have you come across WordPress theme users asking you to help them replace whatever developers stuff in their theme’s footer area? Adding an option to let users easily manage the footer text from the Customizer takes a couple of minutes with Kirki. Here’s the code.
/**
    * Add a Field to change the footer text only if checkbox is checked
    */
    $fields[] = array(
        'type'        => 'textarea',
        'setting'     => 'superminimal_footer_text',
        'label'       => __( 'Footer Text', 'superminimal' ),
        'description' => __( 'Add some text to the footer', 'superminimal' ),
        'section'     => 'superminimal_footer_text',
        'default'     => 'Superminimal Theme – Kirki Toolkit Demo for SitePoint',
        'priority'    => 20,
      ),
    );
The code above outputs a textarea where users can write copyright notices, credits, etc.
To extract and display the text entered in the textarea, use the native Customizer method get_theme_mod in footer.php as follows.
<footer id="footer">

      <?php echo get_theme_mod( 'superminimal_footer_text', __( 'Default text here', 'superminimal' ) ); ?>

      <?php wp_footer(); ?>
    </footer>
Next, let’s check out what more Kirki can do to improve the user experience with the WordPress Customizer.
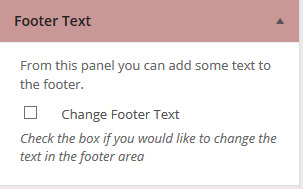
How to Add Conditional Options
As a theme designer, you don’t like to overwhelm users with a plethora of confusing options. Some choices don’t need to be made until users pick some specific option. The Customizer offers the handy active_callback parameter for Panels, Sections and Controls. You can set this parameter to a specific condition that must be met before a Panel, Section, or Control is displayed in the Customizer.
What has Kirki to offer in this respect?
The Kirki API uses the required parameter to hide or show a control in the Customizer on the basis of the value of another control.
For example, let’s say you’d like to show the textarea to let users modify the footer text only if they check a checkbox. To accomplish this, add the following code to the superminimal_footer_text control.
'required'  => array(
      array(
        'setting'  => 'superminimal_reveal_footer_text',
        'operator' => '==',
        'value'    => 1,
      ),
    ),
Adding the snippet above to the code for the textarea control ensures that the superminimal_reveal_footer_text control’s value is to be equal to 1 before the textarea control is displayed in the Customizer. Let’s add the superminimal_reveal_footer_text control to the superminimal_demo_fields() function.
$fields[] = array(
'type' => 'checkbox',
'setting' => 'superminimal_reveal_footer_text',
'label' => __( 'Change Footer Text', 'superminimal' ),
'description' => __( 'Description here', 'superminimal' ),
'section' => 'superminimal_footer_text',
'default' => 0,
'priority' => 10,
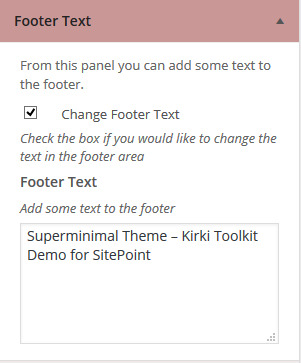
);The superminimal_reveal_footer_text control is a checkbox that by default is set to 0, that is, it’s unchecked. This prevents the textarea from being displayed.
Only after checking the checkbox, that is, by changing its value from 0 to 1, does the textarea appear in the Customizer.
Enhancing the Live Preview
The Customizer comes with a powerful JavaScript API to add AJAX capability to the preview area. This enhancement allows users to check their modifications in real time without waiting for the entire Customizer preview page to refresh.
We can accomplish the same result with Kirki simply by adding a few handy parameters to the $fields[] array.
For example, to add an ajaxified live preview to the superminimal_body_color setting, append the following snippet to the appropriate $fields[] array.
'transport'   => 'postMessage',
    'js_vars'     => array(
      array(
        'element'  => 'body, p',
        'function' => 'css',
        'property' => 'color',
      ),
    )
Let me explain what the code above does.
- First, the code above changes the transport method from Refresh (the default), to postMessage. This signals to the Customizer that it must use JavaScript for the live preview.
- Next, the
js_varsparameter values indicate that thebodyandpelements are to be modified using the CSS color property.
Kirki offers two pre-defined values for the function parameter. Use the css value if the setting you’re adding stores CSS rules like background-color, color, font-size, etc. Use the html value if the setting stores a string of HTML markup to be inserted into the page.
As example of how you can use the html value, let’s add AJAX live preview functionality to the setting that manages changes to the footer text. Append this snippet at the end of the $fields[] array that contains the superminimal_footer_text setting.
'transport'   => 'postMessage',
    'js_vars'     => array(
      array(
       'element'  => 'footer',
       'function' => 'html'
      ),
    ),
That’s it, go and try writing something in the textarea inside the superminimal_footer_text section. You’ll soon notice the corresponding footer text in the preview screen change accordingly without a complete page reload. Cool!
Ajax Live Preview with the Radio Image Control
There may be cases where neither css nor html are a good fit for the function parameter that enables AJAX live preview. A case in point is the setting for changing the site layout. Using css as the value for the function parameter doesn’t make much sense because the setting in question doesn’t store any CSS property value. Likewise, using html doesn’t quite cut it. In fact, it’ll only end up spitting out fullwidth, sidebar-left, or sidebar-right on the preview page, depending on which radio-image control button is selected. But this can’t be what you’d like to accomplish.
The good news is that you can plug in a custom JavaScript function name as the value of the function parameter and it works!
'js_vars'     => array(
      array(
        'element'  => '#content',
        'function' => 'superminimal_customizer_live_preview'
      ),
    ),
You’ll need to enqueue the JavaScript file where your custom function lives and hook it to the customize_preview_init action hook.
function superminimal_customizer_live_preview() {
      wp_enqueue_script( 'superminimal_css_preview',
                         get_template_directory_uri().'/js/superminimal-customizer-preview.js',
                         array( 'customize-preview', 'jquery' ), '', true
                       );
    }
    add_action( 'customize_preview_init', 'superminimal_customizer_live_preview' );
Finally, write the JavaScript function that handles the live preview using the native Customizer JavaScript API.
(function( $ ) {
      "use strict";

      wp.customize( 'superminimal_layout', function( value ) {
        value.bind( function( to ) {
          $( '#content' ).removeClass().addClass( to + ' clearfix' );
        } );
      });

    })( jQuery );
The great thing about Kirki is that you can use it together with, rather than in place of, the WordPress Customizer API. Therefore, where the situation requires it, you can easily switch between the two APIs in no time.
Resources
Hungry for more? Here’s some great resources.
- Kirki Toolkit Documentation.
- Building WordPress Themes Using the Kirki Customizer, by Aristeides Stathopoulos.
- Theme Options – The Customizer API, from the WordPress.org Theme Handbook.
Conclusion
I’ve shown how to integrate the Kirki Toolkit into a WordPress theme.
Kirki is actively being developed and supported. Its API and custom controls already significantly optimize the time it takes to develop Customizer theme options. This becomes especially important if you’re looking to have your theme listed in the WordPress.org themes repository. In fact, themes that provide customization options are required to do so via the Customizer rather than custom options pages.
To delve into the details of the code discussed in this post, feel free to download the Superminimal demo theme from GitHub.
I look forward to your feedback!
Frequently Asked Questions about Fast WordPress Customizer Options Development with Kirki
What is Kirki and how does it benefit WordPress development?
Kirki is a toolkit designed to simplify the process of developing themes for WordPress. It provides a range of features that make it easier to create, customize, and manage WordPress themes. These include a customizer that allows you to preview changes in real-time, a variety of controls for different types of content, and a modular structure that lets you include only the features you need. By using Kirki, developers can save time and effort, and create more powerful and flexible themes.
How do I install and set up Kirki for WordPress?
Installing Kirki is straightforward. You can download it from the WordPress plugin directory and install it like any other plugin. Once installed, you can access Kirki’s features through the WordPress customizer. To set up Kirki, you need to add a configuration for your theme. This involves adding a few lines of code to your theme’s functions.php file. The configuration specifies the options and settings for your theme.
What types of controls does Kirki provide?
Kirki provides a wide range of controls for different types of content. These include basic controls like text, checkbox, and radio buttons, as well as more advanced controls like color picker, image uploader, and typography selector. Each control comes with its own set of options and settings, allowing you to customize the control to suit your needs.
How do I use the real-time preview feature in Kirki?
The real-time preview feature in Kirki allows you to see changes as you make them. To use this feature, you need to add a ‘transport’ option to your control configuration. The ‘transport’ option specifies how changes to the control are reflected in the preview. By setting this option to ‘postMessage’, you can enable real-time preview for the control.
Can I use Kirki with any WordPress theme?
Yes, Kirki is designed to work with any WordPress theme. However, to take full advantage of Kirki’s features, your theme needs to support the WordPress customizer. Most modern WordPress themes support the customizer, so this should not be a problem for most users.
How do I add a new panel using Kirki?
Adding a new panel using Kirki involves adding a few lines of code to your theme’s functions.php file. The code specifies the ID, title, description, and priority of the panel. Once added, the panel will appear in the WordPress customizer, and you can add sections and controls to it.
What is the modular structure of Kirki and how does it benefit me?
The modular structure of Kirki means that it is divided into separate modules, each providing a specific set of features. This allows you to include only the modules you need, reducing the size and complexity of your theme. It also makes it easier to manage and update your theme, as you can update or replace individual modules without affecting the rest of the theme.
How do I customize the typography in my theme using Kirki?
Kirki provides a typography control that allows you to customize the typography in your theme. This control provides options for setting the font family, variant, size, line height, letter spacing, and color. You can also add Google Fonts to the control, giving you access to a wide range of fonts.
Can I use Kirki to create a child theme?
Yes, you can use Kirki to create a child theme. A child theme is a theme that inherits the functionality and styling of another theme, known as the parent theme. By creating a child theme, you can modify the parent theme without affecting the original code. Kirki provides a range of features that make it easier to create and customize child themes.
How do I update Kirki?
Updating Kirki is as simple as updating any other WordPress plugin. You can update it through the WordPress dashboard, or by downloading the latest version from the WordPress plugin directory and installing it manually. It’s important to keep Kirki up to date to ensure compatibility with the latest version of WordPress and to benefit from new features and improvements.
 Maria Antonietta Perna
Maria Antonietta Perna is a teacher and technical writer. She enjoys tinkering with cool CSS standards and is curious about teaching approaches to front-end code. When not coding or writing for the web, she enjoys reading philosophy books, taking long walks, and appreciating good food.