What Are WordPress Taxonomies/Custom Taxonomies?
Taxonomies are essentially a way to group together sets of information.
As covered in my previous article on Custom WordPress Taxonomies, WordPress uses its in-built taxonomies categories and tags to provide grouping for your content types and by default applies these to the posts content type. These taxonomies consist of one or more terms which are basically names used to group your items together.
While the standard taxonomies may be fine, sometimes you may need additional ways to group content together which is logical to your needs. That is where custom taxonomies can prove exceptionally useful.
Custom taxonomies let you create your own names and structures to organise your posts. You may create a new taxonomy called grade_ranking which will handle the ranking of your posts by a grade score such as pass,credit,distinction and high distinction.
Taxonomy Standard Information
When you define taxonomies you determine if it will be hierarchical or non-hierarchial. This determines what information will be collected about your taxonomy.
hierarchical taxonomies act similar to categories, allowing different levels of terms (you can assign parents and children to terms).
Non-hierarchical taxonomies act like tags where all terms are of the same flat level.
Your custom taxonomy will let you enter the following pieces of information for each of your terms
- Name
- defines the name used for the term itself, this is shown to the end user. Applied to both categories and tags
- Slug
- determines the url used for the term (generally lower case and spaces replaced by a dash character). Applies to both categories and terms
- Parent
- Let you determine if your term will be a top level parent term or if it will be a child term. Applies only to hierarchical taxonomies such as categories
- Description
- A brief description of what this term in. This is shown on the term listing page (when you click to view on the term itself)
That is the entirety of what WordPress will provide for you in regards to your terms.
Extending Taxonomies
While the default information may be all that you need for your taxonomy, you may want to save additional information which you can use elsewhere on your website.
WordPress offers are series of hooks that can be used to modify the administration areas of your taxonomy screen and help you in the process of saving additional information.
For our tutorial, we will be extending the default category taxonomy. You can easily extend both the in-built taxonomies or taxonomies you have created yourself, but for simplicity we will be modifying an existing taxonomy.
Where do we start?
WordPress will provide two primary ways for you to create the terms of your taxonomies:
- Creating them via the taxonomy administration screen
- On the fly while editing a post type that your taxonomy is bound to.
For example, you can create terms for your category taxonomy such featured and sponsored in either the category administration menu (by defining the name, slug, parent description etc) or by creating them directly inside your post or page (by using the category meta box and adding a new category dynamically).
Since we will want to save additional information about our terms, we will be using the taxonomy administration screens as they provide the best way to add, edit and remove terms.
What needs to be modified?
When you work with taxonomies you will be interacting with both the add and edit administration screens. These screens handle the process of adding a new term and editing an existing term respectively. WordPress provides a series of hooks that are made to help you hook into specific functionality and provide you with an easy way to modify core functionality.
Since we will be saving additional information we will need to modify both screens so that we can attach, collect and interact with our saved information.
In this tutorial we will be adding additional form elements so we can collect more information about our categories. To this end we will capture the following elements:
- text
- textarea
- select
- checkbox
These are the most common form elements and should help to give you a better understanding about how you can extend taxonomies to save additional information.
Modifying the add category administration menu
The first place we will need to modify will be the add category administration menu. This menu is generally where you will be adding all of your categories and where we will need to save additional information.
We need to use the category_add_form_fields hook.
The category_add_form_fields hook is used to add additional information to the category administration screen. This hook takes in a single parameter which is the name of the taxonomy itself. This hook allows us to add additional information to the add category screen, so first we will need to define a function that displays a few fields for us to save. The following code should go in your theme’s functions.php file (or another file that you use for your custom code)
function add_extra_fields_to_category($taxonomy_name){
    ?>
    <div class="form-field">
        <label for="category-text">Category Text Field</label>
        <input type="text" name="category-text" id="category-text"/>
        <p>This is a text field </p>
    </div>
    <div class="form-field">
        <label for="category-textarea">Category Textarea Field</label>
        <textarea name="category-textarea" id="category-textarea"></textarea>
        <p>This is a textarea field </p>
    </div>
    <div class="form-field">
        <label for="category-select">Category Select Field</label>
        <select name="category-select" id="category-select">
            <option value="select-value-one"> Value One </option>
            <option value="select-value-two"> Value Two </option>
        </select>
        <p>This is a select field </p>
    </div>
    <div>
        <label for="category-radio-value-one">Category Radio Value One</label>
        <input type="radio" name="category-radio" id="category-radio-value-one" value="category-radio-value-one"/>
        <label for="category-radio-value-two">Category Radio Value Two</label>
        <input type="radio" name="category-radio" id="category-radio-value-two" value="category-radio-value-two"/>
        <p>This is a radio field </p>
    </div>
    <?php
}
Now that we have our function defined, all we need to do is connect it to our category_add_form_fields hook and it will activate as soon as the add category screen is displayed. We will do this by calling the add_action() function.
add_action('category_add_form_fields','add_extra_fields_to_category');
Once you have completed this, your category administration screen should show the additional fields you defined in your function. Mine looks as follows:
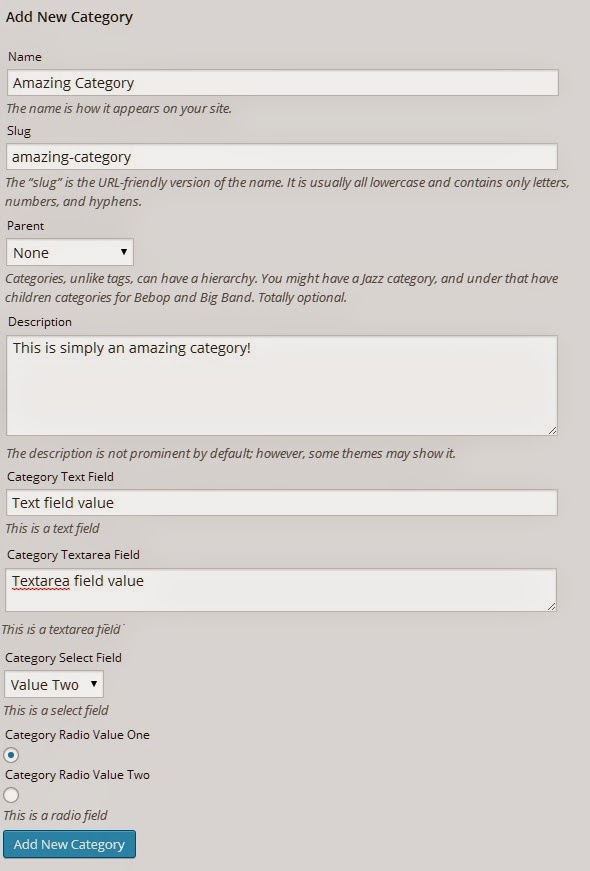
As a side-note, when you define your fields to add to your screen you will generally wrap them within a form-field class, this ensures that the contained input elements span the full width of the screen. As you can see in our example I have let this class enabled except for the radio buttons. We wouldn’t want our radio buttons to span full width (as it would look strange).
In addition, if you add the class form-required it will ensure that you element is entered before adding the new term.
Saving our new category information
Now that we have modified the add category screen, we need to save our additional information so that we can use it.
We will need to attach a function to another hook to trigger on our save action, this hook is called create_category. This function we create will handle the saving of our term information.
When collecting information that will be directly used in updating the WordPress database, it’s always a good practice to sanitize values. We can use ‘sanitize_text_field($string)’ to sanitize a string, stripping all tags, removing line breaks, tabs and converts character entities such as < and >
.function save_extra_taxonomy_fields($term_id){
//collect all term related data for this new taxonomy
$term_item = get_term($term_id,'category');
$term_slug = $term_item->slug;
//collect our custom fields
$term_category_text = sanitize_text_field($_POST['category-text']);
$term_category_textarea = sanitize_text_field($_POST['category-textarea']);
$term_category_select = sanitize_text_field($_POST['category-select']);
$term_category_radio = sanitize_text_field($_POST['category-radio']);
//save our custom fields as wp-options
update_option('term_category_text_' . $term_slug, $term_category_text);
update_option('term_category_textarea_' . $term_slug, $term_category_textarea);
update_option('term_category_select_' . $term_slug, $term_category_select);
update_option('term_category_radio_' . $term_slug, $term_category_radio);
}sanitize_text_field will work perfectly for these values. However, additional functions for handling different data types can be seen here: http://codex.wordpress.org/Data_Validation. Thanks to Ryan Hellyer for his advice and comments.
This function takes in one parameter, the ID of the new term being saved.
With this ID we are able to call the get_term($term_id,$taxonomy_name) function.
This function takes in two parameters, the ID of the term itself and the taxonomy name. Since we know the ID of the term itself and also that we are working on the category taxonomy, we will now be able to access the term object.
We collect the slug value from the term object and save it. Then we collect all four of our new fields values from the $_POST object. Finally we called another function called update_option($option_name,$option_value).
This function allow us to create a new entry in the WordPress options table so we can save our value. All this function needs is the name of the new option and its value. We are calling this function four times, one for each of our new fields we are saving.
For example, if we are creating a new category called test when we are saving our textarea field the option name will become term_category_textarea_test and our select field option will become text_category_select_test etc. We are adding our slug onto the end of the name for these fields to ensure that no two values can be the same (as all slugs are unique).
Now all we have to do is hook this function up to the create_category hook and we are sorted
add_action('create_category','save_extra_taxonomy_fields');Modifying the edit category administration menu
Now that we have our new field elements displaying on the add category screen and have saved these as options, we need to modify the edit screen and pre-populate our new values here (so they can be updated if required).
We will need to attach onto the category_edit_form_fields hook to display our additional fields.
The category_edit_form_fields hook is used to output additional fields to the edit administration screen for categories. This hook takes in one value, which is the term object itself. Since this hook will have access to the term object itself, it will be very simple to collect its information.
We need to create a function that will output our additional fields and pre-populate them with our information. Since we now have access to the term object this will be easy.
function edit_extra_fields_for_category($term){

    //collect the term slug
    $term_slug = $term->slug;

    //collect our saved term field information
    $term_category_text = get_option('term_category_text_' . $term_slug);
    $term_category_textarea = get_option('term_category_textarea_' . $term_slug);
    $term_category_select = get_option('term_category_select_' . $term_slug);
    $term_category_radio = get_option('term_category_radio_' . $term_slug);

    //output our additional fields?>
    <tr class="form-field">
        <th valign="top" scope="row">
            <label for="category-text"> Category Text Field </label>
        </th>
        <td>
            <input type="text" name="category-text" id="category-text" value="<?php echo $term_category_text; ?>"/>
            <p class="description">This is a text field </p>
        </td>
    </tr>
    <tr class="form-field">
        <th valign="top" scope="row">
            <label for="category-textarea"> Category Textarea Field </label>
        </th>
        <td>
            <textarea name="category-textarea" id="category-textarea"><?php echo $term_category_textarea; ?></textarea>
            <p class="description">This is a textarea field </p>
        </td>
    </tr>
    <tr class="form-field">
        <th valign="top" scope="row">
            <label for="category-select"> Category Select Field </label>
        </th>
        <td>
            <select name="category-select" id="category-select" value="<?php echo $term_category_select; ?>">
                <option value="select-value-one" <?php if($term_category_select=='select-value-one'){ echo 'selected';}?>> Value One </option>
                <option value="select-value-two" <?php if($term_category_select=='select-value-two'){ echo 'selected';}?>> Value Two </option>
            </select>
            <p class="description">This is a select field </p>
        </td>
    </tr>
    <tr>
        <th valign="top" scope="row">
            <label> Category Radio Field </label>
        </th>
        <td>
            <label for="category-radio-value-one">Category Radio Value One</label>
            <input type="radio" name="category-radio" id="category-radio-value-one" value="category-radio-value-one" <?php if($term_category_radio=='category-radio-value-one'){ echo 'checked'; }?> />
            <br/>
            <label for="category-radio-value-two">Category Radio Value Two</label>
            <input type="radio" name="category-radio" id="category-radio-value-two" value="category-radio-value-two" <?php if($term_category_radio=='category-radio-value-two'){ echo 'checked'; }?>/>
            <p>This is a radio field </p>
        </td>
    </tr>

    <?php
}
This function uses its passed in term object to access the slug of the term itself. Using this slug, it searched for our four saved custom field values using theget_option($option_name)function.
This function searched for an option with the specified name and assigns its value. In our case we are looking for our four field values and will be assigning them to variables.
The largest part of this function is outputting our HTML form elements, they are added as table elements. For each of our fields we display the label and the applicable text, textarea, select or radio elements.
The way that we pre-populate our custom fields is different for each type we are handling. Here is what we do
Text Field – For the textfield we assign its value directly to its
valueattribute, which will pre-populate the field itselfTextarea field – For the textarea field we echo its value directly between the
<textarea>and</textarea>tags, this outputs its value directly into the textarea element.Select Field – For the select field we first create the select element and all of its associated options. We add an attribute for the select element called
valueand populate it with our saved value (this is very similar to how we handled the text field). Even though we are outputting the value into the select list, we still need to determine which option will be initially selected. What we do now is for each of the options in the select element, we determine if its value is the same as what we collected, if it is it is selected. We use a basicIFstatement and if they match we echo theselectedattribute onto the option, this will make the browser select this option by default.Radio Field – For the radio fields we output them directly onto the page and determine if their value matches the saved value, if so we use a basic
IFstatement to output thecheckedattribute onto it, this attribute makes the browser select this value by default (in many ways this is handled similar to a select element, as we need to tell the browser which option to have displayed)
Making sure these values are pre-populated correctly is critically important as if you don’t select them, when the user updates their term their data may not be consistent.
All we have to do is connect our new function to the category_edit_form_fields hook and this function will execute when we click on the edit screen for our terms.
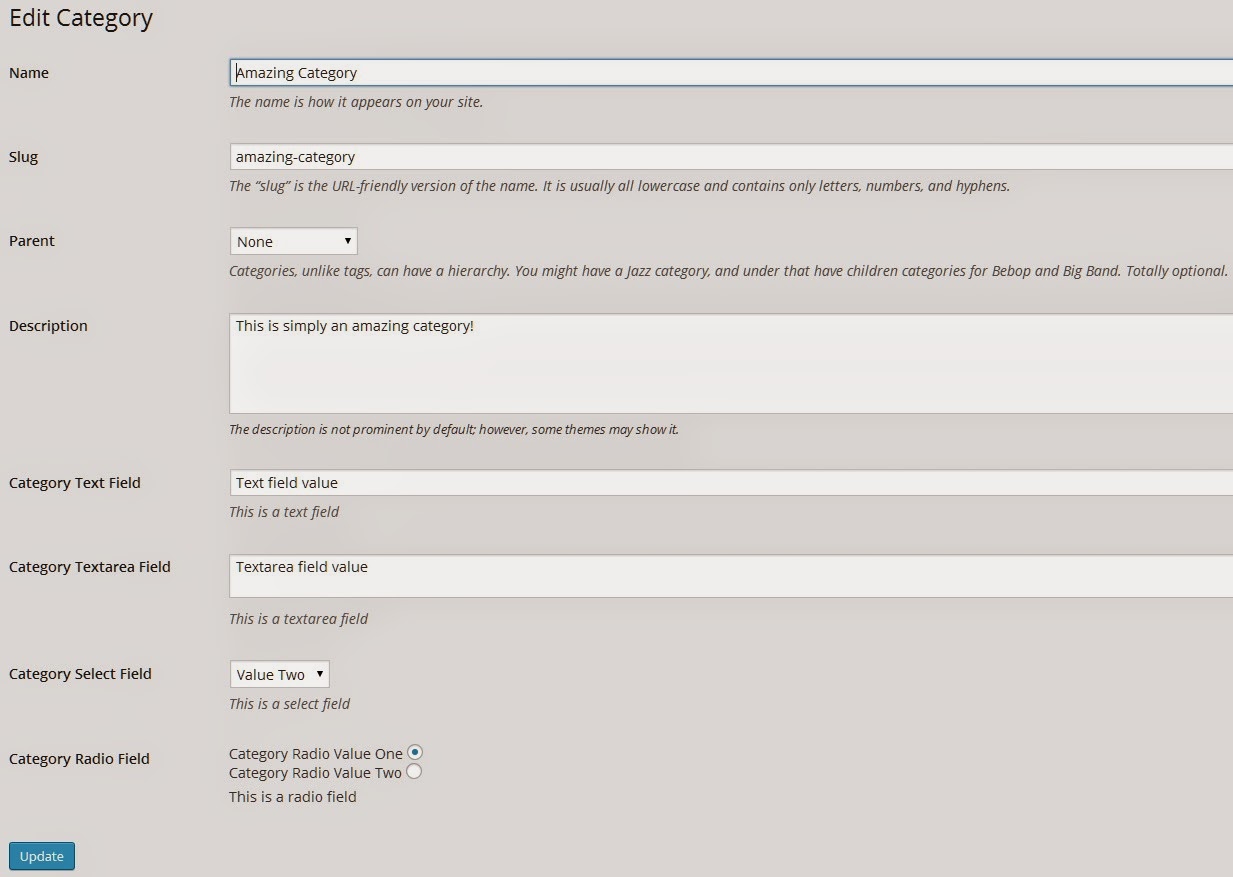
add_action('category_edit_form_fields','edit_extra_fields_for_category');After hooking this function your category edit screen should be updated and show your additional fields and values. Mine looks as follows:
Saving our updated category information
When we update our category information we will need a function to save our new field values.
Thankfully, we already have a function for that. Previously we created thesave_extra_taxonomy_fields($term_id) function which we used when we added a new category term.
We can call this function when we update the category by attaching it onto another hook. We will add our save_extra_taxonomy_fields function onto the edit_category hook and when we update our category this function will save our information.
add_action('edit_category','save_extra_taxonomy_fields');Extending custom taxonomies
Custom taxonomies can be extended in the exact same manor as the inbuilt taxonomies (categories and tags).
The only modifications you will need to make will be to the names of the hooks used.
For categories you would use the following hooks:
category_add_form_fields– Add fields to your category new term screencategory_edit_form_fields– Add fields to your category edit term screencreate_category– Used when you want to save your new category termedit_category– Used when you want to save your updated category term
Those hooks would connect you to the areas you need to edit, allowing you to save and retrieve your additional information.
For custom taxonomies they would be very similar, the hooks you would use are dynamic and based on the name of your taxonomy, they would be:
$TAXONOMY_NAME_add_form_fields$TAXONOMY_NAME_edit_form_fieldscreate_$TAXONOMY_NAME,edit_$TAXONOMY_NAME
For example if you registered your own taxonomy called members your hooks would be called:
members_add_form_fieldsmembers_edit_form_fieldscreate_members,edit_members
You need to follow the basic pattern and apply them to your custom taxonomy and you will be able to edit these screens and save your information as you need.
Wrapping It All Up
Now that you know how to save additional information for your taxonomies / terms, you can extend WordPress to do even more than what it was originally intended to do.
You can access your individual term using get_term($term_name,$taxonomy_name) and then from there you can use your slug as we have done to access additional information pulled from the WordPress options table.
You can edit your child theme files and other resources to take advantage of this new information. I would start by editing your category.php or tag.php file if you have altered those taxonomies to pull in your new information.
There is virtually no limit as to the complexity you can accomplish with your taxonomies now as you can save any information you like and output it as required.
If you’re interested in more information on custom taxonomies, check out “A refresher on custom taxonomies” by Justin Tadlock.
Frequently Asked Questions on Extending WordPress Taxonomies
What are WordPress taxonomies and why are they important?
WordPress taxonomies are a way of grouping posts and custom post types together. They are important because they allow you to organize your site’s content in a meaningful and browsable way. This can improve the user experience on your site, making it easier for visitors to find the content they’re interested in. Taxonomies can also improve your site’s SEO, as they can create more links to your content and increase its visibility on search engines.
How can I extend WordPress taxonomies?
You can extend WordPress taxonomies by adding custom fields to them. This can be done by using the ‘add_term_meta’, ‘update_term_meta’, and ‘delete_term_meta’ functions in your theme’s functions.php file. You can also use plugins like Advanced Custom Fields to add custom fields to your taxonomies without having to write any code.
What are custom fields in WordPress taxonomies?
Custom fields in WordPress taxonomies are additional data that you can add to each term in a taxonomy. This can include things like images, descriptions, and other types of metadata. Custom fields can be used to add more information to your taxonomy terms, making them more useful and informative for your site’s visitors.
How can I display custom fields in my taxonomy templates?
You can display custom fields in your taxonomy templates by using the ‘get_term_meta’ function in your template files. This function will retrieve the value of a custom field for a specific term in a taxonomy. You can then use this value in your template to display the custom field’s data.
Can I use plugins to extend WordPress taxonomies?
Yes, there are many plugins available that can help you extend WordPress taxonomies. These plugins can add custom fields to your taxonomies, create new types of taxonomies, and provide other functionality related to taxonomies. Some popular taxonomy plugins include Advanced Custom Fields, Custom Post Type UI, and Taxonomy Terms Order.
How can I create a custom taxonomy in WordPress?
You can create a custom taxonomy in WordPress by using the ‘register_taxonomy’ function in your theme’s functions.php file. This function allows you to define the properties of your custom taxonomy, such as its name, labels, and whether it’s hierarchical or not.
What is the difference between hierarchical and non-hierarchical taxonomies?
Hierarchical taxonomies are taxonomies that can have parent and child terms, like categories in WordPress. Non-hierarchical taxonomies are taxonomies that can’t have parent and child terms, like tags in WordPress. The type of taxonomy you choose to create depends on how you want to organize your content.
Can I add custom fields to built-in WordPress taxonomies?
Yes, you can add custom fields to built-in WordPress taxonomies like categories and tags. This can be done by using the same functions and methods that you would use to add custom fields to custom taxonomies.
How can I order my taxonomy terms?
You can order your taxonomy terms by using the ‘get_terms’ function with the ‘orderby’ and ‘order’ parameters. You can also use plugins like Taxonomy Terms Order to easily change the order of your taxonomy terms in the WordPress admin.
Can I use taxonomies to create a custom post type archive?
Yes, you can use taxonomies to create a custom post type archive. This can be done by creating a taxonomy that’s associated with your custom post type, and then using the ‘taxonomy’ parameter in the ‘WP_Query’ class to retrieve the posts for that taxonomy.
 Simon Codrington
Full stack developer and overall web enthusiast. I love everything to do with web / design and my passion revolves around creating awesome websites. Focusing primarily on WordPress, I create themes, plugins and bespoke solutions.