Tap User Interests with Curated Feeds in Rails

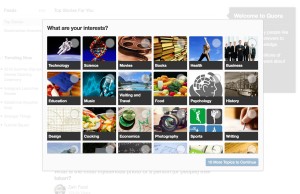
Often, when signing up for a new platform, you are asked to select from a list of items in order to see posts that relate to your interests. Some of the sites employing this technique are Quora, Medium and pinterest just to name a few. This is a screenshot from quora right after signing up.

In this tutorial, we are going to implement this feature on a normal blog. In the first part, we will create posts and tag them. Later on, we will add user authentication and let users select their interests. Here is a working demo. The complete code can be found on github.
Let’s start by creating a new rails app. I am using rails 4.2 in this tutorial:
rails new curated-feed
Key Takeaways
- Utilize the Rails framework to create a blog that allows users to select posts based on their interests by implementing tagging functionality.
- Enhance user experience by integrating user authentication with Devise, enabling users to sign up, sign in, and manage their interests.
- Employ the chosen-rails gem to simplify the selection of tags through a user-friendly dropdown, improving the tagging process in forms.
- Set up a many-to-many relationship between tags and posts using a pivot table, allowing for dynamic association and management of tags per post.
- Customize user feeds to display posts that match their tagged interests, ensuring a personalized content experience based on user preferences.
The Blog
Now let’s create a Posts controller and a post model, respectively:
rails g controller Posts index feed new edit show
rails g model Posts title:string description:text
rake db:migrate
The posts we’ll be creating are pretty basic, having just a title and a description. Let’s add a posts resource so we can get all the routes to perform CRUD operations on posts. We’ll also change our root_path to point to the index action of the PostsController:
config/routes.rb
Rails.application.routes.draw do
  #create routes for performing all CRUD operations on posts
  resources :posts

  #make the homepage the index action of the posts controller
  root 'posts#index'
end
Now, add the following code to the controller actions:
app/controllers/posts_controller.rb
class PostsController < ApplicationController
  before_action :find_post, only: [:show, :edit, :update, :destroy]

  def index
    @posts = Post.all
  end

  def feed

  end

  def new
    @post = Post.new
  end

  def create
    @post = Post.new post_params
    if @post.save
      flash[:success] = "Post was created successfully"
      redirect_to @post
    else
      render :new
    end
  end

  def show
  end

  def edit
  end

  def update
    if @post.update post_params
      flash[:success] = "The post was updated successfully"
      redirect_to @post
    else
      flash.now[:danger] = "Error while submitting post"
      render :edit
    end
  end

  def destroy
    @post.destroy
    redirect_to root_url
  end

  private

  def post_params
    params.require(:post).permit(:title, :description, tag_ids: [])
  end

  def find_post
    @post = Post.find(params[:id])
  end
end
The index, create, update, and destroy actions are normal for a typical Rails CRUD application. We’ve declared a before_action to find a post for the show and edit actions. We’ll add code for the feed method later.
On to creating the views. We will use bootstrap since it makes styling quite easy:
Gemfile
gem 'bootstrap-sass'
[...]
Then run bundle install
We need to update our app/files/css/application.scss file so that bootstrap styles can take effect:
@import "bootstrap";
@import "bootstrap-sprockets";
First, here is the code for our layout:
app/views/layouts/application.html.erb
<nav class="navbar navbar-default">
  <div class="container">
    <div class="navbar-header">
      <%= link_to 'Curated-feed', root_path, class: 'navbar-brand' %>
    </div>
    <div id="navbar">
      <ul class="nav navbar-nav pull-right">
        <li>< %= link_to 'Sign up', "#" %>
      </ul>
    </div>
  </div>
</nav>

<div class="container">
  <% flash.each do |key, value| %>
    <div class="alert alert-< %= key %>">
      <%= value %>
    </div>
  <% end %>
  <%= yield %>
</div>
Always a good idea to make a partial for a form:
app/views/posts/_form.html.erb
<div class="form-group">
  <%= form_for @post do |f| %>
    <div class="form-group">
      <%= f.label :title %>
      <%= f.text_field :title, class: "form-control" %>
    </div>

    <div class="form-group">
      <%= f.label :description %>
      <%= f.text_area :description, class: "form-control" %>
    </div>

    <div class="form-group">
      <%= f.submit class: "btn btn-primary" %>
    </div>
  <% end %>
</div>
Finally, here’s the new, edit, show, and index views for a post:
app/views/posts/new.html.erb
<div class="col-md-6 col-md-offset-3">
  <h1>Create a new post</h1>
  <%= render 'form' %>
</div>
app/views/posts/edit.html.erb
<div class="col-md-6 col-md-offset-3">
  <h1>Create a new post</h1>
  <%= render 'form' %>
</div>
app/views/posts/show.html.erb
<div class="col-md-8 col-md-offset-2">
  <h1><%= @post.title %></h1>
  <p><%= @post.description %></p>
</div>
app/views/posts/index.html.erb
<div class="col-md-8 col-md-offset-2">
  <h1>All posts</h1>
  <% @posts.each do |post| %>
    <ul>
      <li>
        <h3><%= post.title %></h3>
        <p><%= post.description %></p>
      </li>
    </ul>
  <% end %>
</div>
So, up until now, we’ve stayed within the bounds of Rails’ RESTful approach. Here is a feed view, which is non-standard.
app/views/posts/feed.html.erb
<div class="col-md-8 col-md-offset-2">
  <h1>Feed</h1>
</div>
Eventually, the feed view will only have posts that are tagged with the user interests. Actually, the code in the feed and index views won’t be different. The only difference is the logic loading the posts in the index and feed actions.
Now that we have our views setup, we can seed our database so that we can see the general layout. I am going to seed the database with 15 posts using the faker gem, so add this to the Gemfile:
[...]
gem 'faker', '~> 1.6', '>= 1.6.6'
[...]
Run bundle install to install the gem. With the faker gem in our toolbox, the seed file looks like:
app/db/seeds.rb
15.times do
  title = Faker::Lorem.sentence # all options available below
  description = Faker::Lorem.paragraph
  Post.create!(title:  title,
               description: description)
end
Run rake db:seed to populate our database with fake data. If you visit http://localhost:3000 in your browser you should see the random posts. This was boring, though, I am sure you are past the create a blog with Rails level. In the next section, we will talk about adding tags to posts.
Tagging Posts
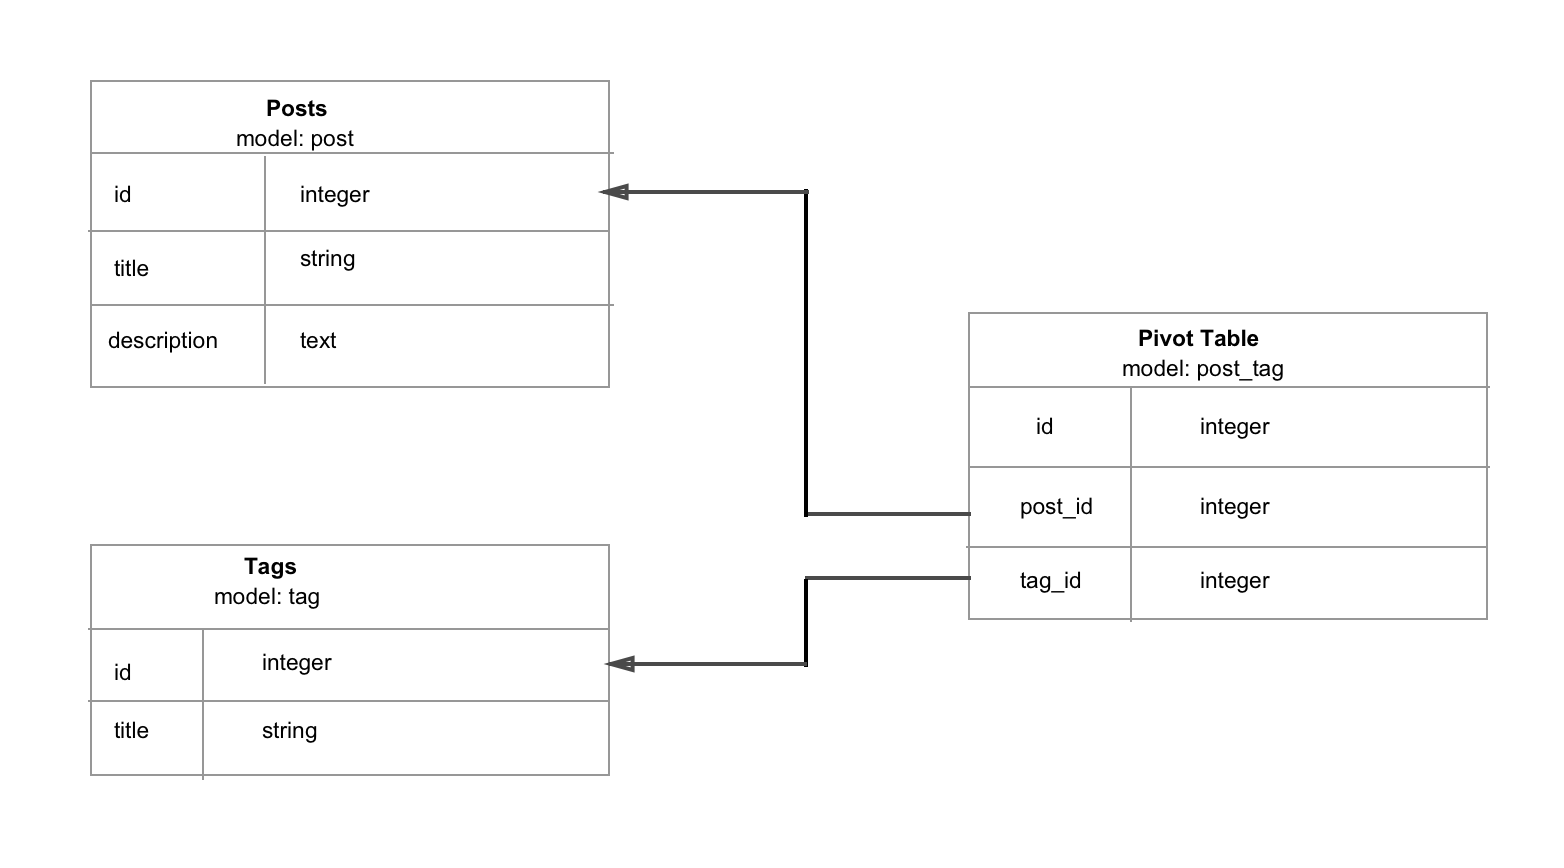
Tags and posts, you likely realize a many-to-many relationship, meaning, a tag can be associated with many posts and vice versa. To do this, we need a pivot table. A pivot table is an intermediate table with relationships between two other tables. It links the two tables together by using two foreign keys to define the rows from the other tables. The diagram below will help you understand this better:
To begin, generate the Tag model:
rails g model Tag title
rake db:migrate
And the pivot model. Let’s call it post_tag:
rails g model Post_tag title post:references tag:references
rake db:migrate
Update our models to take note of the relationships:
app/models/tag.rb
[...]
has_many :post_tags, dependent: :destroy
has_many :posts, through: :post_tags
[...]
app/models/post.rb
[...]
has_many :post_tags, dependent: :destroy
has_many :tags, through: :post_tags
[...]
Now that we’ve declared our relationships, it’s time to add the ability to tag posts when they are created or edited. We have to change the line that specifies the permitted params for posts, allowing tag_ids as part of those params:
app/controllers/posts_controller.rb
def post_params
  params.require(:post).permit(:title, :description, tag_ids: [])
end
Note, tag_ids are stored as an array since a post can be tagged with more than one tag. We won’t be creating a tags controller, as all tags are created in the console for this tutorial. However, we will create a tag partial, enabling us to render tags below posts:
mkdir app/views/tags
touch app/views/tags/_tag.html.erb
app/views/tags/tag.html.erb
<span class="quiet"><small><%= link_to tag.title, "#" %> </small></span>
Let’s create a few tags through the console. Five will do:
$ rails c
Tag.create!(title: "technology")
Tag.create!(title: "politics")
Tag.create!(title: "science")
Tag.create!(title: "entrepreneurship")
Tag.create!(title: "programming")
We could have used checkboxes to tag posts, but checkboxes can be limiting. Let’s say we had hundreds of tags, that means hundreds of checkboxes. Messy right? In this tutorial, we will require the chosen-rails gem for this. Chosen is a jQuery plugin that makes long, unwieldy select boxes much more user-friendly. It also makes it possible to filter through tags just by typing in the tag name. Add this to your Gemfile then do a bundle install:
Gemfile
[...]
gem 'compass-rails'
gem 'chosen-rails'
[...]
Update the following files to make chosen effective:
app/assets/javascripts/application.js
[...]
//Make sure you require chosen after jquery. In my case I have it after the turbolinks line
//= require chosen-jquery
[...]

This is for those using jQuery. There's documentation for those of you using prototype on the chosen-rails github repo.

app/assets/css/application.scss
[...]
*= require chosen
[...]
Then, in your app/assets/javascripts folder, add this CoffeeScript file:
app/assets/javascripts/tag-select.js.coffee
 $ ->
  # enable chosen js
  $('.chosen-select').chosen
    allow_single_deselect: true
    no_results_text: 'No results matched'
    width: '450px'
Add this snippet inside the form so that users can choose tags:
app/views/posts/_form.html.erb
<div class="form-group">
  <%= f.collection_select :tag_ids, Tag.order(:title), :id, :title, {}, { multiple: true, class: "chosen-select" } %>
</div>

</code></pre>

<p>This is how your form should look like now:</p>
<pre><code>
<div class="form-group">
  <%= form_for @post do |f| %>
    <div class="form-group">
      <%= f.label :title %>
      <%= f.text_field :title, class: "form-control" %>
    </div>

    <div class="form-group">
      <%= f.label :description %>
      <%= f.text_area :description, class: "form-control" %>
    </div>

    <div class="form-group">
      <%= f.collection_select :tag_ids, Tag.order(:title), :id, :title, {}, { multiple: true, class: "chosen-select" } %>
    </div>

    <div class="form-group">
      <%= f.submit class: "btn btn-primary" %>
    </div>
  <% end %>
</div>
Try creating a new post. You should be able to add and remove tags similar to how you do it on Stack Overflow. It’s possible to let users create tags if they don’t exist in the list of available options, but that is beyond the scope of this tutorial. We also want to list tags belonging to a post below the post. Update the posts index view as follows:
app/views/posts/index.html.erb
<div class="col-md-8 col-md-offset-2">
  <h1>All posts</h1>
  <% @posts.each do |post| %>
    <ul>
      <li>
        <h3><%= post.title %></h3>
        <p><%= post.description %></p>
        <% if post.tags.any? %>
          <p>Tags: <%= render post.tags %></p>
        <% end %>
      </li>
    </ul>
  <% end %>
</div>
Modelling Users
Let’s allow people to sign up on our platform. We will use the devise gem for this:
Gemfile
[...]
gem 'devise', '~> 4.2'
[...]
Then do a bundle install.
Run the devise generator.
rails generate devise:install
After you run this command, you’ll see a couple of instructions in the console. You can safely ignore these instructions, since we have most of the things set up and won’t be sending any emails today.
Let’s generate the User model:
rails g devise User
rake db:migrate
At this point, users are able to sign up and sign in. Update the navigation so that users are able to see sign up, sign in, and logout links:
app/views/layouts/application.html.erb
<nav class="navbar navbar-default">
  <div class="container">
    <div class="navbar-header">
      <%= link<em>to 'Curated-feed', root</em>path, class: 'navbar-brand' %>
    </div>
    <div id="navbar">
      <ul class="nav navbar-nav pull-right">
        <% unless user_signed_in? %>
          <li><%= link_to "Sign in", new_user_session_path %></li>
          <li><%= link_to "Sign up", new_user_registration_path %></li>
        <% else %>
          <li><%= link_to "Sign out", destroy_user_session_path, method: :delete %></li>
        <% end %>
      </ul>
    </div>
  </div>
</nav>

<div class="container">
  <% flash.each do |key, value| %>
    <div class="alert alert-<%= key %>">
      <%= value %>
    </div>
  <% end %>
  <%= yield %>
</div>
Back to our relationships. A user can subscribe to more than one tag and a tag can have more than one person subscribed to it. This is a many to many relationship. We will need another pivot table for this, so generate the model:
rails g model user_tag user:references tag:references
rake db:migrate
Update the Tag and User models. They should now look like this:
app/models/tag.rb
class Tag < ActiveRecord::Base
  has_many :post_tags, dependent: :destroy
  has_many :posts, through: :post_tags

  has_many :user_tags, dependent: :destroy
  has_many :users, through: :user_tags
end
app/models/user.rb
class User < ActiveRecord::Base
  # Include default devise modules. Others available are:
  # :confirmable, :lockable, :timeoutable and :omniauthable
  devise :database_authenticatable, :registerable,
         :recoverable, :rememberable, :trackable, :validatable
  has_many :user_tags, dependent: :destroy
  has_many :tags, through: :user_tags
end
Generate a users controller:
rails g controller users edit update
Note that the new and create actions are taken care of by Devise. Devise also provides a method to update a user object without providing a password, so long as you are editing the attributes inside of a UsersController. In our case, we will pass in tag_ids as a part of the params we want to update:
app/controllers/users_controller.rb
class UsersController < ApplicationController
  before_action :find_user

  def edit
  end

  def update
    if @user.update(user_params)
      flash[:success] = "Interests updated"
      redirect_to root_path
    else
      flash[:alert] = "Interests could not be updated."
      render :edit
    end
  end

  private

  def find_user
    @user = current_user
  end

  def user_params
    params.require(:user).permit(tag_ids: [])
  end
end
Now, we can assign tag_ids to a user through the console. Let’s update our routes file to accommodate the edit and update actions of a user. We will also create the view for updating user interests and add the link to update interests in the navigation:
config/routes.rb
[...]
resources :users, only: [:edit, :update]
[...]
app/views/users/edit.html.erb
<div class="col-md-8 col-md-offset-2">
  <h1>Please check your interests</h1>
  <%= form_for (@user) do |f| %>

    <strong>Interests:</strong>
    <%= f.collection_check_boxes :tag_ids, Tag.all, :id, :title do |cb| %>
    <%= cb.label(class: "checkbox-inline input_checkbox") {cb.check_box(class: "checkbox") + cb.text} %>
    <% end %>
    <br><br>

    <div class="form-group">
      <%= f.submit class: "button button_flat button_block" %>
    </div>

  <% end %>
</div>
app/views/layouts/application.html.erb
[...]
<% unless user_signed_in? %>
  <li><%= link_to "Sign in", new_user_session_path %></li>
  <li><%= link_to "Sign up", new_user_registration_path %></li>
<% else %>
  <li><%= link_to "Update interests", edit_user_path(current_user) %></li>
  <li><%= link_to "Sign out", destroy_user_session_path, method: :delete %></li>
<% end %>
[...]
Visit http://localhost:3000/users/1/edit and you will see a list of interests with checkboxes next to them. In the edit view, we are using the named interests when referring to tags. In most cases, however, users are supposed to choose their interests right after signing up before accessing the available content.
Let’s make a new controller called registrations_controller and add the code to redirect users to the edit view after signing up:
touch app/controllers/registrations_controller.rb
app/controllers/registrations_controller.rb
class RegistrationsController < Devise::RegistrationsController
  protected

  def after_sign_up_path_for(resource)
    edit_user_path(current_user)
  end
end
Modify the routes to use the new controller. We will be updating the devise_for line to look like this:
config/routes.rb
[...]
devise_for :users, controllers: { registrations: "registrations" }
[...]
After signing up, users will be taken to the edit page where they will update their interests before proceeding.
We haven’t yet updated the code in the feed method inside the posts_controller. In the meantime, users will just be redirected to the root_path. Let’s update our feed method now:
app/controllers/posts_controller.rb
def feed
  @my_interests = current_user.tag_ids
  @posts = Post.select { |p| (p.tag_ids & @my_interests).any? }
end
On the first line, we are getting all the tag_ids belonging to the authenticated user – remember we stored tag_ids as an array. In Ruby we can look for the intersection between two arrays using the & symbol. Fire up our console so you can see what I mean:
rails c
irb(main):001:0> [1,2,3,4] & [3, 1]
=> [1, 3] #what is returned
irb(main):002:0> [7,3,4,5] & [3, 1]
=> [3]
irb(main):003:0> [2,3,4,5] & [6, 7]
=> []
If there’s an intersection between two arrays, an array containing the elements common to the two arrays is returned, otherwise an empty array is returned. Let’s go back to the code inside the feed method. Once we get the tag_ids belonging to the authenticated user, we can compare these tag_ids to the tag_ids belonging to a post, if there’s an intersection, the post will be selected and added to the @posts variable.
We are now able to load all the posts tagged with any of the interests belonging to the logged in user. Let’s update the feed view:
app/views/posts/feed.html.erb
<div class="col-md-8 col-md-offset-2">
  <h1>Your feed</h1>
  <% @posts.each do |post| %>
    <ul>
      <li>
        <h3><%= post.title %></h3>
        <p><%= post.description %></p>
        <% if post.tags.any? %>
          <p>Tags: <%= render post.tags %></p>
        <% end %>
      </li>
    </ul>
  <% end %>
</div>
Still, visiting the homepage shows all posts, regardless of whether they are tagged with any of the users interests or not. This is because the root_path is mapped to posts#index. Authenticated users should only see relevant posts, not all posts. Devise comes with a handful of methods, including one that makes it possible to define the root_path for authenticated users. In config/routes.rb add this:
config/routes.rb
 [...]
authenticated :user do
  root 'posts#feed', as: "authenticated_root"
end

root 'posts#index'
[...]
Now, when we visit http://localhost:3000, only posts tagged with our interests will show up. Then there’s the problem of the authenticated user not having selected any interests. Does this mean that their feed will be empty? Let’s revisit the feed method inside posts_controller and update it:
def feed
  @my_interests = current_user.tag_ids

  #check if the authenticated user has any interests
  if @my_interests.any?
    @posts = Post.select { |p| (p.tag_ids & @my_interests).any? }
  else
    #load all the posts if the authenticated user has not specified any interests
    @posts = Post.all
  end
end
Conclusion
This is a simple approach on how to do this. I wanted to talk about many-to-many relationships and how one checks for intersections between different models. You can build on top of this by adding images to tags then displaying the images next to the checkboxes in the view. This is how most sites do it. You can also let users click on the images instead of checkboxes, making AJAX calls to update the user object. There are so many ways to make this fancy. I am learning Rails and enjoy sharing what I have learned, so I hope this tutorial was helpful.
Frequently Asked Questions (FAQs) about Building Curated Interest Feeds in Rails
How can I add the Ruby Faker gem to my Rails project?
The Ruby Faker gem is a handy tool for generating fake data for your Rails application. To add it to your project, you need to include it in your Gemfile. Open your Gemfile and add the following line: gem 'faker'. Then, run bundle install in your terminal to install the gem. After installation, you can use Faker in your Rails application to generate fake data for testing purposes.
What is the purpose of the Faker gem in Rails?
The Faker gem is a library for generating fake data. It’s often used in Rails applications during the development process to populate the database with sample data. This can be useful for testing features and functionality, as well as for demonstrating the application to stakeholders before real data is available.
How can I generate specific types of fake data with Faker?
Faker provides a variety of methods for generating specific types of data. For example, you can use Faker::Name.name to generate a random name, or Faker::Internet.email to generate a random email address. You can find a full list of available methods in the Faker documentation.
How can I use Faker to generate data for a specific locale?
Faker supports a wide range of locales, allowing you to generate data that is appropriate for different regions and languages. To use a specific locale, you can set the Faker::Config.locale configuration option. For example, Faker::Config.locale = 'en-US' will generate data for the US English locale.
How can I use Faker in my Rails tests?
Faker can be a valuable tool for generating test data in your Rails applications. You can use it in your test setup to create realistic data for your test cases. For example, if you’re testing a feature that involves user accounts, you could use Faker to generate a set of fake user data to use in your tests.
How can I customize the data generated by Faker?
While Faker provides a wide range of methods for generating different types of data, you may sometimes need to customize this data to suit your specific needs. You can do this by chaining methods together. For example, Faker::Name.unique.name will generate a unique name each time it’s called.
How can I ensure that the data generated by Faker is unique?
Faker provides a unique method that ensures the generated data is unique. For example, Faker::Internet.unique.email will generate a unique email address each time it’s called. This can be useful when you need to generate unique identifiers or other unique data.
How can I generate a large amount of fake data with Faker?
If you need to generate a large amount of fake data, you can use Faker in combination with a loop. For example, you could use a times loop to generate a specified number of fake names: 10.times do puts Faker::Name.name end.
Can I use Faker with other Ruby frameworks?
Yes, Faker is a Ruby gem and can be used with any Ruby framework, not just Rails. However, the process for adding it to your project may vary depending on the framework you’re using.
How can I contribute to the Faker gem?
The Faker gem is an open-source project, and contributions are welcome. If you’re interested in contributing, you can check out the project on GitHub to see open issues and pull requests. Before contributing, be sure to read the project’s contribution guidelines.
Chris is a software developer at Andela. He has worked with both Rails and Laravel and blogs to share a few tips. Chris also loves traveling.

Published in
·AngularJS·App Development·Mobile·Mobile Web Development·Tools & Libraries·April 11, 2017