Build an Android App with React Native

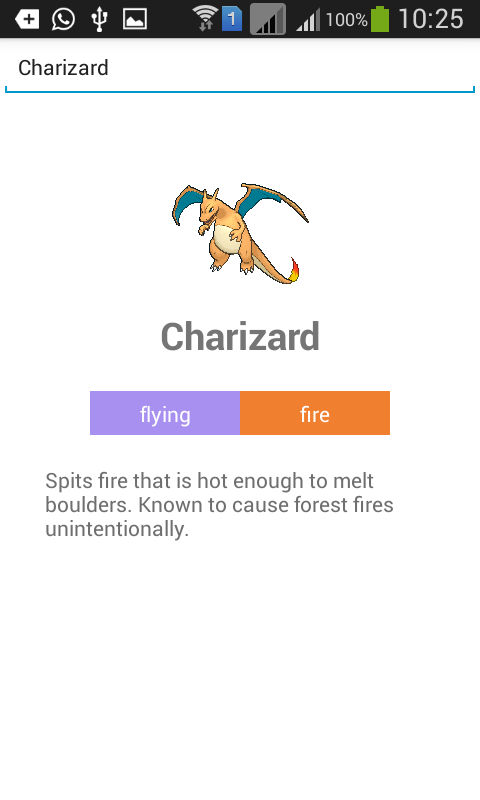
In this article I’ll be showing you how to create a Pokedex App with React Native in Android. The app wont be as full-featured as an app in the Google Play Store, with just a text field for entering the exact name of the Pokemon and then showing details on submission. We’re also going to add text-to-speech functionality which will read the details out loud. Here’s how the final app will look:
Note: I won’t be showing the initial setup such as installing the Android SDK or installing React Native and creating a project or any other development tools that you need. I will assume that this is going to be your first React Native app and will provide detailed explanation for each code block.
Key Takeaways
- Utilize React Native to develop a Pokedex App for Android that features text-to-speech and a simple UI for displaying Pokemon details.
- Set up a PHP server and CouchDB database to handle backend data storage and retrieval, enhancing performance by reducing API calls.
- Implement data handling in PHP, utilizing CouchDB for storing and querying Pokemon data fetched from the PokeAPI.
- Develop the mobile app’s UI using React Native components like TextInput for input fields, ListView for displaying lists, and custom styling with StyleSheet.
- Integrate essential libraries such as lodash for data manipulation, react-native-android-speech for text-to-speech functionality, and react-native-gifted-spinner for loading animations.
- Handle network requests in React Native using the fetch API to retrieve data from your PHP server, ensuring smooth data flow between the backend and the app.
- Debug and optimize the app using React Native’s live reload and debugging features, and prepare the app for release by following best practices for deployment.
Building the Server
First we need to build the server component for this app. We’ll be using PHP as the server-side language and CouchDB for the database. Find installation instructions for CouchDB here and for PHP here.
Once complete, check if CouchDB is running by executing curl localhost:5984, this should return something like:
{"couchdb":"Welcome","uuid":"xxxxxxxxxxxxxxxx","version":"1.6.0","vendor":{"name":"Ubuntu","version":"15.10"}}Now open http://localhost:5984/_utils in your browser to access Futon, the default CouchDB management system. Click Create Database to create the database where we’ll store the data received from the Pokemon API. Enter pokedex for the database name then click create. We could access the API directly with React Native but this will require more network access. Storing it in a database first allows us to retrieve everything with just one request. This also lets us query the data any way we want.
With that out of the way, let’s start building.
Saving Data
Next we move to building the server component. Start by creating a working directory inside your web server folder. Then inside the working directory create a composer.json file and add the following:
{
    "require": {
        "doctrine/couchdb-odm":  "@dev"
    },
    "minimum-stability": "dev",
    "prefer-stable": true
}
This specifies the doctrine/couchdb-odm library as a dependency for this project. This library allows us to work with CouchDB in PHP. Execute composer install to install it.
While it’s installing, create a pokemon.php file inside your working directory and add the following:
<?php
require 'vendor/autoload.php';
set_time_limit(0);

$client = \Doctrine\CouchDB\CouchDBClient::create(array('dbname' => 'pokedex'));

$pokedex = file_get_contents('http://pokeapi.co/api/v1/pokedex/1/');
$pokedex_data = json_decode($pokedex, true);


foreach($pokedex_data['pokemon'] as $row){
    //get details
    $pokemon = file_get_contents('http://pokeapi.co/' . $row['resource_uri']);
    $pokemon = json_decode($pokemon, true);

    //get description
    $pokemon_description = file_get_contents('http://pokeapi.co/' . $pokemon['descriptions'][0]['resource_uri']);

    $pokemon['description'] = json_decode($pokemon_description, true)['description'];

    //get sprites
    $pokemon_sprites = file_get_contents('http://pokeapi.co' . $pokemon['sprites'][0]['resource_uri']);
    $pokemon_sprites = json_decode($pokemon_sprites, true);

    $pokemon['small_photo'] = 'http://pokeapi.co' . $pokemon_sprites['image'];

    $client->postDocument($pokemon);

}
Breaking down the code above, we first include the autoloader file. This automatically loads all the libraries that we’ve installed via Composer. Below that, we set the time limit to zero. PHP scripts have a default max execution time and once it reaches that time it stops executing. Adding this removes that limit. At the time of writing of this article, there are 721 Pokemon and we have to perform a total of three HTTP request for each Pokemon in order to get the general details, descriptions and sprites… I think you get the idea.
<?php
require 'vendor/autoload.php';
set_time_limit(0);
Initialize the CouchDB client and supply the name of the database that we’ll be working with.
<?php
$client = \Doctrine\CouchDB\CouchDBClient::create(array('dbname' => 'pokedex'));
Get the full list of Pokemon from the API by using the file_get_contents function. This returns the data in JSON format so we have to convert it to an array to work with the data:
<?php
$pokedex = file_get_contents('http://pokeapi.co/api/v1/pokedex/1/');
$pokedex_data = json_decode($pokedex, true);
Loop through all the results:
<?php
foreach($pokedex_data['pokemon'] as $row){
    ...
}
Inside the loop, access the resource_uri for each Pokemon and use it to construct the URL that returns the Pokemon details.
<?php
//get details
$pokemon = file_get_contents('http://pokeapi.co/' . $row['resource_uri']);
$pokemon = json_decode($pokemon, true);
Use the data received from the previous request to construct the URL for getting the Pokemon description and sprites.
<?php
//get description
$pokemon_description = file_get_contents('http://pokeapi.co/' . $pokemon['descriptions'][0]['resource_uri']);

$pokemon['description'] = json_decode($pokemon_description, true)['description'];

//get sprites
$pokemon_sprites = file_get_contents('http://pokeapi.co' . $pokemon['sprites'][0]['resource_uri']);
$pokemon_sprites = json_decode($pokemon_sprites, true);

$pokemon['small_photo'] = 'http://pokeapi.co' . $pokemon_sprites['image'];
Save the data to CouchDB:
<?php
$client->postDocument($pokemon);
To start saving the data, open pokemon.php in your browser. This will take a while but you can move on to the next step while it’s executing.
Fetching Data
To fetch data with CouchDB we first have to create a view. To create a view, go to the database we created earlier. Click on the view dropdown and select temporary view. Add the following code under the map function text field:
function(doc) {
  emit(doc.name, null);
}
Click on the run button to check that some results are yielded by the view.
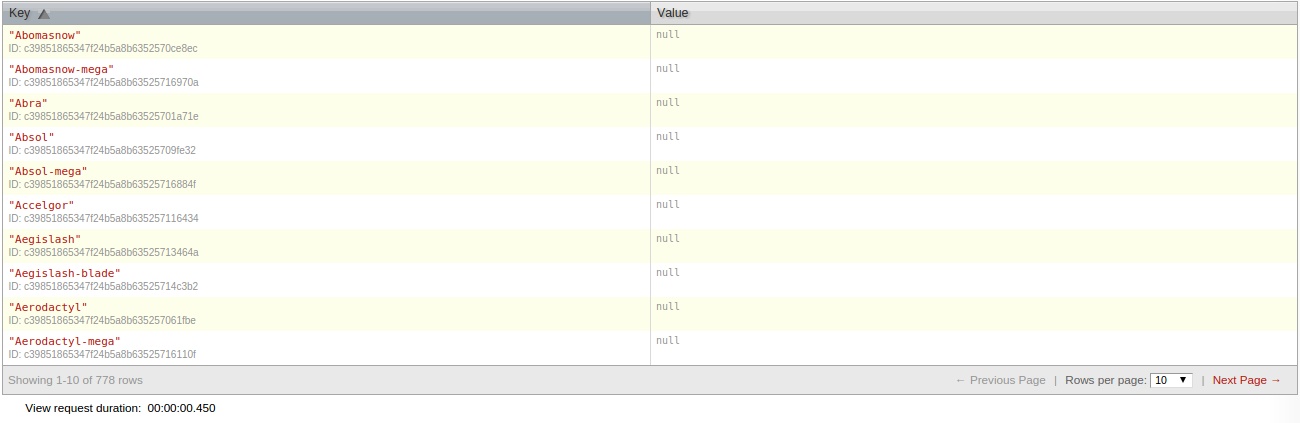
Click the save as button and enter pokemon for the design document field and by_name for the view name.
Once that’s complete, return to your working directory and create a new file called get.php and add the following code:
<?php
require 'vendor/autoload.php';

$client = \Doctrine\CouchDB\CouchDBClient::create(array('dbname' => 'pokedex'));

$pokemon = $_GET['name'];

$query = $client->createViewQuery('pokemon', 'by_name');
$query->setKey($pokemon);
$query->setReduce(false);
$query->setIncludeDocs(true);
$result = $query->execute();

if(!empty($result[0])){

    $data = $result[0];
    echo json_encode($data);

}else{
    $result = array('no_result' => true);
    echo json_encode($result);
}
Breaking down the code above. First we get the name of the Pokemon sent from the app.
<?php
$pokemon = $_GET['name'];
Query the view by calling the createViewQuery method, supply the design document name and view name and then specify the options. Here we use the setKey method to specify the query, setReduce to further filter the results returned from the view, and setIncludeDocs to specify that the actual document for each result is returned as well. You may have noticed from the screenshot of the results view earlier, the actual document wasn’t there. That’s because it’s the default behavior, calling setIncludeDocs and supplying an argument of true would include the document that saved when we accessed the pokemon.php file earlier.
<?php
$query = $client->createViewQuery('pokemon', 'by_name'); // design document name + view name
$query->setKey($pokemon); // set the key to the name of the pokemon
$query->setReduce(false); // disable reduce
$query->setIncludeDocs(true); // include the actual document for each result
$result = $query->execute(); // perform the query
Next we check if there are results and return the JSON encoded version. Otherwise, return that there are no results.
<?php
if(!empty($result[0])){

    $data = $result[0];
    echo json_encode($data);

}else{
    $result = array('no_result' => true);
    echo json_encode($result);
}
At this point if you’re working on a local machine, expose the server to the public internet by using Ngrok. Or use the internal IP address assigned by your network. Take note of it as we’ll be using that later in the app.
Building the App
Installing the Dependencies
Start by initializing a new React Native project and installing its dependencies:
react-native init PokedexOnce complete, install the dependencies via npm:
cd Pokedex
npm install lodash react-native-android-speech react-native-gifted-spinner --save
Here’s a summary of what each does:
lodash: Used for capitalizing a word and extracting specific data from an array.react-native-android-speech: Used for converting the description text to speech.react-native-gifted-spinner: Used for showing the user a loading animation during a network request.
You can open the node_modules/react-native/node_modules directory to view the different modules installed.
When the installation is complete, visit the Github repo of React Native Android Speech and follow the setup instructions.
Performing Network Requests
In the root directory of your React Native project, create a src folder and inside that create an api.js and add the following code:
module.exports = function(pokemon){

    var url = 'http://192.168.xxx.xxx/pokedex/get.php?name=' + pokemon;

    return fetch(url).then(function(response){
        return response.json();
    }).then(function(json){
        return json;
    });
}
This exports the function for fetching data from the server using the fetch method which is React Native’s way for making network requests. This method accepts the URL to make the request to and returns a promise to use the then method and supply a callback function to get the response.
The response returned can’t be directly used, that’s why we have to return the result of the json method which is available from the response object. From there we can capture the actual JSON data by chaining another then method. The callback function would then have the actual JSON data passed to it as an argument which we then return.
Note that we’re returning the result of the fetch method, this is also a promise, so when we call this module later in our main script, we have to use the then method again to access the JSON data.
Note: Be sure to change http://192.168.xxx.xxx/ to the IP address or domain name noted earlier. Note that pokedex is a folder inside my web directory.
Main App File
Open the index.android.js file. It should contain some default code, but go ahead and clear it out.
First at the beginning of each file we will enable strict mode. This helps prevent common mistakes in our code such as not defining a variable before initializing a value.
After that, import React Native and the additional dependencies for the project.
'use strict';

var React = require('react-native');
var tts = require('react-native-android-speech')
var GiftedSpinner = require('react-native-gifted-spinner');
var _ = require('lodash');
Initialize all the components and APIs that we need.
var {
  AppRegistry,
  StyleSheet,
  Text,
  TextInput,
  View,
  Image,
  ListView
} = React;
React Native has different components and APIs available. These aren’t loaded by default so you have to specify which ones you need. Think of components as UI components.
For example, in a webpage there are text fields, lists, tables, images, tabs and more. In React Native these small pieces of UI are components. There’s a component for displaying an image, a component for displaying a scrollbar, a component for generating a list and more.
React’s API’s are a way to access different device capabilities such as the camera and push notifications. Though you may not use these APIs frequently, there are some you will use in every project.
Examples include the StyleSheet and AppRegistry.
Here’s a brief description for each of the components and APIs we have used:
AppRegistry: For registering custom components. In React Native every thing is a component and each component can consist of smaller components.StyleSheet: For declaring styles used in the app.Text: For displaying text.TextInput: For creating a text field.View: The basic component for building the UI. Mostly used for wrapping content.Image: For displaying an image.ListView: For displaying a list.
Returning to the code, import the src/api.js file created earlier. This allows us to make network calls by calling the api method.
var api = require('./src/api.js');Create a new custom React component which will contain all the UI and application logic.
var Pokedex = React.createClass({
    ...
});
Inside the class we initialize the state. ‘State’ is React Native’s way of storing data that will be available throughout the whole component. The query is the text inputted by the user, hasResult indicates whether there’s a search result, noResult indicates whether there’s no search result. This is the opposite of hasResult but used for deciding whether to display the no results found
text or not. This is because when the app is initially loaded we do not want the user to see that text since they haven’t even started searching yet. result stores the current search result retrieved from the server, isLoading indicates whether the loader is showing, and dataSource contains the data source for a list view. This is done by creating a new instance of ListView.DataSource which accepts an object that contains a rowHasChanged function. This function tells the ListView to re-render a row when the data source has changed. In this case, the data source is the array of Pokemon type objects. You’ll see how this data is supplied by looking at the code for the search method.
getInitialState: function(){
  return {
    query: null,
    hasResult: false,
    noResult: false,
    result: null,
    isLoading: false,
    dataSource: new ListView.DataSource({
      rowHasChanged: (row1, row2) => row1 !== row2,
    })
  }
},
Next we’ll look at the render method. This is the method that renders the UI for us.
render: function() {
    ...
},
Inside the method we return the UI.
return (
  <View style={styles.container}>
    <View style={styles.search}>
      <TextInput
        style={styles.text_input}
        onChangeText={this.changeText}
        onSubmitEditing={this.search}
        placeholder="Type a pokemon name"
      />
    </View>

    {
      this.state.hasResult &&

      <View style={styles.result}>
        <View style={styles.main_details}>
          <Image source={{uri: this.state.result.small_photo}}
                 style={styles.image_dimensions} resizeMode={Image.resizeMode.contain} />
          <Text style={styles.main_text}>{this.state.result.name}</Text>

          <ListView contentContainerStyle={styles.types} dataSource={this.state.types} renderRow={this.renderType}></ListView>

          <View style={styles.description}>
            <Text style={styles.description_text}>{this.state.result.description}</Text>
          </View>
        </View>
      </View>

    }

    {
      this.state.noResult &&
      <View style={styles.no_result}>
        <Text style={styles.main_text}>Pokemon not found</Text>
        <Text style={styles.sub_text}>Please type the exact name</Text>
      </View>
    }

    {
      this.state.isLoading &&
      <View style={styles.loader}>
        <GiftedSpinner />
      </View>
    }
  </View>
);
Breaking down the code above. We have the main container.
<View style={styles.container}>
</View>Note: This is a requirement because there should be only one root component in which all other components are nested in. This has an attribute called style and the value is an object describing how this component is styled. Later we’ll take a look at how the styles object is declared. For now just remember that you should skip the double quotes when using objects as values.
Inside the main container is the component for inputting the name of the Pokemon. This has three attributes. onChangeText to specify a function executed every time the text inside the text field changes. onSubmitEditing to specify the function executed when the text field is submitted. And placeholder to specify the text which will appear if there’s currently no input.
<View style={styles.search}>
  <TextInput
    style={styles.text_input}
    onChangeText={this.changeText}
    onSubmitEditing={this.search}
    placeholder="Type a pokemon name"
  />
</View>
Next we have the component for displaying the search result. This has a slightly different syntax from the previous component because it’s wrapped inside curly braces and there’s a condition at the beginning. This tells React to only render this component if there’s a result stored in the state. Inside the component is an Image component displaying the photo of the Pokemon and below it a Text component displaying the name of the Pokemon. After the name is the ListView displaying the Pokemon type. Some Pokemon’s have more than one type that’s why we need a ListView to display it. Lastly we have another View component that displays the description.
{
  this.state.hasResult &&

  <View style={styles.result}>
    <View style={styles.main_details}>
      <Image source={{uri: this.state.result.small_photo}}
             style={styles.image_dimensions} resizeMode={Image.resizeMode.contain} />
      <Text style={styles.main_text}>{this.state.result.name}</Text>

      <ListView contentContainerStyle={styles.types} dataSource={this.state.types} renderRow={this.renderType}></ListView>

      <View style={styles.description}>
        <Text style={styles.description_text}>{this.state.result.description}</Text>
      </View>
    </View>
  </View>

}
Let’s dive into each of these components. The Image component accepts a source attribute which allows us to specify where the image is coming from. This can be a network image (from the internet), filesystem image or from the app resources. In this case we’re using a network image and the data is stored in the state. resizeMode specifies how to resize the image when the frame doesn’t match the raw image dimensions. Here we used contain as the value. This means that the image gets contained inside the frame while maintaining the aspect ratio.
<Image source={{uri: this.state.result.small_photo}}
             style={styles.image_dimensions} resizeMode={Image.resizeMode.contain} />
The Text component displays text. Every time you want to display text in React Native you always have to wrap it in a Text component.
<Text style={styles.main_text}>{this.state.result.name}</Text>The ListView component displays a list. One gotcha here is that it accepts the contentContainerStyle as opposed to the style attribute to specify the style. dataSource allows us to specify where the data used for rendering this list will be coming from, and renderRow allows us to specify the function to execute for rendering each list item.
<ListView contentContainerStyle={styles.types} dataSource={this.state.types} renderRow={this.renderType}></ListView>After displaying the search result we have the component to display if there are no results.
{
  this.state.noResult &&
  <View style={styles.no_result}>
    <Text style={styles.main_text}>Pokemon not found</Text>
    <Text style={styles.sub_text}>Please type the exact name</Text>
  </View>
}
Below that we have the loading indicator which uses the Gifted Spinner module to display a loading animation. This is displayed only when the isLoading property in the state is set to true. This state is set right before performing the network request and it’s set to false once a response comes back.
{
  this.state.isLoading &&
  <View style={styles.loader}>
    <GiftedSpinner />
  </View>
}
Next we add the method for rendering each list item. Earlier in the ListView declaration we specified this.renderType as the value for the renderRow attribute, this is that method.
renderType: function(type){

  return (
    <View style={[styles[type.name], styles.type]}>
      <Text style={styles.type_text}>{type.name}</Text>
    </View>
  );

},
If you check the code for the ListView you will see that nowhere in the renderRow attribute did we bind the type which we are trying to access below. This is because renderRow automatically passes it behind the scenes.
If you inspect the response returned from the server you can see that the types object contains an array of objects that represent each type:
[
    {
        "name":"electric",
        "resource_uri":"\/api\/v1\/type\/13\/"
    }
]
In the renderType method we have access to that object through the type argument. We’re using it to display the type name and it’s also used to control the style. Later in our style declaration we need to add a different style for each Pokemon type. If you noticed, we’re using two style declarations for the View component. The way we do that in React Native is to add each style declaration inside an array.
<View style={[styles[type.name], styles.type]}>
  <Text style={styles.type_text}>{type.name}</Text>
</View>
Next add the changeText method which gets executed every time the text in the text field changes. The actual text content is passed along to this method so it’s a good place to update the state property which stores the current user input.
changeText: function(text){
  this.setState({
    query: text
  });
},
Next add the search method which gets executed when the user submits the text field. When you type on a text field in Android there’s a done button on the keyboard. When you tap on that, the onSubmitEditing event gets triggered on the text field. Earlier we specified this.search as the value for the onSubmitEditing attribute so the method below gets executed when that happens.
search: function(){
  var pokemon = _.capitalize(this.state.query);

  this.setState({
    isLoading: true
  });

  api(pokemon).then(
    (data) => {

      var speech = 'Pokemon was not found. Please type the exact name.';

      if(data.doc){
        var types = this.state.dataSource.cloneWithRows(data.doc.types);

        this.setState({
          hasResult: true,
          noResult: false,
          result: data.doc,
          types: types,
          isLoading: false
        });

        var type_names = _.map(data.doc.types, function(type){
           return type.name;
        });

        speech = data.doc.name + ". A " + type_names.join(' and ') + ' pokemon. ' + data.doc.description;

      }else{

        this.setState({
          hasResult: false,
          noResult: true,
          isLoading: false,
          result: null
        });

      }

      tts.speak({
        text: speech,
        forceStop : true ,
        language : 'en'
      });

    }
  );

}
Breaking down the code above. We call the capitalize method provided by Lodash to convert all characters of the string to lowercase and the first character should be uppercase. Then we update the state, setting the isLoading property to true. This shows the loading indicator just below the last component.
var pokemon = _.capitalize(this.state.query);

this.setState({
  isLoading: true
});
Perform the network request via the api module.
api(pokemon).then(
  (data) => {
    ...
  }
);Note: The syntax of the callback function is slightly different from what we are used to, but is pretty much the same as:
api(pokemon).then(function(data){
  ...
});
The one distinct difference aside from the syntax is the value of the this object. In the newer syntax, this refers to the outer scope and not the callback function. This allows us to use the this object to update the state from inside the callback function without having to create a variable which stores the current scope.
Inside the callback function we set the default text used for the speech.
var speech = 'Pokemon was not found. Please type the exact name.';If the doc object is present on the result we first extract the types array and pass it as an argument to the cloneWithRows method in the dataSource initialized earlier in the state. This returns an object which can be used as the value for the dataSource attribute in the <ListView>.
Next we update the state so that the result is rendered in the UI. Once that’s done, create a new array named type_names which contains only the names of each type the Pokemon has. This is done via the map method provided by Lodash. From there we construct the text to convert to speech, the name of the Pokemon, its types and its description.
if(data.doc){
  //create the list view data source
  var types = this.state.dataSource.cloneWithRows(data.doc.types);

  //update the state
  this.setState({
    hasResult: true,
    noResult: false,
    result: data.doc,
    types: types,
    isLoading: false
  });

  //create an array containing the type names
  var type_names = _.map(data.doc.types, function(type){
     return type.name;
  });

  //construct the text to be used for the speech
  speech = data.doc.name + ". A " + type_names.join(' and ') + ' pokemon. ' + data.doc.description;
}
Otherwise, we set all the necessary values in the state. Particularly we need to set hasResult to false so that the result component won’t be displayed, noResult to true so that it will show the no results found
text, isLoading to false to hide the loading indicator and result to null to clear the previous result.
...
else{

  this.setState({
    hasResult: false,
    noResult: true,
    isLoading: false,
    result: null
  });
}
Right below the conditions, use the Android speech module to convert the text to speech.
if(data.doc){
    ...
}else{
    ...
}

tts.speak({
  text: speech,
  forceStop : true ,
  language : 'en'
});
Next add the styles via the StyleSheet API, add this after the closing braces of the Pokodex class.
var styles = StyleSheet.create({
  container: {
    flex: 1,
    backgroundColor: '#FFF'
  },
  search: {
    flex: 1
  },
  result: {
    flex: 8
  },
  no_result: {
    flex: 8,
    alignItems: 'center'
  },
  loader: {
    flex: 1,
    alignItems: 'center'
  },
  main_details: {
    padding: 30,
    alignItems: 'center'
  },
  image_dimensions: {
    width: 100,
    height: 100
  },
  main_text: {
    fontSize: 25,
    fontWeight: 'bold',
    textAlign: 'center'
  },
  sub_text: {
    color: '#6e6e6e'
  },
  description: {
    marginTop: 20
  },
  text_input: {
    height: 40,
    borderColor: 'gray',
    borderWidth: 1
  },
  types: {
    flexDirection: 'row',
    marginTop: 20
  },
  type: {
    padding: 5,
    width: 100,
    alignItems: 'center'
  },
  type_text: {
    color: '#fff',
  },
  normal: {
    backgroundColor: '#8a8a59'
  },
  fire: {
    backgroundColor: '#f08030'
  },
  water: {
    backgroundColor: '#6890f0'
  },
  electric: {
    backgroundColor: '#f8d030'
  },
  grass: {
    backgroundColor: '#78c850'
  },
  ice: {
    backgroundColor: '#98d8d8'
  },
  fighting: {
    backgroundColor: '#c03028'
  },
  poison: {
    backgroundColor: '#a040a0'
  },
  ground: {
    backgroundColor: '#e0c068'
  },
  flying: {
    backgroundColor: '#a890f0'
  },
  psychic: {
    backgroundColor: '#f85888'
  },
  bug: {
    backgroundColor: '#a8b820'
  },
  rock: {
    backgroundColor: '#b8a038'
  },
  ghost: {
    backgroundColor: '#705898'
  },
  dragon: {
    backgroundColor: '#7038f8'
  },
  dark: {
    backgroundColor: '#705848'
  },
  steel: {
    backgroundColor: '#b8b8d0'
  },
  fairy: {
    backgroundColor: '#e898e8'
  }
});
Breaking down the code above. We have the main container, where we set flex to 1 as we’re using Flexbox for layout. The value 1 means that it will consume the entire screen. This is because we have attached this style to the root component. There are no other components at the same level so it’s going to consume the entire screen.
container: {
  flex: 1,
  backgroundColor: '#FFF'
},
Next we have the styles for the search, result, no result and loader:
search: {
  flex: 1
},
result: {
  flex: 8
},
no_result: {
  flex: 8,
  alignItems: 'center'
},
loader: {
  flex: 1,
  alignItems: 'center'
},
Since they are all siblings, they share the available space. The root component consumes the entire screen so its children will also share the entire screen. Think in terms of fractions. The search and loader components are flex: 1 so they consume the least space. As a fraction they consume 1/10th of the screen since there’s a total of 10 sections visible at a time: 1 for search, 8 for result or no result, and 1 for the loader.
<View style={styles.search}>
    ...
</View>

<View style={styles.result}>
    ...
</View>

<View style={styles.no_result}>
    ...
</View>

<View style={styles.loader}>
    ...
</View>
The main details serves as the container for the photo, name, type and description of the Pokemon. We want all aligned center but we also need to place some padding around so that the text wouldn’t be too close to the edges of the screen.
main_details: {
  padding: 30,
  alignItems: 'center'
},
Next are some style declarations which are just standard CSS.
image_dimensions: {
  width: 100,
  height: 100
},
main_text: {
  fontSize: 25,
  fontWeight: 'bold',
  textAlign: 'center'
},
sub_text: {
  color: '#6e6e6e'
},
description: {
  marginTop: 20
},
Next are the styles for the list of types. The ListView is set to have row for the flexDirection. This means that the space allotted to it will have its sections divided using rows. This allows us to achieve a float like
or inline effect. This means that each list item will be rendered next to each other. For each list item we specify a width so that the width will be uniform no matter the length of the text contained inside. A padding of 5 is given so that the text won’t be too close to the edges of the type container. alignItems is used to align the text to the center.
types: {
  flexDirection: 'row',
  marginTop: 20
},
type: {
  padding: 5,
  width: 100,
  alignItems: 'center',
},
type_text: {
  color: '#fff',
},
Now we have the styles for each Pokemon type. For example, if the Pokemon is an electric type it would display a yellowish background color for the type container.
normal: {
  backgroundColor: '#8a8a59'
},
fire: {
  backgroundColor: '#f08030'
},
water: {
  backgroundColor: '#6890f0'
},
electric: {
  backgroundColor: '#f8d030'
},
grass: {
  backgroundColor: '#78c850'
},
ice: {
  backgroundColor: '#98d8d8'
},
fighting: {
  backgroundColor: '#c03028'
},
poison: {
  backgroundColor: '#a040a0'
},
ground: {
  backgroundColor: '#e0c068'
},
flying: {
  backgroundColor: '#a890f0'
},
psychic: {
  backgroundColor: '#f85888'
},
bug: {
  backgroundColor: '#a8b820'
},
rock: {
  backgroundColor: '#b8a038'
},
ghost: {
  backgroundColor: '#705898'
},
dragon: {
  backgroundColor: '#7038f8'
},
dark: {
  backgroundColor: '#705848'
},
steel: {
  backgroundColor: '#b8b8d0'
},
fairy: {
  backgroundColor: '#e898e8'
}
Register the component to the AppRegistry. This tells React Native to render the component named Pokedex when the app opens.
AppRegistry.registerComponent('Pokedex', () => Pokedex);Running the App
Make sure your PHP backend is running and then execute react-native run-android to compile the app and run it on a device or in the emulator. You will get an error at this point:
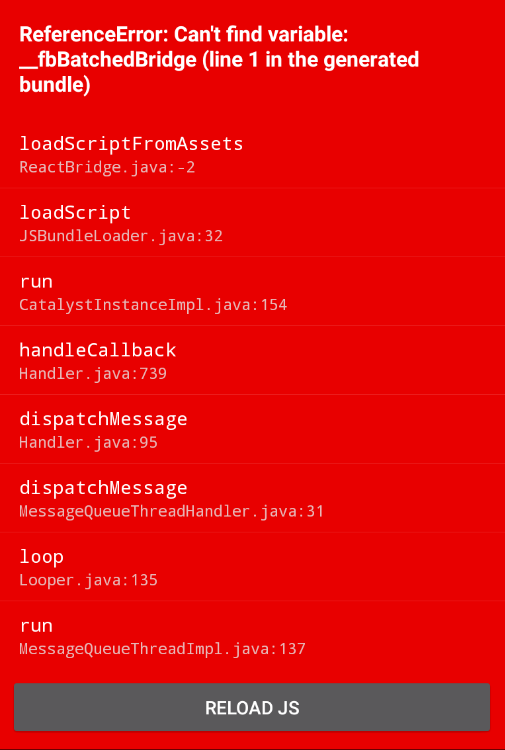
That is because the React server has to run first. The React server converts components on the fly. When you make a change to any of your source files (e.g. index.android.js) it will automatically re-compile. Execute react-native start from the terminal to run the React server. Here’s a sample output when you run it:
[7:38:33 AM] <START> Building Dependency Graph
[7:38:33 AM] <START> Crawling File System
[7:38:33 AM] <START> Loading bundles layout
[7:38:33 AM] <END> Loading bundles layout (1ms)
React packager ready.
[7:38:46 AM] <END> Crawling File System (13516ms)
[7:38:46 AM] <START> Building in-memory fs for JavaScript
[7:38:52 AM] <END> Building in-memory fs for JavaScript (6200ms)
[7:38:52 AM] <START> Building in-memory fs for Assets
[7:38:59 AM] <END> Building in-memory fs for Assets (6048ms)
[7:38:59 AM] <START> Building Haste Map
[7:39:03 AM] <START> Building (deprecated) Asset Map
[7:39:05 AM] <END> Building (deprecated) Asset Map (2191ms)
[7:39:08 AM] <END> Building Haste Map (9348ms)
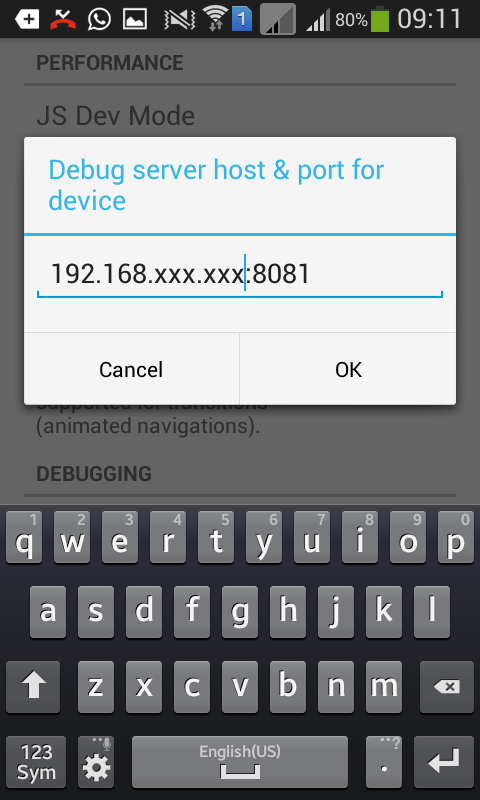
[7:39:08 AM] <END> Building Dependency Graph (35135ms)When the Building Dependency Graph is complete, open a new terminal window and execute adb shell input keyevent 82 to open the developer menu in the device. Select dev settings from the menu that pops up, then under the debugging section, input the internal IP address of your computer followed by the port in which the React server is running.
Once complete, return to the main app screen and open the developer menu again and select Reload JS to reload the app. At this point the app should now work.
Common Problems
In this section I’ll cover some common problems.
Running the React Server
If you get an error when running the React server it’s commonly because of Watchman. Here’s an example error:
Error building DependencyGraph:
 Error: Watcher took too long to load
Try running `watchman version` from your terminal
https://facebook.github.io/watchman/docs/troubleshooting.html
    at [object Object]._onTimeout (index.js:103:16)
    at Timer.listOnTimeout (timers.js:89:15)
To fix, execute the following:
sudo sysctl fs.inotify.max_user_instances=99999
sudo sysctl fs.inotify.max_user_watches=99999
sudo sysctl fs.inotify.max_queued_events=99999

watchman shutdown-server
If that doesn’t work, try the following:
echo 999999 | sudo tee -a /proc/sys/fs/inotify/max_user_instances
echo 999999 | sudo tee -a /proc/sys/fs/inotify/max_user_watches
echo 999999 | sudo tee -a /proc/sys/fs/inotify/max_queued_events

watchman shutdown-server
What the commands above do is to set how many different root directories can be watched, how many directories in each root directory can be watched, and how many events can be queued. The last line just shuts down the watchman server so the changes will take effect.
App Problems
Once you get the React server to run, another problem you may encounter is that the app still won’t run after the React server starts. This happens for two reasons:
- When the Android device and the computer are not on the same network.
- The IP address that inputted in the device does not match the IP address of the computer.
All you have to do is verify that those aren’t the case and you should be good to go.
Debugging and Live Reload
Once you get the app running on your device, you can now enable some of the goodies like debugging in Chrome and live reload. You can do that by opening the developer menu and tapping on Debug in Chrome and Enable Live Reload. This allows you to see outputs from console.log and view errors through the console tab in Chrome. Live reload reloads the app when you make changes to the source files.
Where to Go from Here
Now that you’ve created your first React Native app, what’s next? Here are some recommendations:
- Check out the React Native Documentation and learn about the other components and APIs that you can use.
- Improve the app by dividing it into smaller components and then importing them in index.android.js.
- Generate a release copy of the app.
- Check out the Reapp UI Kit.
Conclusion
In this article you have learned how to use React Native to build a simple Pokedex app. We have covered the basic concepts such as creating a component, stylesheets, performing network requests and using third-party libraries. If you’re having problems getting the code to work, I encourage you to check out the Github repo in which I uploaded the full source code for this project.
If you have any comments or questions please let me know in the comments below.
Frequently Asked Questions (FAQs) about Building Android Apps with React Native
What are the prerequisites for building an Android app with React Native?
Before you start building an Android app with React Native, you need to have some basic knowledge of JavaScript, as React Native is a JavaScript framework. You also need to have Node.js, a JavaScript runtime, installed on your computer. Additionally, you need to install the React Native command line interface (CLI) on your computer. You also need to have Android Studio installed, as it provides the necessary tools to build an Android app.
How do I set up my environment for React Native?
Setting up your environment for React Native involves several steps. First, you need to install Node.js and the React Native CLI on your computer. Then, you need to install Android Studio, which provides the necessary tools to build an Android app. You also need to set up a virtual device for testing your app. Finally, you need to create a new React Native project using the CLI.
How do I build my React Native app from source?
Building your React Native app from source involves several steps. First, you need to clone the repository of your app. Then, you need to install the dependencies of your app using the npm install command. After that, you can build your app using the react-native run-android command. This command builds your app and starts it on your connected device or emulator.
How can I improve the build speed of my React Native app?
There are several ways to improve the build speed of your React Native app. One way is to use a faster computer. Another way is to use a faster network connection. You can also improve the build speed by optimizing your code. This involves removing unnecessary code, reducing the size of your images, and using fewer libraries.
How do I use the PokeAPI in my React Native app?
Using the PokeAPI in your React Native app involves several steps. First, you need to install the axios library, which allows you to make HTTP requests from your app. Then, you need to use the axios.get method to make a request to the PokeAPI. The response from the PokeAPI is a promise, which you can handle using the then method.
How do I handle errors in my React Native app?
Handling errors in your React Native app involves using the catch method. The catch method is called when a promise is rejected. In the catch method, you can handle the error and display an appropriate message to the user.
How do I test my React Native app?
Testing your React Native app involves using a testing framework like Jest. Jest is a JavaScript testing framework that allows you to write tests for your app. You can write tests for your components, your functions, and your entire app.
How do I debug my React Native app?
Debugging your React Native app involves using the developer tools provided by React Native. These tools allow you to inspect your app, view the console logs, and debug your JavaScript code. You can also use third-party tools like Reactotron for debugging.
How do I deploy my React Native app?
Deploying your React Native app involves several steps. First, you need to build a release version of your app using the react-native run-android –variant=release command. Then, you need to sign your app using the Android Studio. Finally, you can upload your app to the Google Play Store.
How do I update my React Native app?
Updating your React Native app involves several steps. First, you need to update the version number of your app in the package.json file. Then, you need to update the dependencies of your app using the npm update command. After that, you can build a new version of your app and upload it to the Google Play Store.
Wern is a web developer from the Philippines. He loves building things for the web and sharing the things he has learned by writing in his blog. When he's not coding or learning something new, he enjoys watching anime and playing video games.