Easily Add Social Logins to Your App with Socialite


This article was peer reviewed by Wern Ancheta. Thanks to all of SitePoint’s peer reviewers for making SitePoint content the best it can be!
Laravel Socialite is a package developed to abstract away any social authentication complexities and boilerplate code into a fluent and expressive interface.

Socialite only supports Google, Facebook, Twitter, LinkedIn, Github, and Bitbucket as OAuth providers. They won’t be adding any others to the list, however, there’s a community-driven collection called Socialite Providers, which contains plenty of unofficial providers for Socialite. More on this in the next section.
I’ll assume you already have a fresh Laravel application instance up and running on your machine, so you can see the code in action along the way. If you need a good development environment, you’re free to use Homestead Improved.
Key Takeaways
- Laravel Socialite simplifies the integration of social logins into your app, abstracting complex authentication details.
- Socialite supports major OAuth providers like Google, Facebook, and GitHub, with additional providers available through the Socialite Providers community project.
- Configuration involves registering your app with each social platform to obtain necessary credentials and updating your Laravel app’s `config/services.php`.
- Database schema modifications are necessary to accommodate social login data, such as making email and password fields nullable.
- Socialite’s functionality is extended through custom providers if the needed social platform is not supported out of the box.
- The tutorial provides a comprehensive example of adding GitHub social login, including handling OAuth callbacks and updating user authentication states.
Form Based Authentication
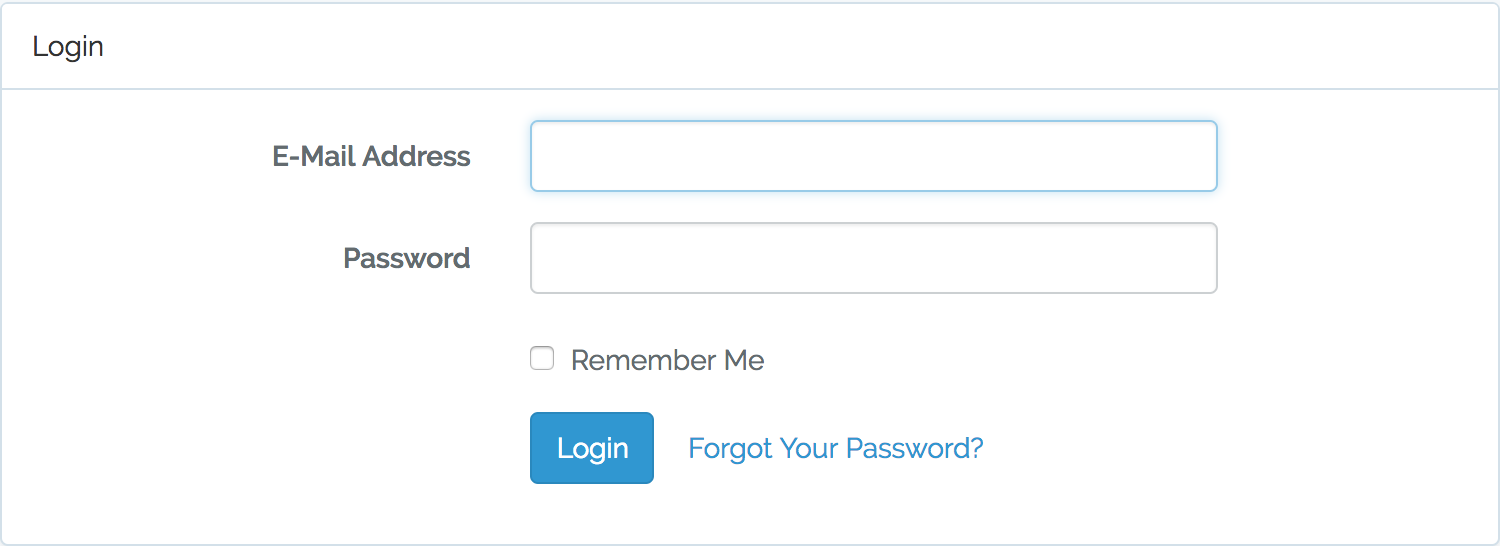
Before getting into OAuth authentication, let’s set up Laravel’s standard form based authentication. To do this, we run the make:auth artisan command, which installs all the necessary views as well as the required authentication endpoints.
php artisan make:auth
Note We also need to run
php artisan migrateto make sure theuserstable is created.
Now, if we head over to /login, we should see a nice Bootstrap-styled login page that works.
Adding Social Authentication
To get started with Socialite, we install it with Composer:
composer require laravel/socialite
Once installed, Socialite’s service provider and facade should be registered in config/app.php – just like with any other Laravel package.
config/app.php
<?php

// ...

'providers' => [

        // ...

        /*
         * Package Service Providers...
         */
        Laravel\Socialite\SocialiteServiceProvider::class,

    ],

// ...
And here’s the facade alias:
<?php

// ...
'aliases' => [

        // ...

        'Socialite' => Laravel\Socialite\Facades\Socialite::class,

    ],
// ...
Socialite is registered as a lazy-loaded singleton service inside the service container.
Configuration
To use any provider, we need to register an OAuth application on that provider platform. In return, we’ll be given a pair of client ID and client secret keys as our credentials for interacting with the provider’s API.
We need to add the credentials in config/services.php for each provider:
// ...

'facebook' => [
        'client_id'     => env('FB_CLIENT_ID'),
        'client_secret' => env('FB_CLIENT_SECRET'),
        'redirect'      => env('FB_URL'),
],

'twitter' => [
        'client_id'     => env('TWITTER_CLIENT_ID'),
        'client_secret' => env('TWITTER_CLIENT_SECRET'),
        'redirect'      => env('TWITTER_URL'),
],

'github' => [
        'client_id'     => env('GITHUB_CLIENT_ID'),
        'client_secret' => env('GITHUB_CLIENT_SECRET'),
        'redirect'      => env('GITHUB_URL'),
],

// ...
The actual key values are put into the .env file in the project’s root directory.
Database Considerations
Since the users table structure hasn’t been designed to integrate social authentications, we first need to do a few tweaks there.
Usually, when users take the social authentication approach, they don’t have to choose a password unless we ask them to do so (after OAuth authorization – please don’t do that). Apart from that, the user may not have an email address associated with the respective OAuth provider. Hence, we need to make email and password fields nullable.
To modify the schema, we use Laravel’s schema builder. Before modifying the fields in the existing tables, we need to have doctrine/dbal package installed.
composer require doctrine/dbal
Let’s start with users:
php artisan make:migration prepare_users_table_for_social_authentication --table users
Now, we make email and password fields nullable:
File:
database/migrations/xxxxxx_prepare_users_table_for_social_authentication.php
<?php

// ...

/**
     * Run the migrations.
     *
     * @return void
     */
    public function up()
    {
        Schema::table('users', function (Blueprint $table) {

        // Making email and password nullable
            $table->string('email')->nullable()->change();
            $table->string('password')->nullable()->change();

        });
    }

    /**
     * Reverse the migrations.
     *
     * @return void
     */
    public function down()
    {
        Schema::table('users', function (Blueprint $table) {

            $table->string('email')->nullable(false)->change();
            $table->string('password')->nullable(false)->change();

        });
    }

// ...
For storing a user’s linked social accounts, we create the model and its migration file together:
php artisan make:model LinkedSocialAccount --migration
File:
database/migrations/xxxxxx_create_linked_social_accounts_table.php
<?php

// ...

public function up()
    {
        Schema::create('linked_social_accounts', function (Blueprint $table) {

            $table->increments('id');
            $table->bigInteger('user_id');
            $table->string('provider_name')->nullable();
            $table->string('provider_id')->unique()->nullable();
            $table->timestamps();

        });
    }

    /**
     * Reverse the migrations.
     *
     * @return void
     */
    public function down()
    {
        Schema::dropIfExists('linked_social_accounts');
    }

// ...
provider_name is the name of the provider while provider_id is the user’s ID on the provider platform.
To apply the changes, we run migrate:
php artisan migrate
The Models
Each user can have many linked social accounts, which implies a one-to-many relationship between User and LinkedSocialAccounts. To define this relationship, we add the following method to the User model:
File:
app/User.php
 // ...

public function accounts(){
    return $this->hasMany('App\LinkedSocialAccount');
}

 // ...
Let’s add the inverse of this relationship in LinkedSocialAccount model as well:
File: app/LinkedSocialAccounts.php
<?php
// ...

public function user()
{
    return $this->belongsTo('App\User');
}

// ...
Additionally, we make provider_name and provider_id mass assignable, by adding them to the $fillable array in LinkedSocialAccounts.
File:
app/LinkedSocialAccounts.php
<?php

// ...

protected $fillable = ['provider_name', 'provider_id' ];

public function user()
{
    return $this->belongsTo('App\User');
}
This allows us to use the create() method when associating a social account with the user.
Controllers
Now, we create the controller under the Auth namespace. We need two actions in our controller class, one for redirecting the user to the OAuth provider and another for receiving the callback from the provider.
php artisan make:controller 'Auth\SocialAccountController'
We edit the controller class and end up with something like this:
File:
app/Http/Controllers/Auth/SocialAccountController.php
<?php

    /**
     * Redirect the user to the GitHub authentication page.
     *
     * @return Response
     */
    public function redirectToProvider($provider)
    {
        return \Socialite::driver($provider)->redirect();
    }

    /**
     * Obtain the user information
     *
     * @return Response
     */
    public function handleProviderCallback(\App\SocialAccountsService $accountService, $provider)
    {

        try {
            $user = \Socialite::with($provider)->user();
        } catch (\Exception $e) {
            return redirect('/login');
        }

        $authUser = $accountService->findOrCreate(
            $user,
            $provider
        );

        auth()->login($authUser, true);

        return redirect()->to('/home');
    }
}
In the preceding code, redirectToProvider() redirects the user to the respective authorization endpoint – by calling the provider’s redirect() method.
<?php
// ...
 return Socialite::driver($provider)->redirect();
// ...
We can also change the default scopes using scopes(), before calling redirect():
<?php
// ...
 return Socialite::driver($provider)->scopes(['users:email'])->redirect();
// ...
Since the behavior of OAuth providers isn’t predictable at all times, we use a try/catch block to take care of unexpected situations. If everything goes as expected without an exception, the user object (an instance of Laravel\Socialite\Contracts\User) is retrieved from the provider. This object exposes a few getter methods for retrieving the user’s information – including name, email, access token, etc. You can find the available methods in the documentation.
Next, we retrieve the local user object (residing in our users table) or create one if it doesn’t exist yet. To do this, we call findOrCreate() from a helper class called SocialAccountsService (this class is injected as an argument into handleProviderCallback() method).
After retrieving the user object, we log the user in, redirecting them to the dashboard page.
Now, let’s create our helper class SocialAccountService.php.
Under the App namespace, create a file with the following code:
File:
app/SocialAccountService.php
<?php

namespace App;

use Laravel\Socialite\Contracts\User as ProviderUser;

class SocialAccountService
{
    public function findOrCreate(ProviderUser $providerUser, $provider)
    {
        $account = LinkedSocialAccount::where('provider_name', $provider)
                   ->where('provider_id', $providerUser->getId())
                   ->first();

        if ($account) {
            return $account->user;
        } else {

        $user = User::where('email', $providerUser->getEmail())->first();

        if (! $user) {
            $user = User::create([
                'email' => $providerUser->getEmail(),
                'name'  => $providerUser->getName(),
            ]);
        }

        $user->accounts()->create([
            'provider_id'   => $providerUser->getId(),
            'provider_name' => $provider,
        ]);

        return $user;

        }
    }
}
This class has only one job and one method for creating or obtaining a local user and associating a social account with it.
In findOrCreate, we first query the linked_social_accounts table to see if there’s any social account registered with the current provider ID. If so, we return the local user object to which this social account belongs:
<?php
// ...

if ($account) {
   return $account->user;
}

// ...
If no social account is found, either the user does not exist or the user hasn’t linked any social accounts yet. With that in mind, we search the users table by email, because the user may have registered into our system via the registration form. If no user is found, we create a new user entry and associate the current social account with it.
Routes
We need two routes for our social authentication feature:
File:
routes/web.php
<?php

// ...

Route::get('login/{provider}',          'Auth\SocialAccountController@redirectToProvider');
Route::get('login/{provider}/callback', 'Auth\SocialAccountController@handleProviderCallback');
In the above routes, provider is specified as a route parameter. This allows us to reuse these two routes for other providers as well.
Example: Authentication via Github
To test out what we’ve built, let’s add Github as our social authentication (login) option.
First, we need to register a new OAuth application on Github.
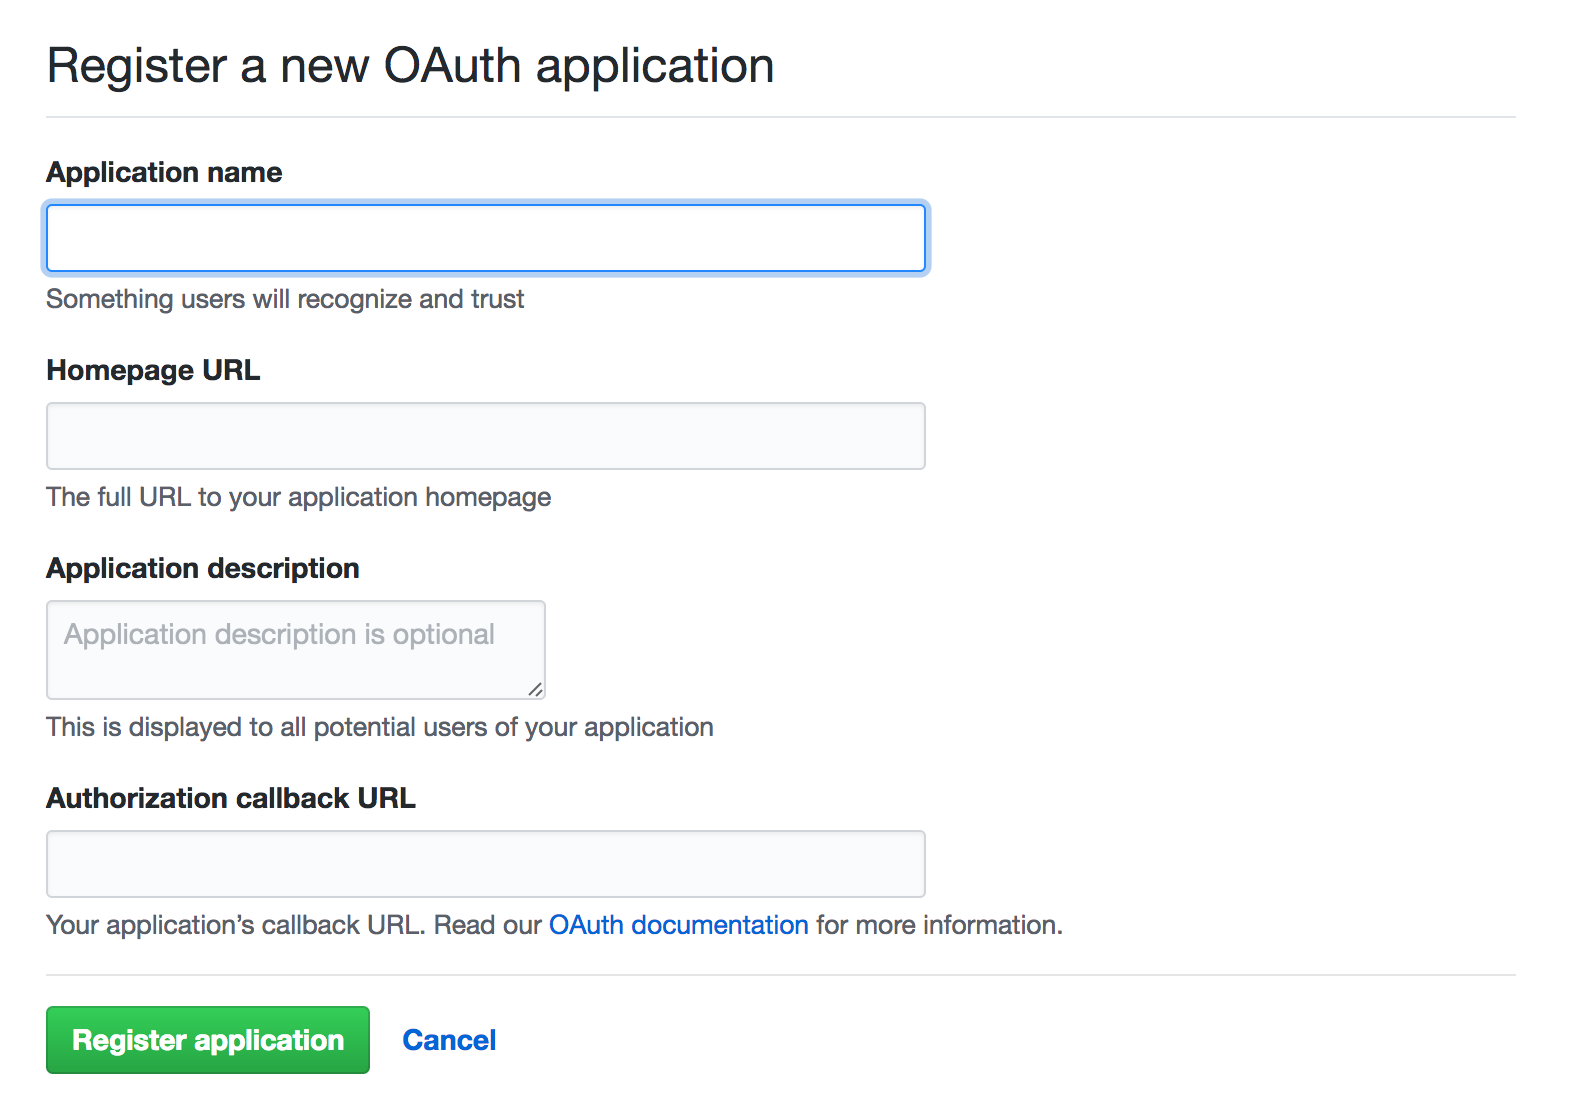
On the app creation page, there are a few fields we need to fill:
-
Application Name should be a descriptive name for our application. This is what the users will see when redirected to Github to authorize our application.
-
Homepage URL is our website’s URL. It can be
http://localhost:8000or any other valid domain. -
Authorization Callback URL is an endpoint on our website to which the user is redirected after the authorization is completed.
After creating the application, we’re redirected to the edit page where we can find (and copy) our keys.

Configuration
In this step, we add our Github credentials to config/services.php:
File:
config/services.php
<?php

// ...

'github' => [
        'client_id'     => env('GITHUB_CLIENT_ID'),
        'client_secret' => env('GITHUB_CLIENT_SECRET'),
        'redirect'      => env('GITHUB_URL'),
],

// ...
Although we can directly put the credentials and the callback URL inside config/services.php, we keep them in our application’s .env file (and automatically load them from services.php file using getenv()). This is useful when we want to change the values in our production environment without touching the code.
File:
.env
GITHUB_CLIENT_ID=API Key
GITHUB_CLIENT_SECRET=API secret
GITHUB_URL=callbackurl
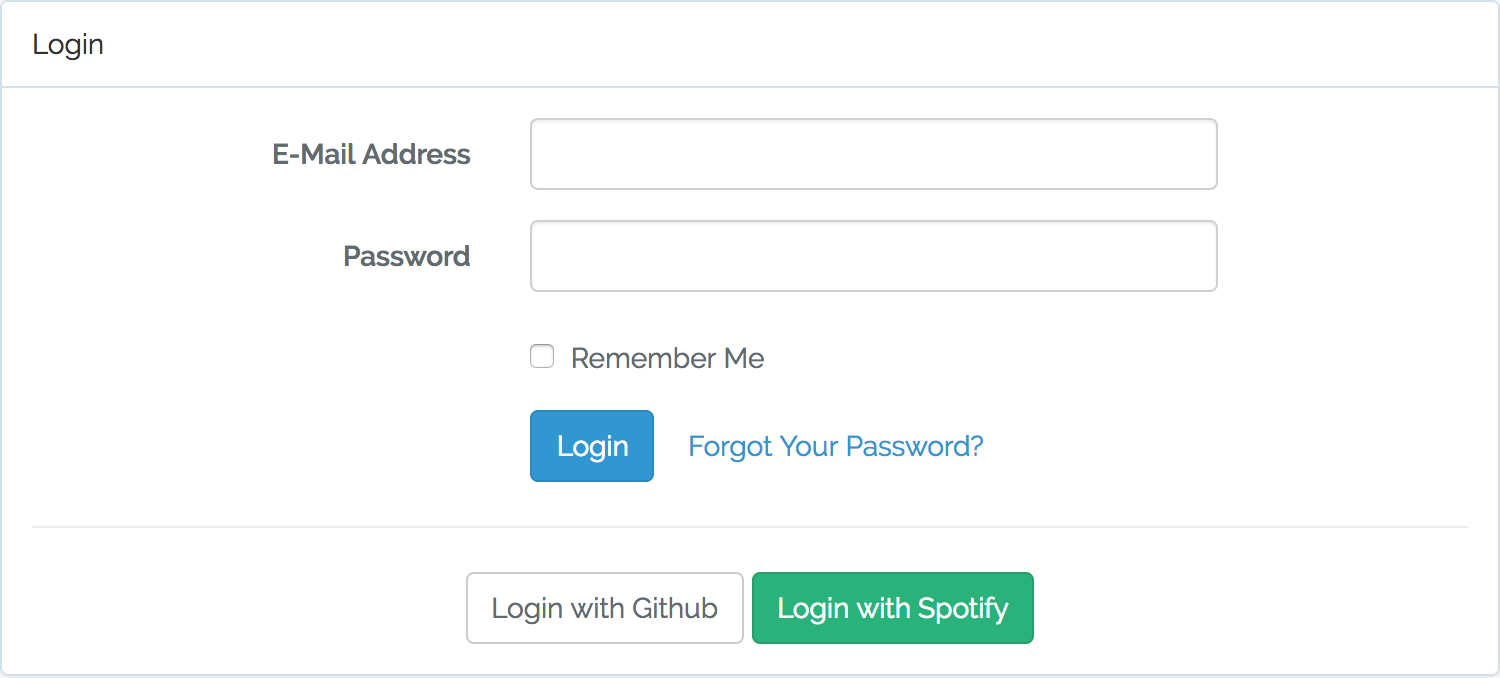
Adding the Github Link to the Login Page
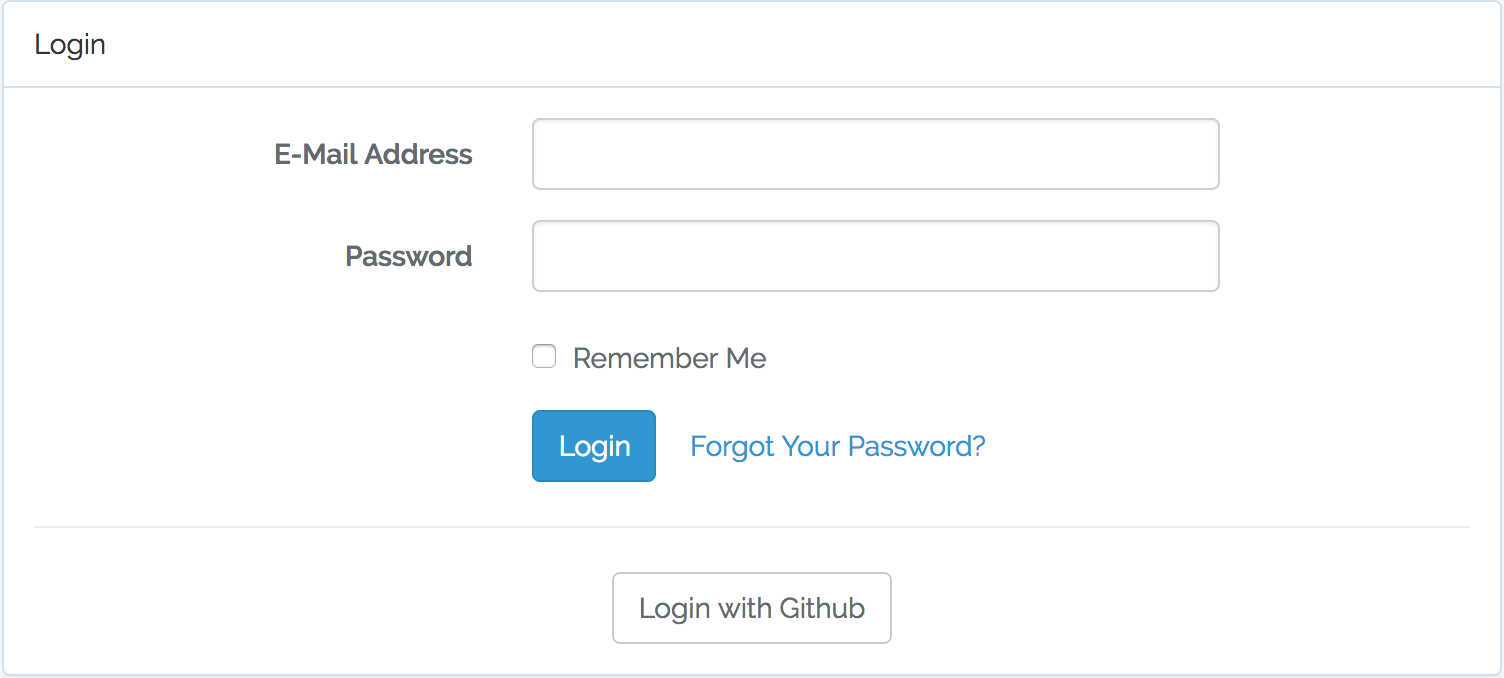
The last piece of the puzzle is adding the Github link to the login page. Open resources/views/auth/login.blade.php and put the following code in the proper place.
File:
resources/views/auth/login.blade.php
<!-- Login page HTML code  -->

<a href="/login/github"  class="btn btn-default btn-md">Log in with Github</a>

<!-- Login page HTML code  -->
It should look like this:
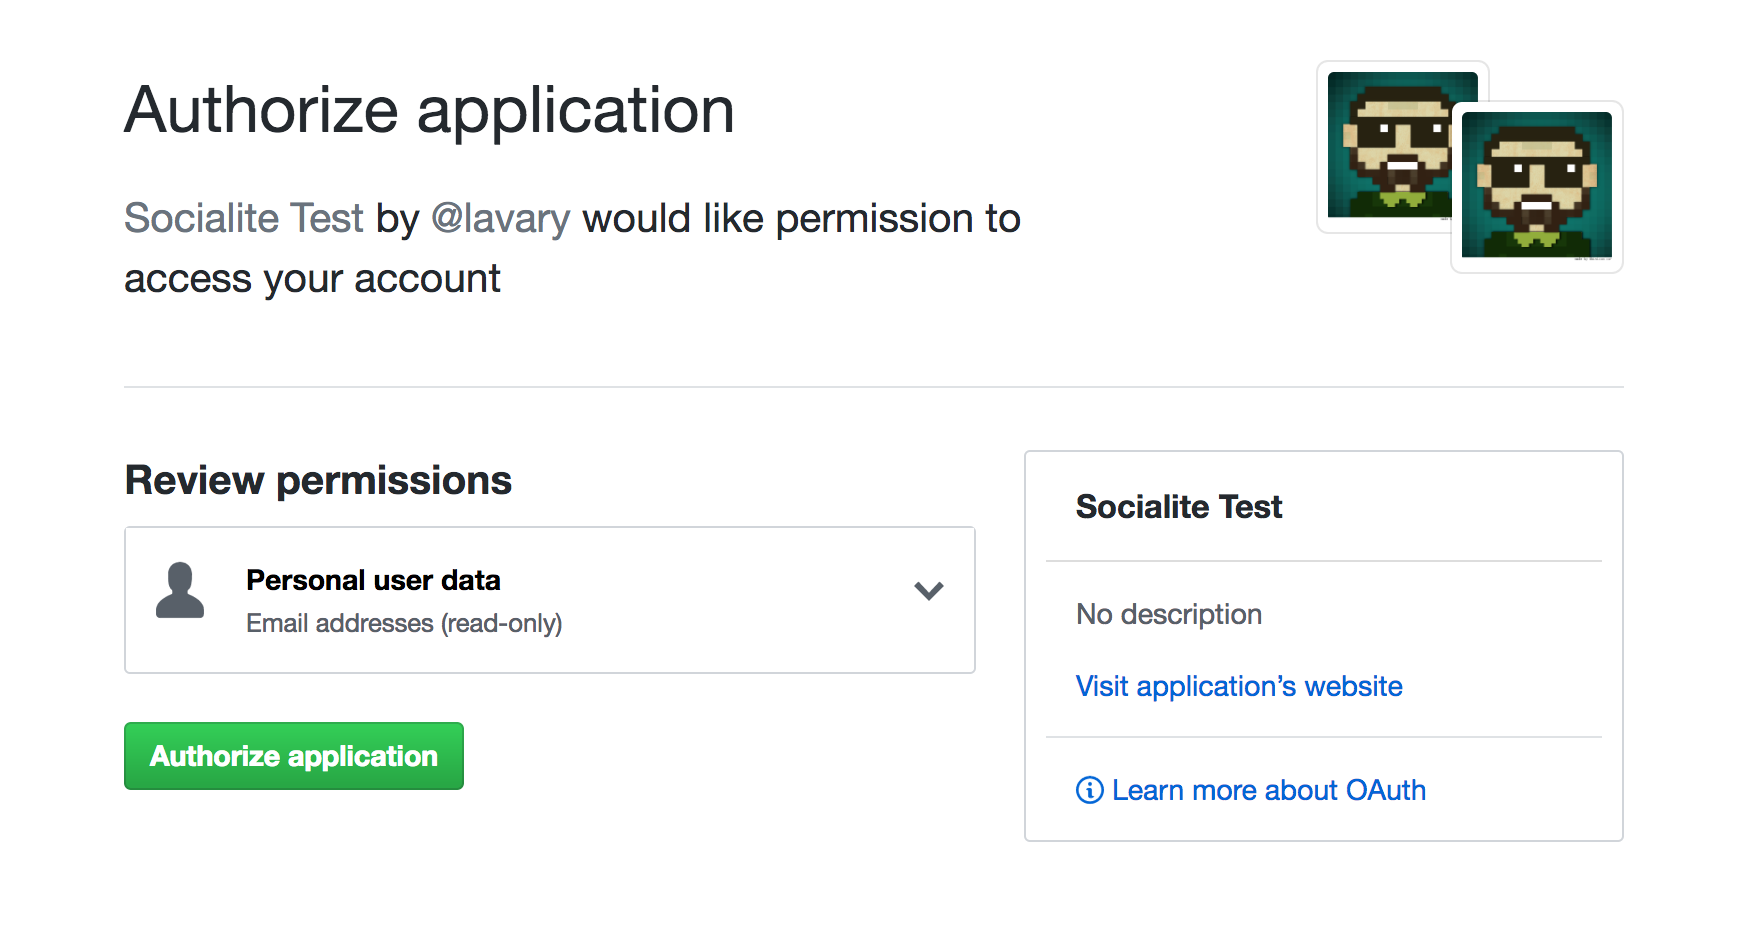
If we click on Log in with Github, we’ll be sent to Github’s authorization page:
Socialite Providers Project
Socialite Providers is a community-driven project providing plenty of unofficial providers for Socialite. Each provider is installed as an independent package (via Composer).
Providers use the Manager package, developed as part of the Socialite Providers project and installed with each provider as a dependency, to register themselves as Socialite providers.
The Manager package comes with a Laravel service provider, which extends Socialite’s default service provider. To use the providers in the SP collection, we need to replace this service provider with Socialite’s:
File: config/app.php
        // ...

        SocialiteProviders\Manager\ServiceProvider:class,

        // ...
Note: service providers and socialite providers are two different concepts with similar names and should not be confused with each other. A service provider is a class for registering a service inside Laravel’s service container, while Socialite providers (or simply providers) are classes for interacting with different OAuth providers.
Each provider from the collection comes with an event listener, which needs to be added to the app/Provider/EventServiceProvider class, to listen to the SocialiteWasCalled event.
Whenever Socialite is accessed, the SocialiteWasCalled event is triggered. Consequently, all providers listening to this event will register themselves with Socialite (implementing the observer pattern).
File:
app/Providers/EventServiceProvider.php
<?php

// ...

protected $listen = [
    \SocialiteProviders\Manager\SocialiteWasCalled::class => [
        'SocialiteProviders\Deezer\DeezerExtendSocialite@handle',
    ],
];
The above example registers a provider for authenticating via Deezer.
Note: Standard Socialite providers can still be used unless we override them with a provider of the same name.
Example: Authentication via Spotify
As an example, let’s add Spotify as a login option.
First, we head over to Socialite Providers to find the provider for Spotify – in the left sidebar.
Each provider has its own manual for installation and usage. To install the provider for Spotify, we use Composer:
composer install socialproviders/spotify
Configuration
Again, we need to register an app on Spotify’s developer platform to obtain our credentials. Once we get the keys, we add them to our settings.
The Manager package makes it super easy to configure settings for new providers. Unlike the standard providers, we don’t have to add an entry in config/services.php per provider. Instead, we only add the settings to our application’s .env file – thanks to the Manager’s Config Retriever helper class.
The settings should be called CLIENT_ID, CLIENT_SECRET, and REDIRECT_URL, prefixed with their provider name:
File:
.env
SPOTIFY_CLIENT_ID = YOUR_CLIENT_ID_ON_SPOTIFY
SPOTIFY_CLIENT_SECRET = YOUR_CLIENT_SECRET_ON_SPOTIFY
SPOTIFY_REDIRECT_URL = YOUR_CALL_BACK_URL
The View
Next, we add the Log in with Spotify link to the login page:
File:
resources/views/auth/login.blade.php
<!-- Login page HTML code  -->

<a href="/login/spotify"  class="btn btn-default btn-md">Log in with Spotify</a>

<!-- Login page HTML code  -->
The login page should now look like this:
We can reuse the routes we defined in the previous example (authentication via Github) or create new routes with new controllers and logic.
By clicking on Login with Spotify, we’ll be redirected to Spotify’s authorization page:
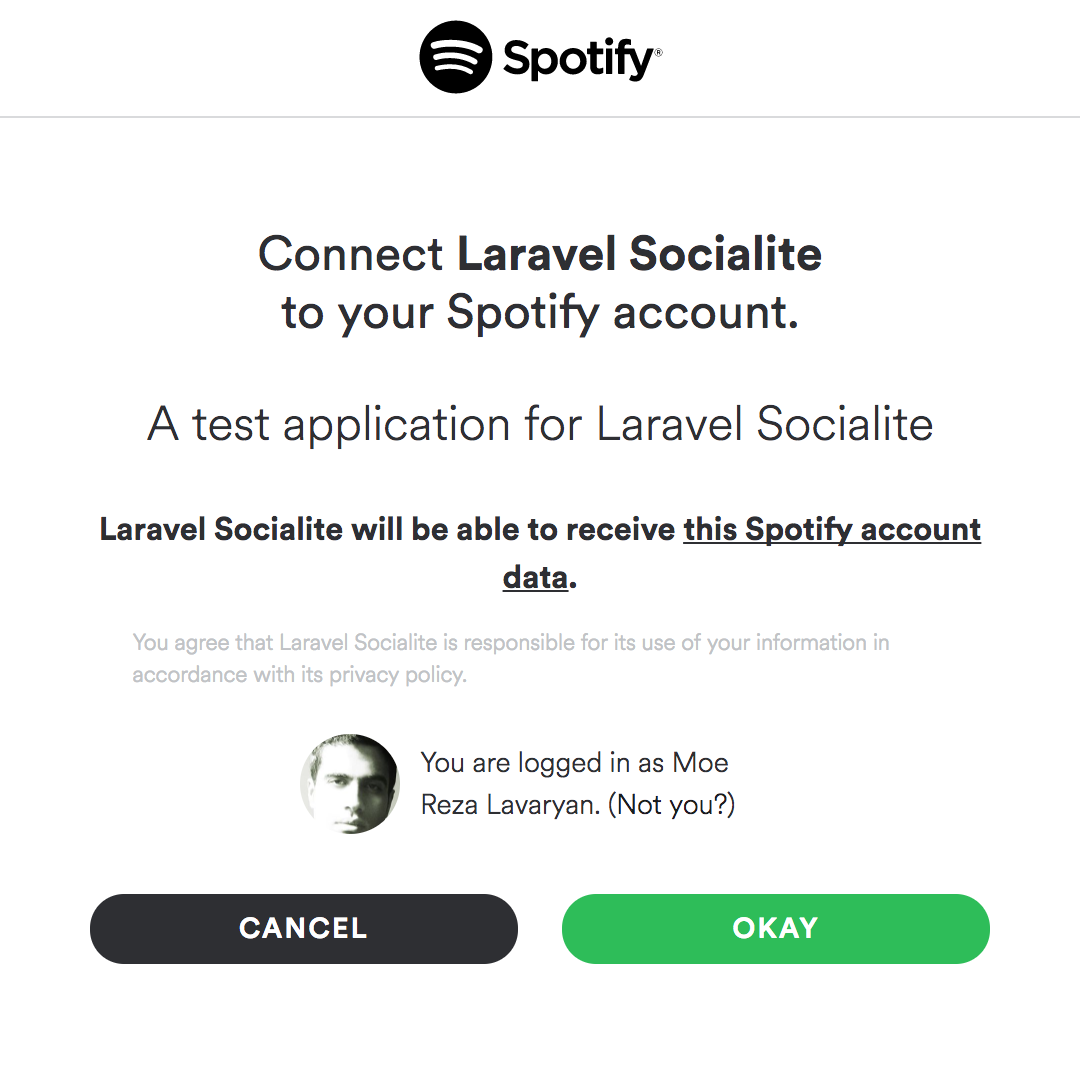
This means it works!
Creating a Custom Provider
We can easily create our own provider if we can’t find a certain provider in the Socialite Providers collection.
Each provider consists of two components:
- The provider class
- The event listener
Provider Class
A provider class contains all the logic for handling OAuth related operations.
If you want to support OAuth 1.0 as well, you need to implement a separate provider class for it.
To get started quickly, let’s take a look at Deezer’s provider class from the SP collection:
File:
vendor/socialiteproviders/deezer/Provider.php
<?php

namespace SocialiteProviders\Deezer;

use SocialiteProviders\Manager\OAuth2\User;
use Laravel\Socialite\Two\ProviderInterface;
use SocialiteProviders\Manager\OAuth2\AbstractProvider;

class Provider extends AbstractProvider implements ProviderInterface
{
    /**
     * Unique Provider Identifier.
     */
    const IDENTIFIER = 'DEEZER';

    /**
     * {@inheritdoc}
     */
    protected $scopes = ['basic_access', 'email'];

    /**
     * {@inheritdoc}
     */
    protected function getAuthUrl($state)
    {
        return $this->buildAuthUrlFromBase(
            'https://connect.deezer.com/oauth/auth.php', $state
        );
    }

    /**
     * {@inheritdoc}
     */
    protected function getTokenUrl()
    {
        return 'https://connect.deezer.com/oauth/access_token.php';
    }

    /**
     * {@inheritdoc}
     */
    protected function getUserByToken($token)
    {
        $response = $this->getHttpClient()->get(
            'https://api.deezer.com/user/me?access_token='.$token
        );

        return json_decode($response->getBody()->getContents(), true);
    }

    /**
     * {@inheritdoc}
     */
    protected function mapUserToObject(array $user)
    {
        return (new User())->setRaw($user)->map([
            'id' => $user['id'], 'nickname' => $user['name'],
            'name' => $user['firstname'].' '.$user['lastname'],
            'email' => $user['email'], 'avatar' => $user['picture'],
        ]);
    }

    /**
     * {@inheritdoc}
     */
    protected function getCodeFields($state = null)
    {
        return [
            'app_id' => $this->clientId, 'redirect_uri' => $this->redirectUrl,
            'scope' => $this->formatScopes($this->scopes, $this->scopeSeparator),
            'state' => $state, 'response_type' => 'code',
        ];
    }

    /**
     * {@inheritdoc}
     */
    public function getAccessToken($code)
    {
        $url = $this->getTokenUrl().'?'.http_build_query(
            $this->getTokenFields($code), '', '&', $this->encodingType
        );

        $response = file_get_contents($url);

        $this->credentialsResponseBody = json_decode($response->getBody(), true);

        return $this->parseAccessToken($response->getBody());
    }

    /**
     * {@inheritdoc}
     */
    protected function getTokenFields($code)
    {
        return [
            'app_id' => $this->clientId,
            'secret' => $this->clientSecret,
            'code' => $code,
        ];
    }

    /**
     * {@inheritdoc}
     */
    protected function parseAccessToken($body)
    {
        parse_str($body, $result);

        return $result['access_token'];
    }
}
Each provider class extends the abstract class Laravel\Socialite\Two\AbstractProvider. This abstract class contains a few concrete methods for handling generic OAuth 2.0 operations – from formatting scopes to getting and handling access tokens. We just need to extends this abstract class and implement its abstract methods.
Additionally, we need to implement ProviderInterface, which specifies two methods to implement, redirect() and user().
As you probably remember from the previous section, redirect() redirects users to the OAuth provider’s authorization page, while user() returns an instance of Laravel\Socialite\Contracts\User – containing a user’s information from the provider platform.
Provider’s Event Listener
The provider’s event listener is a class, which registers the provider as a Socialite provider, whenever SocialiteWasCalled event is triggered.
Let’s take a look at Deezer’s event listener:
File: vendor/socialiteproviders/deezer/DeezerExtendSocialite.php
<?php

namespace SocialiteProviders\Deezer;

use SocialiteProviders\Manager\SocialiteWasCalled;

class DeezerExtendSocialite
{
    /**
     * Register the provider.
     *
     * @param \SocialiteProviders\Manager\SocialiteWasCalled $socialiteWasCalled
     */
    public function handle(SocialiteWasCalled $socialiteWasCalled)
    {
        $socialiteWasCalled->extendSocialite(
            'deezer', __NAMESPACE__.'\Provider'
        );
    }
}
The event SocialiteWasCalled has a method extendSocialite(), which accepts the provider’s class as an argument and registers it with Socialite.
Wrapping Up
Social authentication has never been easier when using Laravel. We learned how to authenticate our users using a wide array of OAuth providers. We also learned how to create our own provider.
Other than the provider’s name and provider ID, you can store additional social information in the users table, including avatars, access tokens, refresh tokens (if any), just to name a few. You can also interact with the provider’s API or even take some actions on behalf of the user. Of course, only if the user has given you the permission to do so.
The full code for this tutorial is available on Github, in case you want to try it for yourself.
If you have any questions on the topic or if we’ve missed anything, let us know in the comments below!
Frequently Asked Questions (FAQs) about Adding Social Logins to Your App with Socialite
How Can I Install Laravel Socialite in My Application?
To install Laravel Socialite, you need to use Composer, a tool for dependency management in PHP. You can install it by running the command composer require laravel/socialite in your terminal. This command will download and install the Socialite package into your Laravel application. After installation, you need to add the service provider and alias to your config/app.php file. The service provider is Laravel\Socialite\SocialiteServiceProvider::class and the alias is 'Socialite' => Laravel\Socialite\Facades\Socialite::class.
How Do I Configure Socialite for Different Social Media Platforms?
Socialite supports a variety of social media platforms including Facebook, Twitter, LinkedIn, Google, GitHub, GitLab and Bitbucket. To configure Socialite for these platforms, you need to add the corresponding services in the config/services.php file of your Laravel application. Each service requires a client ID, client secret, and redirect URL which you can obtain from the respective platform’s developer console.
What is the Role of the Redirect Method in Socialite?
The redirect method in Socialite is used to redirect the user to the OAuth provider. Once the user approves the authentication request, they are redirected back to your application. The redirect method is part of the Socialite facade and is used in the controller method that handles the authentication request.
How Can I Handle User Data Returned by Socialite?
After a successful authentication, Socialite provides a user object that contains the details of the authenticated user. You can access this data using methods like user->getName(), user->getEmail(), and user->getAvatar(). You can use this data to create or update a user in your application’s database.
How Can I Implement a Custom Driver for Laravel Socialite?
Implementing a custom driver for Laravel Socialite involves extending the AbstractProvider class and implementing the ProviderInterface. You need to define methods like getAuthUrl, getTokenUrl, getUserByToken and mapUserToObject. Once the custom driver is implemented, you can register it using the Socialite::extend method.
How Can I Handle Errors in Socialite?
Socialite throws exceptions when it encounters errors during the OAuth process. You can catch these exceptions and handle them appropriately in your application. For example, you can redirect the user to a custom error page or display a flash message.
Can I Use Socialite with JavaScript Frontend Frameworks?
Yes, you can use Socialite with JavaScript frontend frameworks like Vue.js or React. However, this requires additional setup to handle the OAuth process on the client side and securely pass the access token to the server side.
How Can I Secure My Application When Using Socialite?
To secure your application when using Socialite, you should always use HTTPS for the redirect URLs. You should also validate the state parameter to prevent CSRF attacks. Additionally, you should handle the access tokens securely and not expose them to the client side.
Can I Use Socialite for API Authentication?
Yes, you can use Socialite for API authentication. However, this requires additional setup to handle the OAuth process and generate API tokens. You can use Laravel Passport or Sanctum for this purpose.
How Can I Test Socialite in My Application?
Testing Socialite in your application involves mocking the Socialite facade and simulating the OAuth process. Laravel provides testing helpers for this purpose. You can also use tools like PHPUnit or Mockery for more advanced testing scenarios.
A web developer with a solid background in front-end and back-end development, which is what he's been doing for over ten years. He follows two major principles in his everyday work: beauty and simplicity. He believes everyone should learn something new every day.
Published in
·APIs·Authentication·CMS & Frameworks·Frameworks·Laravel·Libraries·Patterns & Practices·PHP·Security·Web Services·February 28, 2017

Published in
·APIs·Authentication·CMS & Frameworks·Frameworks·Laravel·Libraries·PHP·Web Services·July 22, 2016


Published in
·APIs·Authentication·CMS & Frameworks·Frameworks·Laravel·PHP·Web Services·April 29, 2016