This article is part of a web development series from Microsoft. Thank you for supporting the partners who make SitePoint possible.
This is the third part in the Angular 2 series. You can read part two here.
Code for this article can be found on Github here. Browse to the src/data-flows folder to find the applicable source. This application running on Node in Azure can be found here.
Data Binding in Angular 2
Data binding can be a touchy topic. Prior to Angular 1 it was reserved largely for compiled and server rendered languages or UI frameworks such as Silverlight and Flex. When Angular 1 broke onto the scene we were amazed at the “magic” that data binding provides in the UI.
If you’ve been reading up on Angular 2 you’ve probably heard things like “immutability” and “one-way data flow”. But how exactly do these relate to Angular? Do they work with NgModel? How can we manage the state of our application when everything flows in one direction.
This article covers first how to treat Angular 2 data bindings similarly to Angular 1. Then we will talk about converting to a one-way data flow and will make the needed modifications to do so.
Simple Angular 1 App
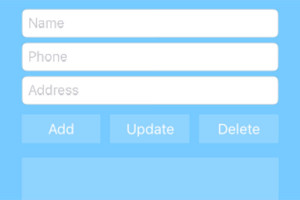
We will build the most basic Todo app I can think of. No styling, just an input allowing the user to type a Todo and hit Enter to submit. Then a list of Todos with the ability to mark them Done.
The final product looks like this
Browser screenshots in Microsoft Edge
Building this in Angular 1 should be relatively straight-forward. We have a simple HTML form with an ng-submit (so our form handles the Enter key), a controller method that turns the text we entered into a new Todo, and a way to toggle done vs not done Todos.
The markup looks something like this:
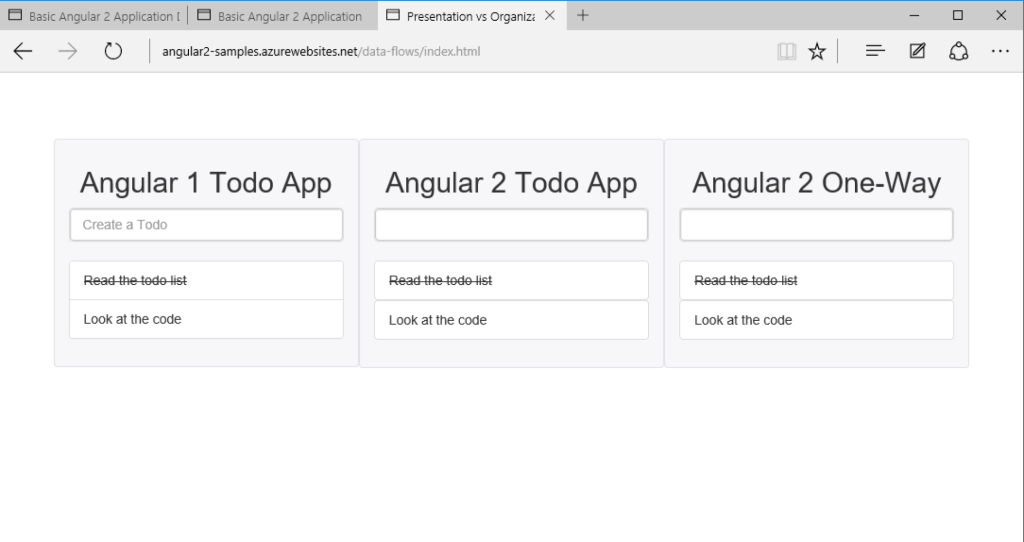
<h2>Angular 1 Todo App</h2>
<div ng-controller="AddTodo as addTodo">
	<form ng-submit="addTodo.addTodo(todo)">
	<input ng-model="todo" placeholder="Create a Todo"/>
	</form>
</div>
<div ng-controller="TodoList as todoList">
	<ul>
	<li ng-repeat="todo in todoList.todos"
	ng-click="todoList.toggleTodo(todo)"
	ng-class="{completed: todo.completed}"
	>{{todo.title}}</li>
	</ul>
</div>
There is a simple service that manages the list of Todos that are rendered. The service also handles adding and toggling the completed state of each Todo:
function TodoService () {
	return {
		// Default a couple Todos for initial rendering
		todos: [
			{title: "Read the todo list", completed: true},
			{title: "Look at the code", completed: false}
		],
		add: function (todo) {
			if (!todo.length) {
				return;
			}
			this.todos.push({title: todo, completed: false});
		},
		toggle: function (todo) {
			todo.completed = !todo.completed;
		}
	}
}
When a user types into the <input> they will be adding to the “todo” model property. Hitting Enter will submit the form and run addTodo() on the AddTodo controller, which looks like this:
functionAddTodoController (TodoService) {
	this.todoService = TodoService;
}

AddTodoController.prototype.addTodo = function (todo) {
	this.todoService.add(todo);
}
And finally the list of Todos is rendered in the <ul> tag and each Todo can run the toggleTodo() method. The TodoList controller looks like this:
functionTodoListController (TodoService) {
	this.todoService = TodoService;
	this.todos = this.todoService.todos;
}

TodoListController.prototype.toggleTodo = function (todo) {
	this.todoService.toggle(todo);
}
Angular 1 Summary
While this extremely basic Angular 1 application might not be something you would write for production (I would recommend using directives and/or a router to tie views to controllers rather than using ng-controller), it provides a simple example using basic data binding and dirty checking to render the list of Todos. It’s a good place to start since it touches on the common data flow scenarios in Angular 1.
Converted to Angular 2
In Angular 2 we can build an application in the same way as Angular 1. We can use two-way data binding (really it’s just two one-way data bindings, but the end result is two-way data binding) and a service to manage our data. We can rely on dirty checking to re-render the UI when changes happen to our data.
So what would be the advantage of using Angular 2? Well, in looking at the following code samples we’ll see a cleaner separation of concerns. Using components we build the application as a tree from the top down, and the functionality in each component can be easily reasoned about.
Here is the base component for our application:
// TodoApp (app.ts)
import {Component, DoCheck} from 'angular2/core';
import {AddTodo, TodoList, Header} from './components';
import {TodoService} from './services/todos';

@Component({
	selector: 'TodoApp',
	template: '
		<Header></Header>
		<AddTodo></AddTodo>
		<TodoList></TodoList>
	',
	directives: [AddTodo, TodoList, Header],
	// Add the TodoService so all children components

	// have access to the same TodoService instance.
	providers: [TodoService]
})
export class TodoApp {}
This is a very basic component, but the key part of note is the providers property being used in the Component decorator. TodoService isn’t being used directly by this base component, but adding it to the providers list means that any child components will receive the same instance of the TodoService (creating a singleton for any child components).
Notice in the AddTodo component how we inject TodoService, but it isn’t included in a providers property. Angular 2 will look up the chain of injectors until it finds TodoService at the top level and inject that one:
// TodoService (services/todos.ts)
import {Injectable} from 'angular2/core';
import {TodoModel} from '../models/todo';

@Injectable()
export class TodoService {
	todos: TodoModel[];
	constructor () {
		this.todos = [
			{title: "Read the todo list", completed: true},
			{title: "Look at the code", completed: false}
		];
	}

	add (todo: String): void {
		if (!todo.length) {
			return;
		}
		this.todos.push({title: todo, completed: false});
	}

	toggle (todo: TodoModel): void {
		todo.completed = !todo.completed;
	}
}
Now the TodoList gets a reference to the same TodoService instance and uses it to render the list of Todos:
// TodoList (components/todoList.ts)
import {Component, Input} from 'angular2/core';
import {Todo} from './todo';
import {TodoService} from '../services/todos';

@Component({
	selector: 'TodoList',
	template: '
		<ul class="list-group">
		<Todo *ngFor="#todo of todos" [todo]="todo"></Todo>
		</ul>
	',
	directives: [Todo]
})
export class TodoList {
	todos;
	constructor (todoService: TodoService) {
		this.todos = todoService.todos;
	}
}
And finally the Todo component itself renders the Todo text. It also wires up a click event to toggle the state of the Todo:
// Todo (components/todo.ts)
import {Component, Input} from 'angular2/core';
import {TodoService} from '../services/todos';

@Component({
	selector: 'Todo',
	template: '
		<li [ngClass]="{completed: todo.completed}"
		(click)="toggle(todo)"
		class="list-group-item">
		{{todo.title}}
		</li>
	'
})
export class Todo {
	@Input() todo;
	constructor (public todoService: TodoService) {}
	toggle (todo) {
		this.todoService.toggle(todo);
	}
}
Angular 2 Summary
While the implementation is different, the data flows and concepts between the Angular 1 and Angular 2 implementations are identical.
A service manages the list of Todos being rendered. The same service also manages adding and toggling of Todos. Both use a singleton instance of the TodoService so all components of the application are always referring to the same set of data. We mutate the array of Todos (and the individual Todos in the array) and rely on dirty checking to re-render.
Overall this is not a bad way to build an application. But as your applications grow, dependencies between components and the data they render can become cumbersome. It can make reasoning about your application difficult, and relying on data mutation and dirty checking can make testing harder.
Next we will look at a third way to build this simple application: With a one-way data flow.
Overview of One-Way Data Flow
If you’ve been following the JavaScript landscape over the last year or two you’ve likely heard of using a one-way data flow to manage applications. There are some great resources that explain what a one-way data flow is, but at a high level the idea is all data originates from the same place and is pushed down to children that use it. Think of setting up the initial state or data store for a task list application. You define things like what user is logged in, what tasks should be rendered, etc. This initial state setup doesn’t look much different when using a one-way data flow.
The difference comes when you want to update one of your tasks. Instead of changing (mutating) the data model in place, we will send a message to the top-level data store telling it to update something in its object graph. The update happens and the application is re-rendered.
Re-rendering the application is a critical piece to the one-way data flow. You can conceive of it as if the whole application is re-rendered for each and every change that happens. In the real world this is not performant so only the pieces of the application that see changes are re-rendered.
This concept was popularized largely by the React framework. There are numerous libraries that can be used to implement one-way data flows, but a popular one in the React community, with growing popularity in the Angular 2 community, is called Redux.
For an overview of an architecture in a one-way data flow, you can see this article describing Facebook’s Flux architecture.
Redux Library for State Management
The Redux library has a couple basic principles we will see in building out this application. I won’t cover them in depth because there is a great document describing them, but I’ll give the quick overview (straight from the article linked above):
Single source of truth
The state of your whole application is stored in an object tree within a single store.
console.log(store.getState());

/* Prints
{
	visibilityFilter: 'SHOW_ALL',
	todos: [
		{
			text: 'Consider using Redux',
			completed: true,
		},
		{
			text: 'Keep all state in a single tree',
			completed: false
		}
	]
}
*/
State is read-only
The only way to mutate the state is to emit an action, an object describing what happened.
store.dispatch({
	type: 'COMPLETE_TODO',
	index: 1
})

store.dispatch({
	type: 'SET_VISIBILITY_FILTER',
	filter: 'SHOW_COMPLETED'
})
Changes are made with pure functions
To specify how the state tree is transformed by actions, you write pure reducers.
A pure function is a function where the return value is only determined by its input values, without observable side effects (From Functional Programming: Pure Functions).
A reducer (also called a reducing function) is a function that accepts an accumulation and a value and returns a new accumulation. They are used to reduce a collection of values down to a single value (From the Glossary at redux.js.org).
The sample todos reducer:
function todos(state = [], action) {
	switch (action.type) {
		case 'ADD_TODO':
			return [
				...state,
				{
					text: action.text,
					completed: false
				}
			]

		case 'COMPLETE_TODO':
			return [
				...state.slice(0, action.index),
				Object.assign({}, state[action.index], {
					completed: true
				}),
				...state.slice(action.index + 1)
			]

		default:
			return state
	}
}
Angular 2 with One-Way Data Flow
Now that we’ve seen the sample app built in Angular 1 and Angular 2 using two-way data flow, let’s rebuild the same application in Angular 2 using a one-way data flow.
We will use the Redux library to manage the state. We will need to create the store and pass in a reducer for our array of Todos. It looks something like this:
// todo reducer (reducers/todos.ts)
import {TodoModel} from '../models/todo';

const initialState = [
	{title: "Read the todo list", completed: true},
	{title: "Look at the code", completed: false}
];

export function todos (state: TodoModel[] = initialState, action) {
	// Redux reducers typically use a switch statement
	// to determine how to handle a given action
	switch (action.type) {
		case 'ADD_TODO':
			return [
				...state,
				{
					title: action.title,
					completed: false
				}
			]

		case 'TOGGLE_TODO':
			let todo = state[action.index];
			let toggledTodo = Object.assign({}, todo, {
				completed: !todo.completed
			});
			return [
				...state.slice(0, action.index),
				toggledTodo,
				...state.slice(action.index + 1)
			]

		default:
			return state;
	}
}
Let’s break down the parts of this reducer, since much of the logic of the application is contained within.
Default State
When Redux calls createState and receives the reducer above, it will call the reducer function with undefined state and action parameters. So we need to return the default state. Thus:
// Variable to store the first two default Todos
const initialState = [
	{title: "Read the todo list", completed: true},
	{title: "Look at the code", completed: false}
];

// Defaulting the "state" parameter to "initialState". The
// Redux createState() function will call todos() with undefined
// "state" param making the default state "initalState" value
export function todos (state: TodoModel[] = initialState, action) {
	switch (action.type):
		...

		// No action, return the state as-is
		default:
			return state;
}
Adding a Todo
When we dispatch an action of type ADD_TODO, we need to return a new state array with the new Todo appended. Why return a new array rather than just pushing the new Todo onto the existing array? If you remember the three core principles of Redux, the first is the state is read-only. So we must return a new array. But the Todos inside the array can be returned by reference since they didn’t mutate.
For convenience we are using ES6 syntax to produce a new array with the contents of the old array, and appending the new Todo:
case'ADD_TODO':
	return [
		...state,
		{
			title: action.title,
			completed: false
		}
	]
Toggling a Todo
Conceptually toggling a Todo is changing the completed property from true to false or false to true. However, we know we can’t mutate anything in our state tree. So we need to return a new object.
Thanks to ES6 we have Object.assign(target, ...sources) assigns own properties of sources arguments to the target argument. A good explanation of Object.assign can be found on MDN.
case'TOGGLE_TODO':
    let todo = state[action.index];
    let toggledTodo = Object.assign({}, todo, {
	completed: !todo.completed
    });
    return [
	...state.slice(0, action.index),
	toggledTodo,
	...state.slice(action.index + 1)
    ]
So the result of toggling a Todo is a new array. The elements of the array are largely unchanged (same values by reference) other than the Todo we are actually toggling. The toggled Todo will be a new instance of a Todo with the same values as the old Todo, but with completed property toggled.
Wiring it In
Now we need to wire in this reducer to make a state tree. There are a number of ways to do this, but for the purposes of this article I’m going to create a TodoStore module. This module gives access to the state, as well as publishes functions that dispatch actions to update the state tree.
// TodoStore (store.ts)
import {combineReducers, createStore, Store} from 'redux';
import {todos} from './reducers/todos';

// Create the store using the todos reducer
export const TodoStore: Store = createStore(todos);

// Publish action to add a new Todo
export const addTodo: Function = (title: String) : void => {
	// Dispatch will publish an action of type 'ADD_TODO', which
	// runs through the reducer and gets caught in the
	// case 'ADD_TODO': block
	TodoStore.dispatch({
		type: 'ADD_TODO',
		title
	})
}

// Publish action to toggle a Todo
export const toggleTodo: Function = (index: Number) : void => {
	TodoStore.dispatch({
		type: 'TOGGLE_TODO',
		index
	})
}
Now we need to use this TodoStore in our application. Since this is a pretty simple app and we basically just have a top-level TodoApp component, we can pass the data down to all children from the root component.
In the constructor for the root component we can grab hold of the TodoStore. The key thing is we need to subscribe to changes to the TodoStore, which is done with the subscribe() method. Any time the TodoStore changes, we can just re-assign the component’s variable referencing it. This means that any time the store changes, an identity check (===) will show the objects are different and Angular will update the view.
The new components now look like this:
// TodoApp (app.ts)
import {Component} from 'angular2/core';
import {AddTodo, TodoList, Header} from './components';
import {TodoStore} from './store';

@Component({
	selector: 'TodoApp2',
	template: '
		<Header></Header>
		<AddTodo></AddTodo>
		<TodoList [todos]="todos"></TodoList>
	',
	directives: [AddTodo, TodoList, Header]
})
export class TodoApp {
	store = TodoStore;
	todos = this.store.getState();

	constructor () {
		this.store.subscribe(() => {
			this.todos = this.store.getState();
		})
	}
}
Notice the todos property is initially set to the default state. Then every time there are changes to the store we get the new state and assign it back to the todos property. The value of the todos property is passed into TodoList component.
// TodoList (components/todoList.ts)
import {Component, Input} from 'angular2/core';
import {Todo} from './todo';

@Component({
	selector: 'TodoList',
	template: '
		<ul class="list-group">
		<Todo *ngFor="#todo of todos; #i = index;" [todo]="todo" [index]="i"></Todo>
		</ul>
	',
	directives: [Todo]
})
export class TodoList {
	@Input() todos;
}
No major changes here, except passing the index into the Todo component. This is one way to handle reference to the correct Todo. Another way would be to have IDs assigned to each Todo and pass IDs instead of array references. In a production app we would tend to use IDs.
// Todo (components/todo.ts)
import {Component, Input} from 'angular2/core';
import {toggleTodo} from '../store';

@Component({
	selector: 'Todo',
	template: '
		<li [ngClass]="{completed: todo.completed}"
		(click)="toggleTodo(index)"
		class="list-group-item">
		{{todo.title}}
		</li>
	'
})
export class Todo {
	@Input() todo;
	@Input() index;

	// Pass through to the TodoStore
	toggleTodo = toggleTodo;
}
The Todo component can now reference the toggleTodo action from the TodoStore module. So every time a user clicks a Todo an action will be dispatched and the state tree re-created.
The last action is adding a new Todo. Similar to toggling a Todo, we will delegate toggling to the TodoStore:
// AddTodo (components/addTodo.ts)
import {Component, Output, EventEmitter} from 'angular2/core';
import {addTodo} from '../store';

@Component({
	selector: 'AddTodo',
	template: '
		<form (submit)="addTodo(newTodo)" class="panel panel-default">
		<input class="form-control" [(ngModel)]="newTodo"/>
		</form>
	'
})
export class AddTodo {
	addTodo = addTodo;
}
Summary
This application gives you a simple example of a one-way data flow in Angular 2. If we were to build a larger, more complex application we could follow a similar pattern. Create a reducer or reducers, add them to our data store, and provide actions that can be used to update the store. The state of the whole application can be represented in this single state object.
Thinking about applying this to larger applications, the concept maps closely to how Angular 2 applications are structured. One node in a state tree would be the representation of one node in the component tree. Children in the state tree would represent child components in the component tree. And by using read-only data Angular’s dirty checking cycle can be optimized for identity checks rather than deep object graphs.
More Hands-on with Web Development
This article is part of the web development series from Microsoft and DevelopIntelligenceon practical JavaScript learning, open source projects, and interoperability best practices including Microsoft Edge browser and the new EdgeHTML rendering engine.
DevelopIntelligence offers instructor-led JavaScript Training, AngularJS Training and other Web Development Training for technical teams and organizations.
We encourage you to test across browsers and devices including Microsoft Edge – the default browser for Windows 10 – with free tools on dev.microsoftedge.com:
- Scan your site for out-of-date libraries, layout issues, and accessibility
- Download free virtual machines for Mac, Linux, and Windows
- Check Web Platform status across browsers including the Microsoft Edge roadmap
- Remotely test for Microsoft Edge on your own device
More in-depth learning from our engineers and evangelists:
- Interoperability best practices (series):
- Coding Lab on GitHub: Cross-browser testing and best practices
- Woah, I can test Edge & IE on a Mac & Linux! (from Rey Bango)
- Advancing JavaScript without Breaking the Web (from Christian Heilmann)
- Unleash 3D rendering with WebGL (from David Catuhe)
- Hosted web apps and web platform innovations (from Kiril Seksenov)
Our community open source projects:
- vorlon.JS (cross-device remote JavaScript testing)
- manifoldJS (deploy cross-platform hosted web apps)
- babylonJS (3D graphics made easy)
More free tools and back-end web dev stuff:
- Visual Studio Code (lightweight code-editor for Mac, Linux, or Windows)
- Visual Studio Dev Essentials (free, subscription-based training and cloud benefits)
- Code with node.JS with trial on Azure Cloud
 Jason Aden
Jason Aden is a Lead Dev at Salesforce working in Angular technologies and is a Technical Instructor at DevelopIntelligence. He spends his free time with his wife and 4 children, playing ping pong and basketball, learning about new tech, and fishing in the Florida waters near his Tampa area home. He is also one of the authors of Angular 2 in Action.