We previously published an article on using Parse to provide a backend for iOS apps and thought we should write one for the Android developers who want to know how to integrate the Parse SDK in their app.
If you read the previous article, you can skip the introduction. We wanted the articles to be stand-alone tutorials, so you don’t have to read the previous one to follow along with this one.
Introduction
With the increased use of mobile devices, it is common for applications to offer features such as backup storage, data sync, data sharing etc. Building stand alone applications that only function and save their data on the device they are installed on is at times not feasible. A backend is usually needed where data can be saved and manipulated for the app to provide the service it was intended for.
Building this requires time, a different skill set and other resources (e.g. servers, push notification services, etc). Fortunately, there are several platforms that provide ready-made customizable backends that you can integrate with your apps. These are known as ‘Backend as a Service’, or BaaS in short.
Pros and Cons of Using BaaS
Pros
- Saves time and resources.
- Provides different services in one package. Most of the available BaaS vendors not only provide backend cloud storage for you data, but also services as push notifications, analytics, social network integration, etc.
- Caters to scaling. The BaaS platforms are built for scaling and as a developer, you will not need to do any extra work if you were to gain a large amount of users. It will cost you more though, as you may move up the pricing plan.
- Easy to make changes. You can easily make changes to your application’s functionality without requiring a lot of rewrites to its backend. It is easy to change your database models using the platform’s dashboard. This comes in handy to anyone following the iterative ‘lean startup’ methodology of shipping and improving the app based on usage data.
Cons
- Using a BaaS can be expensive. While most of these services offer a free package for a certain number of requests a month, it can get costly if your app was to take off and gain many users.
- You might experience vendor lock-in where a switch to another platform is difficult. But this is becoming less of a problem as most services are built to allow for easier migrations. You might have to give up some services as not all BaaS platforms offer the same services.
- A huge disadvantage you should consider before using a BaaS is the dependence of your app on a third-party service. A provider might make changes to its service which you will either have to tolerate or look for another solution. There is also the possibility of a service being shut down which will be a huge inconvenience as you will be forced to migrate your data to another provider or to your own backend. An example of this is the recent shutdown of StackMob which forced developers to migrate their data.
Enter Parse
For this tutorial, we are going to look at using Parse to provide a backend for an Android application. We’ll briefly look at what it offers before building an application that will use it for user registration, authentication and storing of user data.
Parse is one of the more popular Backend as a Service platforms. The service offers three products in one package: Parse Core, Parse Push and Parse Analytics.
Parse Core generally handles the saving of data and social media integration.
Parse Push is used to send push notifications. It enables the developer to customize, schedule and send push notifications to either all registered users or a select group of users.
Parse Analytics enables you to track your app’s data. You can track usage data such as installations, active users, user retention, push notification open rate etc.
Building the App
You can find the code for the app we’re building here. If you have any problems with the code or dependencies, there are some extra guidelines here.
We will create a simple note taking application that will enable a user to save and retrieve notes to the cloud, thus maintaining the same data across devices. We will also look at how to make the app work offline using the Parse Local Datastore feature which is a new feature added to the Parse Android SDK.
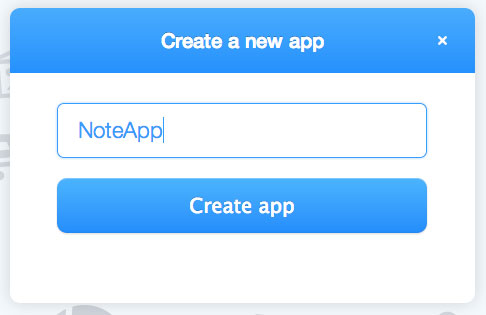
To start, you should first create an account on parse.com if you don’t already have one. Once logged in, access the Dashboard where you should be able to create a new app and also see a list of all apps you create.
Create an app called NoteApp.
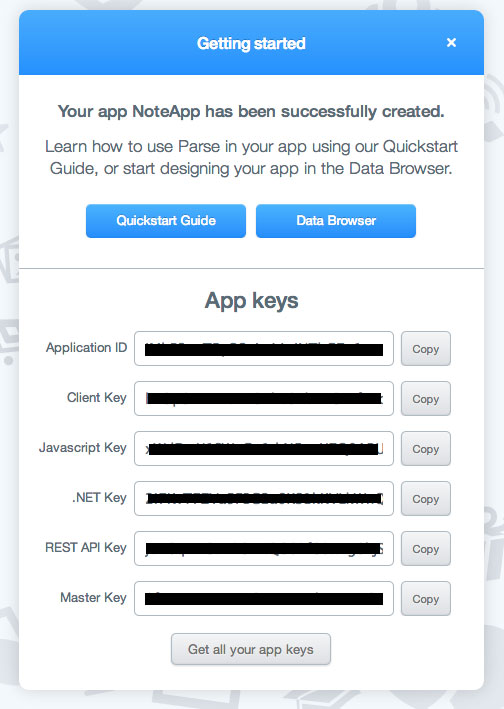
After creating the app, you will see a window containing your app IDs and keys. These will be used later in the Android app.
Download the Parse SDK here. Extract its contents into your project’s libs folder.
Create a new Android project. I named mine NoteApp and set the minimum required SDK to API version 11. In the Create Activity window, select Blank Activity.
Next we’ll create a custom Application class. The Application class is what is first loaded on application launch. By default, Android uses the generic Application class, but we will create our own to do some initial setup.
Create a new class called NoteAppApplication and set android.app.Application as its superclass.
In the AndroidManifest.xml file, set the name of the application attribute with the class name you just created.
<application
    android:name="com.echessa.noteapp.NoteAppApplication"
    android:allowBackup="true"
    android:icon="@drawable/ic_launcher"
    android:label="@string/app_name"
    android:theme="@style/AppTheme" >
Copy the Parse-x.x.x.jar file from your extracted download into your libs folder. If you are using Android Studio, remember to add the dependency in the build.gradle file.
In your manifest file, add the following permissions before the application tag.
<uses-permission android:name="android.permission.INTERNET" />
<uses-permission android:name="android.permission.ACCESS_NETWORK_STATE" />
In the Application class, add an onCreate() method with the following code.
@Override
public void onCreate() {
    super.onCreate();

    Parse.initialize(this, APPLICATION_ID, CLIENT_KEY);

    ParseObject testObject = new ParseObject("TestObject");
    testObject.put("foo", "bar");
    testObject.saveInBackground();
}
Replace the placeholders above with your app’s application id and client key, these can be found in the Parse dashboard. The code that we’ve placed after Parse is initialized is only for testing. We will remove it once we establish that the app has saved data to Parse.
Organize the imports needed in the file with Ctrl+Shift+O . (You can setup Eclipse and Android Studio to do this for you automatically to save yourself some typing. You’ll only have to set an import yourself when there is a conflicting library). In the article, I won’t state the imports needed unless there are potential conflicts.
Run the app and navigate to the Parse dashboard in your browser. Select your app and click on the Data Browser tab. You should see a table data of the object that was created above.
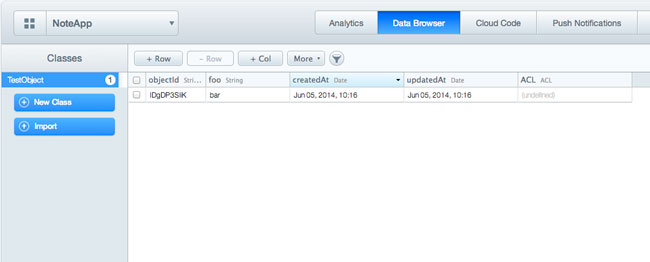
On the Dashboard, you will find controls to add/remove rows and columns, set permissions, export the class and even drop the whole class. Drop the TestObject class as we won’t need it for our app. Drop it by clicking on the More button and selecting Drop Class. Also delete the code that creates the TestObject when the application launches.
Not only can you create objects programmatically as we did above, but you can also do so using the Dashboard. We are going to create a Post class and some test posts that will be loaded in our app.
Click on the New Class button and name the class Post. Leave the type as Custom. Add two string columns: title and content. Add a few rows of data, just fill the title and content fields.
Apart from the title and content columns, other columns are also generated – objectId, createdAt, updatedAt and ACL. The ACL stands for Access Control Lists. These are used to specify the access control users and/or roles have on particular objects.
Back in our app, we are going to load the data in a list view. The list view will show the titles of the post and when clicked on, the content of the selected post will be shown in another activity. To keep it simple we will use the same view for viewing and editing text.
Note that we’ll be creating a simple app with a design not very suited for multiple screens. To design for multiple screens, use fragments to implement a proper master-detail flow.
Remove the code in the onCreate() method above that creates the ParseObject and saves it.
Open the activity_main.xml file and delete the Hello World TextView. Place a list view onto the activity. Change its id attribute to @android:id/list. This is required since we will be using the ListActivity with a custom layout for our view. Remove the padding that was set on the layout and have the list view width and height set to match_parent and wrap_content respectively. The settings are shown below.
<RelativeLayout xmlns:android="http://schemas.android.com/apk/res/android"
    xmlns:tools="http://schemas.android.com/tools"
    android:layout_width="match_parent"
    android:layout_height="match_parent"
    tools:context=".MainActivity" >

    <ListView
        android:id="@android:id/list"
        android:layout_width="match_parent"
        android:layout_height="wrap_content"
        android:layout_alignParentLeft="true"
        android:layout_alignParentTop="true" >
    </ListView>

</RelativeLayout>
Edit the MainActivity class so that it extends ListActivity. This is an activity that displays a list of items by binding to a data source. It has a default layout with a single, full-screen list in the center of the screen, but we will be using a custom layout and that is why we set android:id="@android:id/list" on the ListView element in the activity above.
We will style the list items in our list view to display the title of the post and an icon. Create a layout file in the res/layout folder named list_item_layout.xml. Place a TextView in it with the following settings
<?xml version="1.0" encoding="utf-8"?>
<TextView xmlns:android="http://schemas.android.com/apk/res/android"
    android:layout_width="fill_parent"
    android:layout_height="wrap_content"
    android:gravity="center_vertical"
    android:padding="5dp"
    android:singleLine="true"
    android:textSize="20sp"
    android:ellipsize="end"
    android:drawableRight="@drawable/ic_action_edit">
</TextView>
The ic_action_edit icon is from the Action Bar Icon Pack on the Android developer website. I used the holo-light version. You can also use this tool to generate icons.
Create a class that will hold our Post data. Name it Note.java. It’s just a simple app with the note id, content and title fields and their getters and setters.
package com.echessa.noteapp;

public class Note {

    private String id;
    private String title;
    private String content;

    Note(String noteId, String noteTitle, String noteContent) {
        id = noteId;
        title = noteTitle;
        content = noteContent;

    }

    public String getId() {
        return id;
    }
    public void setId(String id) {
        this.id = id;
    }
    public String getTitle() {
        return title;
    }
    public void setTitle(String title) {
        this.title = title;
    }
    public String getContent() {
        return content;
    }
    public void setContent(String content) {
        this.content = content;
    }

}
In MainActivity.java declare a class variable that will hold a list of notes.
private List<Note> posts;Then edit the onCreate() method in the same file as shown below.
@Override
protected void onCreate(Bundle savedInstanceState) {
    super.onCreate(savedInstanceState);
    setContentView(R.layout.activity_main);

    posts = new ArrayList<Note>();
    ArrayAdapter<Note> adapter = new ArrayAdapter<Note>(this, R.layout.list_item_layout, posts);
    setListAdapter(adapter);

    refreshPostList();
}
Here we create an adapter which manages the data model and adapts it to the individual rows in the list view. We use the ArrayAdapter here for that. This maps the toString() method of the object to a TextView in the row layout. To support other views or to have data other than the object’s toString() output, you have to create a custom adapter. We’ll use the given adapter and override our object’s toString() method so that it gives the title of the note.
In Note.java add the following method.
@Override
public String toString() {
    return this.getTitle();
}
Next add the refreshPostList() method in the class. When this is called, it will fetch data from Parse and assign it to the posts List.
private void refreshPostList() {
ParseQuery<ParseObject> query = ParseQuery.getQuery("Post");
query.findInBackground(new FindCallback<ParseObject>() {
@Override
public void done(List<ParseObject> postList, ParseException e) {
if (e == null) {
// If there are results, update the list of posts
// and notify the adapter
posts.clear();
for (ParseObject post : postList) {
Note note = new Note(post.getObjectId(), post.getString("title"), post.getString("content"));
posts.add(note);
}
((ArrayAdapter<Note>) getListAdapter()).notifyDataSetChanged();
} else {
Log.d(getClass().getSimpleName(), "Error: " + e.getMessage());
}
}
});
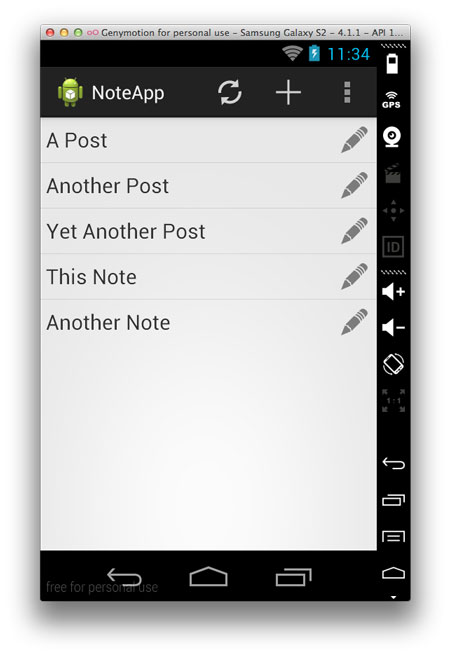
}Run the app and the list view will be populated with the notes you had added earlier on Parse.

There is a brief pause while the data loads. We will give the user an indication of this by including a loading spinner.
Add the following after the super.onCreate(savedInstanceState); statement in the onCreate() method.
requestWindowFeature(Window.FEATURE_INDETERMINATE_PROGRESS);In refreshPostList() add the following before the call to findInBackground()
setProgressBarIndeterminateVisibility(true);This will display a progress spinner control. After the data loads, we need to hide it. Place the following as the first statement in the done method.
setProgressBarIndeterminateVisibility(false);Next, we’ll add two Action Bar actions to refresh the list and add a new note. In res/menu/main.xml add the following.
<item
    android:id="@+id/action_refresh"
    android:icon="@drawable/ic_action_refresh"
    android:showAsAction="always|withText"
    android:title="@string/action_refresh">
</item>

<item
    android:id="@+id/action_new"
    android:showAsAction="always|withText"
    android:title="@string/action_new"
    android:icon="@drawable/ic_action_new"/>
Then add the following values in the res/values/strings.xml file.
<string name="action_new">New Note</string>
<string name="action_refresh">Refresh</string>
I used icons from the previously mentioned icon set from the holo-dark theme folder.
Next we’ll create a new activity for adding and editing notes. You can have separate activities for viewing and editing notes, but for simplicity, we’ll use one view for this.
Right-click on your project and select New -> Other to bring up the New file wizard. From the Android dropdown menu, select Android Activity. On the next page, select Blank Activity. Name the activity EditNoteActivity and change the title to Add/Edit. Click Finish to add the files to your project. This will add code and layout files for the activity as well as modify the strings.xml and AndroidManifest.xml file with required data for the activity.
In MainActivity.java add the following code to handle action bar item clicks.
@Override
public boolean onOptionsItemSelected(MenuItem item) {
    // Handle action bar item clicks here. The action bar will
    // automatically handle clicks on the Home/Up button, so long
    // as you specify a parent activity in AndroidManifest.xml.
    int id = item.getItemId();

    switch (id) {

    case R.id.action_refresh: {
        refreshPostList();
        break;
    }

    case R.id.action_new: {
        Intent intent = new Intent(this, EditNoteActivity.class);
        startActivity(intent);
        break;
    }
    case R.id.action_settings: {
        // Do something when user selects Settings from Action Bar overlay
        break;
    }
    }

    return super.onOptionsItemSelected(item);
}
Run the app, and you should be able to refresh your list of posts and navigate to the new activity using the action bar actions.
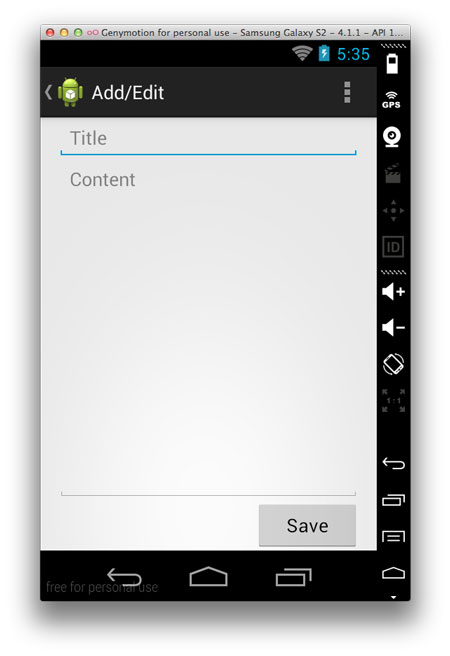
Edit the res/layout/activity_edit_note.xml file as shown below. We change the layout from RelativeLayout to LinearLayout and add two EditText fields and a button.
<?xml version="1.0" encoding="utf-8"?>
<LinearLayout xmlns:android="http://schemas.android.com/apk/res/android"
    android:layout_width="match_parent"
    android:layout_height="match_parent"
    android:paddingLeft="16dp"
    android:paddingRight="16dp"
    android:orientation="vertical" >

    <EditText
        android:id="@+id/noteTitle"
        android:layout_width="match_parent"
        android:layout_height="wrap_content"
        android:ems="10"
        android:hint="@string/note_title_hint" />

    <EditText
        android:id="@+id/noteContent"
        android:layout_width="match_parent"
        android:layout_height="0dp"
        android:layout_weight="1"
        android:gravity="top"
        android:hint="@string/note_content_hint"
        android:ems="10" />

    <Button
        android:id="@+id/saveNote"
        android:layout_width="100dp"
        android:layout_height="wrap_content"
        android:layout_gravity="right"
        android:text="@string/save_button" />
</LinearLayout>
Add the following in the strings.xml file.
<string name="note_title_hint">Title</string>
<string name="note_content_hint">Content</string>
<string name="save_button">Save</string>
When we run the app and navigate to the Add/Edit view, we have to use the Back button to go back to our list view. We’ll add an Up caret to the action bar so that we can go back to our parent view. In the manifest file, modify the EditNoteActivity activity tag as shown.
<activity
    android:name=".EditNoteActivity"
    android:label="@string/title_activity_edit_note" >
    <meta-data
        android:name="android.support.PARENT_ACTIVITY"
        android:value="com.echessa.noteapp.MainActivity" />
</activity>
Add the following in the onCreate() method of the EditNoteActivity.java file right after the call to super.onCreate(savedInstanceState);.
getActionBar().setDisplayHomeAsUpEnabled(true);On running the app, you should see a left-facing caret alongside the app icon which when pressed, navigates Up the hierarchy.
In MainActivity.java we’ll enable a user to select a list item and see its details in the Add/Edit view. Add the following method to the file.
@Override
protected void onListItemClick(ListView l, View v, int position, long id) {

    Note note = posts.get(position);
    Intent intent = new Intent(this, EditNoteActivity.class);
    intent.putExtra("noteId", note.getId());
    intent.putExtra("noteTitle", note.getTitle());
    intent.putExtra("noteContent", note.getContent());
    startActivity(intent);

}
When a list view item is touched, we retrieve the note that the user selected and attach its data to an intent object. We’ll retrieve this data back in the EditNoteActivity class. This is one of the ways you can pass data between activities.
In the EditNoteActivity.java file, add the following fields.
private Note note;
private EditText titleEditText;
private EditText contentEditText;
private String postTitle;
private String postContent;
private Button saveNoteButton;
Modify the onCreate() method as shown.
@Override
protected void onCreate(Bundle savedInstanceState) {
    super.onCreate(savedInstanceState);
    getActionBar().setDisplayHomeAsUpEnabled(true);
    setContentView(R.layout.activity_edit_note);

    Intent intent = this.getIntent();

    titleEditText = (EditText) findViewById(R.id.noteTitle);
    contentEditText = (EditText) findViewById(R.id.noteContent);

    if (intent.getExtras() != null) {
        note = new Note(intent.getStringExtra("noteId"), intent.getStringExtra("noteTitle"), intent.getStringExtra("noteContent"));

        titleEditText.setText(note.getTitle());
        contentEditText.setText(note.getContent());
    }

    saveNoteButton = (Button)findViewById(R.id.saveNote);
    saveNoteButton.setOnClickListener(new View.OnClickListener() {
        @Override
        public void onClick(View v) {
            saveNote();
        }
    });

}
This checks to see if any data was passed in with the Intent and loads the text fields with it if so.
Add the saveNote() method.
private void saveNote() {
postTitle = titleEditText.getText().toString();
postContent = contentEditText.getText().toString();
postTitle = postTitle.trim();
postContent = postContent.trim();
// If user doesn't enter a title or content, do nothing
// If user enters title, but no content, save
// If user enters content with no title, give warning
// If user enters both title and content, save
if (!postTitle.isEmpty()) {
// Check if post is being created or edited
if (note == null) {
// create new post
ParseObject post = new ParseObject("Post");
post.put("title", postTitle);
post.put("content", postContent);
post.saveInBackground(new SaveCallback() {
public void done(ParseException e) {
if (e == null) {
// Saved successfully.
Toast.makeText(getApplicationContext(), "Saved", Toast.LENGTH_SHORT).show();
} else {
// The save failed.
Toast.makeText(getApplicationContext(), "Failed to Save", Toast.LENGTH_SHORT).show();
Log.d(getClass().getSimpleName(), "User update error: " + e);
}
}
});
}
else {
// update post
ParseQuery<ParseObject> query = ParseQuery.getQuery("Post");
// Retrieve the object by id
query.getInBackground(note.getId(), new GetCallback<ParseObject>() {
public void done(ParseObject post, ParseException e) {
if (e == null) {
// Now let's update it with some new data.
post.put("title", postTitle);
post.put("content", postContent);
post.saveInBackground(new SaveCallback() {
public void done(ParseException e) {
if (e == null) {
// Saved successfully.
Toast.makeText(getApplicationContext(), "Saved", Toast.LENGTH_SHORT).show();
} else {
// The save failed.
Toast.makeText(getApplicationContext(), "Failed to Save", Toast.LENGTH_SHORT).show();
Log.d(getClass().getSimpleName(), "User update error: " + e);
}
}
});
}
}
});
}
}
else if (postTitle.isEmpty() && !postContent.isEmpty()) {
AlertDialog.Builder builder = new AlertDialog.Builder(EditNoteActivity.this);
builder.setMessage(R.string.edit_error_message)
.setTitle(R.string.edit_error_title)
.setPositiveButton(android.R.string.ok, null);
AlertDialog dialog = builder.create();
dialog.show();
}
}The code above checks to see if the user is creating a new note or editing an existing one and creates a ParseObject or retrieves one respectively. Data is saved with the saveInBackground() method which saves data asynchronously so your app won’t be blocked until the save is complete. If the network is slow you can navigate back to the notes list view and the data will still get saved.
Add the following to the strings.xml file.
<string name="edit_error_title">Error!</string>
<string name="edit_error_message">You cannot save a note without a title</string>
Just as with our list view, we will show a loading indicator. Add the following after the super.onCreate(savedInstanceState) call in the onCreate() method.
requestWindowFeature(Window.FEATURE_INDETERMINATE_PROGRESS);Then place the following before the call to post.saveInBackground() call for both the create-new and update-post blocks.
setProgressBarIndeterminateVisibility(true);After saving, hide the loading indicator with the following. Place it as the first statement in the done method.
setProgressBarIndeterminateVisibility(false);You can run and test the app to see all we’ve added so far. You will notice that after a note is saved, when the user pressed the Save button again, another note will be created. We will prevent this by creating a Note object when a note is saved so that when the Save button is pressed again, note will not be null.
In the block that creates a new note, add the following after a note has been successfully saved.
note = new Note(post.getObjectId(), postTitle, postContent);Add a final modifier to the post object so that it can be accessed in the inner class.
final ParseObject post = new ParseObject("Post");The following is the resulting code for the if block.
if (note == null) {
    // create new post

    final ParseObject post = new ParseObject("Post");
    post.put("title", postTitle);
    post.put("content", postContent);
    setProgressBarIndeterminateVisibility(true);
    post.saveInBackground(new SaveCallback() {
        public void done(ParseException e) {
        setProgressBarIndeterminateVisibility(false);
        if (e == null) {
            // Saved successfully.
            note = new Note(post.getObjectId(), postTitle, postContent);
            Toast.makeText(getApplicationContext(), "Saved", Toast.LENGTH_SHORT).show();
        } else {
            // The save failed.
            Toast.makeText(getApplicationContext(), "Failed to Save", Toast.LENGTH_SHORT).show();
            Log.d(getClass().getSimpleName(), "User update error: " + e);
          }
        }
    });

}
Now duplicate posts will not be created when the same note is saved again.
The app is saving and retrieving posts, but anyone can use it and see all the notes saved in the backend. We will restrict the app use to logged in users, and also make it so that a user can only access their notes.
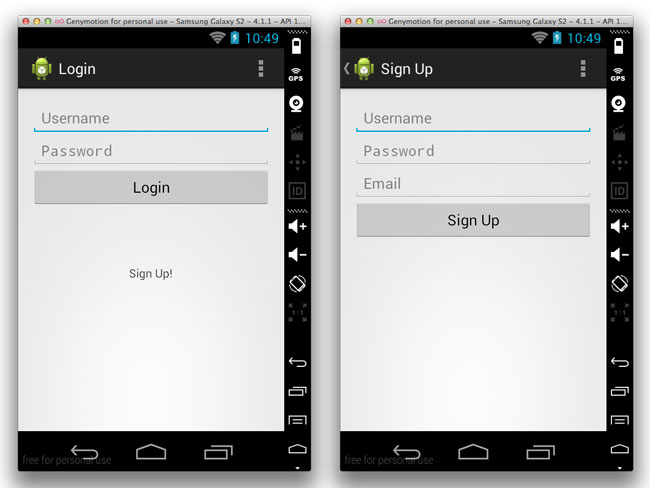
We’ll first create a login activity. Create a blank activity as you did previously. Name it LoginActivity and set its title to Login.
Modify the res/layout/activity_login.xml file as shown.
<RelativeLayout xmlns:android="http://schemas.android.com/apk/res/android"
    xmlns:tools="http://schemas.android.com/tools"
    android:layout_width="match_parent"
    android:layout_height="match_parent"
    android:paddingBottom="@dimen/activity_vertical_margin"
    android:paddingLeft="@dimen/activity_horizontal_margin"
    android:paddingRight="@dimen/activity_horizontal_margin"
    android:paddingTop="@dimen/activity_vertical_margin"
    tools:context=".LoginActivity" >

    <EditText
        android:id="@+id/usernameField"
        android:layout_width="match_parent"
        android:layout_height="wrap_content"
        android:layout_alignParentLeft="true"
        android:layout_alignParentTop="true"
        android:ems="10"
        android:hint="@string/username_hint" >

        <requestFocus />
    </EditText>

    <EditText
        android:id="@+id/passwordField"
        android:layout_width="match_parent"
        android:layout_height="wrap_content"
        android:layout_alignLeft="@+id/usernameField"
        android:layout_below="@+id/usernameField"
        android:ems="10"
        android:hint="@string/password_hint"
        android:inputType="textPassword" />

    <Button
        android:id="@+id/loginButton"
        android:layout_width="match_parent"
        android:layout_height="wrap_content"
        android:layout_alignLeft="@+id/passwordField"
        android:layout_below="@+id/passwordField"
        android:text="@string/login_button_label" />

    <TextView
        android:id="@+id/signUpText"
        android:layout_width="wrap_content"
        android:layout_height="wrap_content"
        android:layout_below="@+id/loginButton"
        android:layout_centerHorizontal="true"
        android:layout_marginTop="69dp"
        android:text="@string/sign_up_text" />

</RelativeLayout>
Add the following to the strings.xml file. Some of the attributes will be used later.
<string name="username_hint">Username</string>
<string name="password_hint">Password</string>
<string name="email_hint">Email</string>
<string name="sign_up_button_label">Sign Up</string>
<string name="signup_error_message">Please make sure you enter a username, password, and email address!</string>
<string name="signup_error_title">Error!</string>
<string name="login_error_message">Please make sure you enter a username and password!</string>
<string name="login_error_title">Error!</string>
<string name="login_button_label">Login</string>
<string name="sign_up_text">Sign Up!</string>
<string name="logout_label">Logout</string>
Create another blank activity and name it SignUpActivity. Give it a title of Sign Up.
Modify the res/layout/activity_sign_up.xml file as shown.
<RelativeLayout xmlns:android="http://schemas.android.com/apk/res/android"
    xmlns:tools="http://schemas.android.com/tools"
    android:layout_width="match_parent"
    android:layout_height="match_parent"
    android:paddingBottom="@dimen/activity_vertical_margin"
    android:paddingLeft="@dimen/activity_horizontal_margin"
    android:paddingRight="@dimen/activity_horizontal_margin"
    android:paddingTop="@dimen/activity_vertical_margin"
    tools:context=".SignUpActivity" >

    <EditText
        android:id="@+id/usernameField"
        android:layout_width="match_parent"
        android:layout_height="wrap_content"
        android:layout_alignParentLeft="true"
        android:layout_alignParentTop="true"
        android:ems="10"
        android:hint="@string/username_hint" >

        <requestFocus />
    </EditText>

    <EditText
        android:id="@+id/passwordField"
        android:layout_width="match_parent"
        android:layout_height="wrap_content"
        android:layout_alignLeft="@+id/usernameField"
        android:layout_below="@+id/usernameField"
        android:ems="10"
        android:inputType="textPassword"
        android:hint="@string/password_hint" />

    <EditText
        android:id="@+id/emailField"
        android:layout_width="match_parent"
        android:layout_height="wrap_content"
        android:layout_alignLeft="@+id/passwordField"
        android:layout_below="@+id/passwordField"
        android:ems="10"
        android:inputType="textEmailAddress"
        android:hint="@string/email_hint" />

    <Button
        android:id="@+id/signupButton"
        android:layout_width="match_parent"
        android:layout_height="wrap_content"
        android:layout_alignLeft="@+id/emailField"
        android:layout_below="@+id/emailField"
        android:text="@string/sign_up_button_label" />

</RelativeLayout>
Below are the resulting Login and Signup views.
When the application starts, we’ll check if a user is logged in and if not, the app will redirect to the Login view.
Since the creation of user accounts is a common requirement in applications, Parse provides the ParseUser class which automatically handles much of the functionality required for user account management. The ParseUser has properties which are used in typical user assignment and management i.e. username, password and email.
In the MainActivity class, add a check for the logged in user in the onCreate() method after the call to setContentView(R.layout.activity_main).
ParseUser currentUser = ParseUser.getCurrentUser();
if (currentUser == null) {
    loadLoginView();
}
Add the loadLoginView() method to the file.
private void loadLoginView() {
    Intent intent = new Intent(this, LoginActivity.class);
    startActivity(intent);
}
Run the app and you will be directed to the Login view. However, when you use the Back button, you will be directed to the main activity. This is because on the history stack, the MainActivity comes before the LoginActivity. So ‘back’ is pressed, the app navigates to the previous activity. We need to clear the stack history and set the LoginActivity as the start of the history stack. Modify loadLoginView() as shown.
private void loadLoginView() {
    Intent intent = new Intent(this, LoginActivity.class);
    intent.addFlags(Intent.FLAG_ACTIVITY_NEW_TASK);
    intent.addFlags(Intent.FLAG_ACTIVITY_CLEAR_TASK);
    startActivity(intent);
}
Now when you press the Back button, the app will exit.
Modify the LoginActivity class as shown.
public class LoginActivity extends ActionBarActivity {

    protected EditText usernameEditText;
    protected EditText passwordEditText;
    protected Button loginButton;

    protected TextView signUpTextView;

    @Override
    protected void onCreate(Bundle savedInstanceState) {
        super.onCreate(savedInstanceState);
        requestWindowFeature(Window.FEATURE_INDETERMINATE_PROGRESS);
        setContentView(R.layout.activity_login);

        signUpTextView = (TextView)findViewById(R.id.signUpText);
        usernameEditText = (EditText)findViewById(R.id.usernameField);
        passwordEditText = (EditText)findViewById(R.id.passwordField);
        loginButton = (Button)findViewById(R.id.loginButton);

        signUpTextView.setOnClickListener(new View.OnClickListener() {
            @Override
            public void onClick(View v) {
                Intent intent = new Intent(LoginActivity.this, SignUpActivity.class);
                startActivity(intent);
            }
        });

        loginButton.setOnClickListener(new View.OnClickListener() {
            @Override
            public void onClick(View v) {
                String username = usernameEditText.getText().toString();
                String password = passwordEditText.getText().toString();

                username = username.trim();
                password = password.trim();

                if (username.isEmpty() || password.isEmpty()) {
                    AlertDialog.Builder builder = new AlertDialog.Builder(LoginActivity.this);
                    builder.setMessage(R.string.login_error_message)
                        .setTitle(R.string.login_error_title)
                        .setPositiveButton(android.R.string.ok, null);
                    AlertDialog dialog = builder.create();
                    dialog.show();
                }
                else {
                    setProgressBarIndeterminateVisibility(true);

                    ParseUser.logInInBackground(username, password, new LogInCallback() {
                        @Override
                        public void done(ParseUser user, ParseException e) {
                            setProgressBarIndeterminateVisibility(false);

                            if (e == null) {
                                // Success!
                                Intent intent = new Intent(LoginActivity.this, MainActivity.class);
                                intent.addFlags(Intent.FLAG_ACTIVITY_NEW_TASK);
                                intent.addFlags(Intent.FLAG_ACTIVITY_CLEAR_TASK);
                                startActivity(intent);
                            }
                            else {
                                // Fail
                                AlertDialog.Builder builder = new AlertDialog.Builder(LoginActivity.this);
                                builder.setMessage(e.getMessage())
                                    .setTitle(R.string.login_error_title)
                                    .setPositiveButton(android.R.string.ok, null);
                                AlertDialog dialog = builder.create();
                                dialog.show();
                            }
                        }
                    });
                }
            }
        });
    }

    @Override
    public boolean onCreateOptionsMenu(Menu menu) {
        // Inflate the menu; this adds items to the action bar if it is present.
        getMenuInflater().inflate(R.menu.login, menu);
        return true;
    }

    @Override
    public boolean onOptionsItemSelected(MenuItem item) {
        // Handle action bar item clicks here. The action bar will
        // automatically handle clicks on the Home/Up button, so long
        // as you specify a parent activity in AndroidManifest.xml.
        int id = item.getItemId();
        if (id == R.id.action_settings) {
            return true;
        }
        return super.onOptionsItemSelected(item);
    }
}
In the above code, we direct the user to the Sign Up view if they touch the Sign Up TextView. When they attempt to login, we first check the fields to make sure that data has been entered before attempting to log them in with Parse. If login fails, they will be notified. If it succeeds, then they will be directed to the list view with the notes. Notice that we clear and set the history stack before MainActivity is called. This will ensure that the user cannot navigate back to the login view by pressing the Back button.
Modify the SignUpActivity class as shown.
public class SignUpActivity extends ActionBarActivity {

    protected EditText usernameEditText;
    protected EditText passwordEditText;
    protected EditText emailEditText;
    protected Button signUpButton;

    @Override
    protected void onCreate(Bundle savedInstanceState) {
        super.onCreate(savedInstanceState);
        requestWindowFeature(Window.FEATURE_INDETERMINATE_PROGRESS);
        getActionBar().setDisplayHomeAsUpEnabled(true);
        setContentView(R.layout.activity_sign_up);

        usernameEditText = (EditText)findViewById(R.id.usernameField);
        passwordEditText = (EditText)findViewById(R.id.passwordField);
        emailEditText = (EditText)findViewById(R.id.emailField);
        signUpButton = (Button)findViewById(R.id.signupButton);

        signUpButton.setOnClickListener(new View.OnClickListener() {
            @Override
            public void onClick(View v) {
                String username = usernameEditText.getText().toString();
                String password = passwordEditText.getText().toString();
                String email = emailEditText.getText().toString();

                username = username.trim();
                password = password.trim();
                email = email.trim();

                if (username.isEmpty() || password.isEmpty() || email.isEmpty()) {
                    AlertDialog.Builder builder = new AlertDialog.Builder(SignUpActivity.this);
                    builder.setMessage(R.string.signup_error_message)
                        .setTitle(R.string.signup_error_title)
                        .setPositiveButton(android.R.string.ok, null);
                    AlertDialog dialog = builder.create();
                    dialog.show();
                }
                else {
                    setProgressBarIndeterminateVisibility(true);

                    ParseUser newUser = new ParseUser();
                    newUser.setUsername(username);
                    newUser.setPassword(password);
                    newUser.setEmail(email);
                    newUser.signUpInBackground(new SignUpCallback() {
                        @Override
                        public void done(ParseException e) {
                            setProgressBarIndeterminateVisibility(false);

                            if (e == null) {
                                // Success!
                                Intent intent = new Intent(SignUpActivity.this, MainActivity.class);
                                intent.addFlags(Intent.FLAG_ACTIVITY_NEW_TASK);
                                intent.addFlags(Intent.FLAG_ACTIVITY_CLEAR_TASK);
                                startActivity(intent);
                            }
                            else {
                                AlertDialog.Builder builder = new AlertDialog.Builder(SignUpActivity.this);
                                builder.setMessage(e.getMessage())
                                    .setTitle(R.string.signup_error_title)
                                    .setPositiveButton(android.R.string.ok, null);
                                AlertDialog dialog = builder.create();
                                dialog.show();
                            }
                        }
                    });
                }
            }
        });
    }

    @Override
    public boolean onCreateOptionsMenu(Menu menu) {
        // Inflate the menu; this adds items to the action bar if it is present.
        getMenuInflater().inflate(R.menu.sign_up, menu);
        return true;
    }

    @Override
    public boolean onOptionsItemSelected(MenuItem item) {
        // Handle action bar item clicks here. The action bar will
        // automatically handle clicks on the Home/Up button, so long
        // as you specify a parent activity in AndroidManifest.xml.
        int id = item.getItemId();
        if (id == R.id.action_settings) {
            return true;
        }
        return super.onOptionsItemSelected(item);
    }
}
In the manifest file, set the parent activity for the SignUpActivity to be the LoginActivity so we can navigate Up to the login view from the signup view.
<activity
    android:name=".SignUpActivity"
    android:label="@string/title_activity_sign_up" >
    <meta-data
        android:name="android.support.PARENT_ACTIVITY"
        android:value="com.echessa.noteapp.LoginActivity" />
</activity>
Now you can create an account and access the notes on the Parse backend. The user session is cached so you won’t need to login every time you use the app. We’ll need to create a relationship between the notes and the user so that a user only loads their notes. Before this, let’s add a Logout feature.
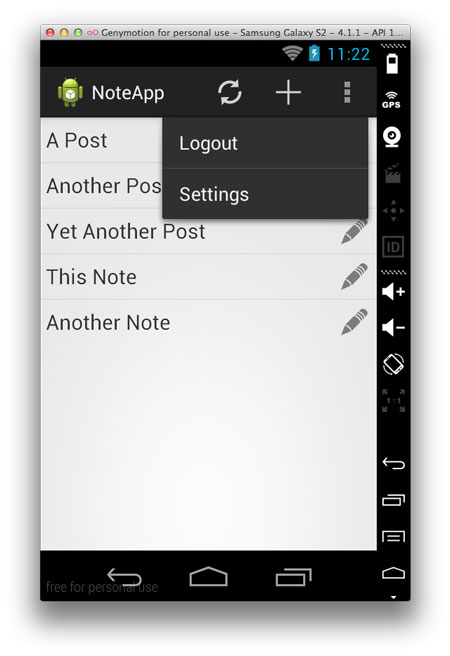
In res/menu/main.xml add an action bar item.
<item
    android:id="@+id/action_logout"
    android:title="@string/logout_label">
</item>
In MainActivity.java add the following case to the switch statement in onOptionsItemSelected(MenuItem item) method.
case R.id.action_logout:
    ParseUser.logOut();
    loadLoginView();
    break;
You can now logout using the action bar action. If you don’t see it on the action bar, then it can be accessed in the action bar overlay menu.
Add the following to EditNoteActivity in the saveNote() method. Add it to the if block that creates a new note, after this statement post.put("content", postContent);.
post.put("author", ParseUser.getCurrentUser());When a new note is added, the currently logged in user will be saved as its author. On the first run, the author column will be created in Parse automatically before the data is saved, so you don’t need to create it using the dashboard before you can use it.
In MainActivity, add the following in the refreshPostList() method after this statement ParseQuery query = ParseQuery.getQuery("Post");.
query.whereEqualTo("author", ParseUser.getCurrentUser());On running, the application, you should be able to create notes and only view the notes you created.
Notes
We have looked at how to integrate the Parse SDK into an Android app. We’ve seen how to save and retrieve data to the backend and how to manage user accounts. There are other features you could include which I will mention here.
Deleting Objects
You should include a way for users to delete notes. How you accomplish this is up to you. Common design patterns in Android for deletion include swiping on the list item to delete, long pressing on the item to bring up a confirmation dialog to delete, and you can also include a delete button on the Add/Edit detail view.
To delete a note, use the following
post.deleteInBackground();Password Reset
When you expect users to have passwords to use your application, you should include a way for them to reset their passwords incase they forget them. Parse already has this functionality in place, so you only need to call the following when a user requests a password reset.
ParseUser.requestPasswordResetInBackground(userEmail, new RequestPasswordResetCallback() {
    public void done(ParseException e) {
        if (e == null) {
            // An email was successfully sent with reset instructions.
        } else {
            // Something went wrong. Look at the ParseException to see what's up.
        }
    }
});
Offline Use
The app that we created needs an internet connection to work as needed. It requires an internet connection to retrieve and save notes.
Parse now offers the Parse Local Datastore which enables you to save data locally and query the data with the usual ParseQuery. You do this by pinning data to the local datastore and unpinning the data to remove it.
When the app is offline it will still be able to retrieve and save data and when an internet connection is established again, it will sync the data in the cloud with the local datastore. For information on how to do this check the guides,
Conclusion
We have looked at using Parse as a BaaS system for your apps. Using such ready-made backend services has numerous advantages, but it also comes with some pitfalls which should be measured against the advantages when deciding whether to build from scratch or to use a BaaS solution. Even if you plan to build your own backend, it might be worth it to start with a BaaS to reduce the time it takes for your app to get to the market and also to test out the app with the market and validate functionality quickly based on usage data.
Apart from Parse, there are several other solutions/services, for example Apigee, Backendless, Kii, built.io, Firebase and others. These provide different services at different prices and it’s worth looking at and comparing the different products to decide what best suits your needs.
 Joyce Echessa
I am a web developer who dabbles in mobile development from time to time. You can find me on Twitter @joyceechessa to see what I’m up to.