Though I often talk about both Sketch App and Photoshop, my slight crush on Sketch means I tend to spend more time with it.
However, the fact remains that I need to use both sometimes. One such example is when I’m designing for screens in Sketch App, but I want to mockup the screen as if it were being viewed on an actual device, and for that I need Photoshop’s “Smart Object” functionality. But why go through the effort?
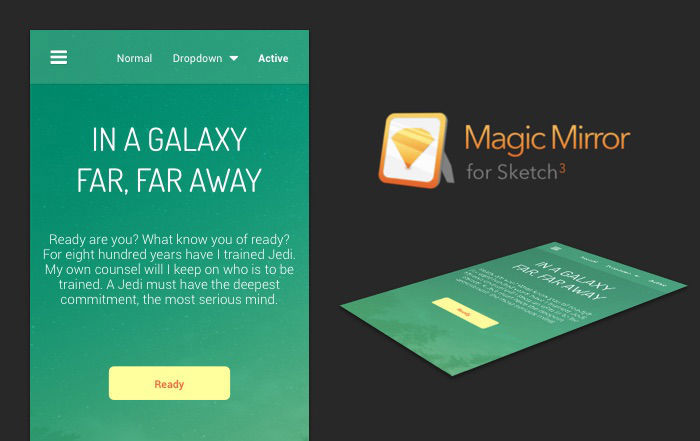
Sometimes the visual aesthetic of a design doesn’t really come to life until you take it off the flat canvas and show it off from a 3D perspective; in other words, how you might see it, realistically, with the naked eye.
Not only that, but it helps the mockup fit into a horizontal frame (for sharing on Behance and Dribbble) and many clients simply love how it looks.
Perspective mockups are very trendy, there’s no argument about it!
MagicMirror Plugin
MagicMirror Plugin works like a Photoshop Action for Sketch, and there’s a terrific free version available. You design your screen in an artboard as normal, and a keyboard shortcut creates a sort-of smart object mockup of your screen.
Let’s take it for a spin!
Getting Started
You can either use a screen that you’ve already designed or download a .sketch freebie, such as this epic Dark Dialer interface by Bootstrap Guru.
Before you open it though, download the MagicMirror Plugin and try to open the .sketchplugin file that comes with it. Just like with Photoshop Actions, this will automatically install it.
Now you can open your .sketch design!

Creating the Makeshift “Smart Object”
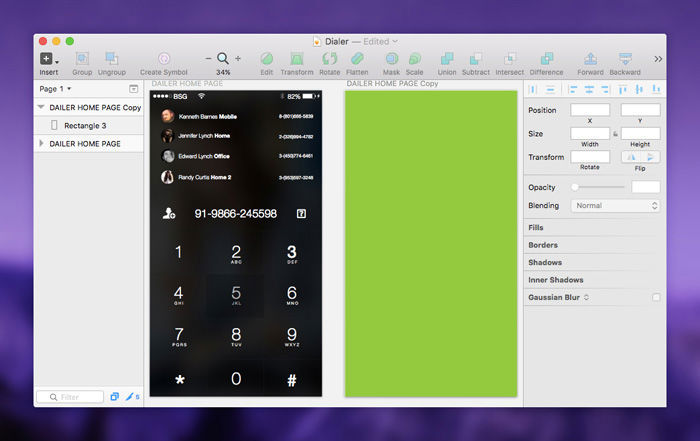
It’s not really a smart object, but it is smart. Press “A” to open the Artboard dialog in the inspector or simply Duplicate (command+d) the “source” artboard and remove its contents.
What we want to achieve here is two artboards of the same width and height, but one of them should be empty to ensure that our smart object retains the same aspect ratio as the design.
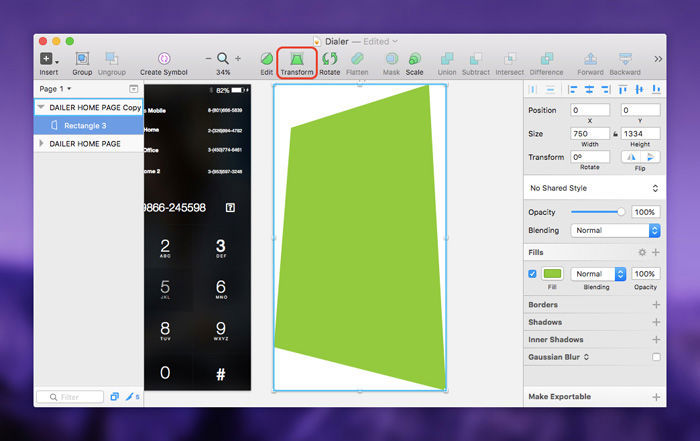
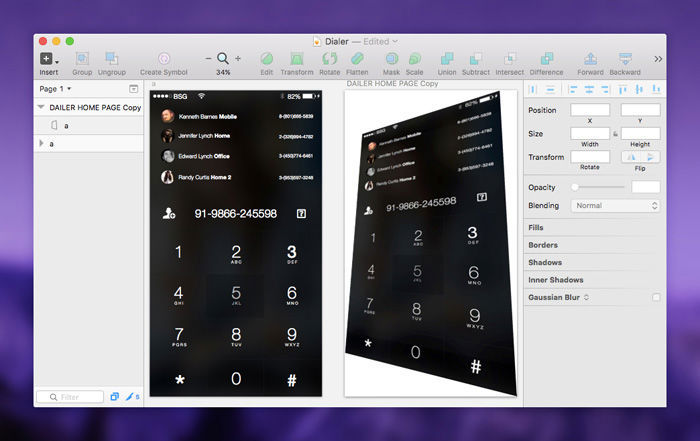
Press “R” to create a Rectangle and draw it out so that it fills up all of the whitespace in the new, empty artboard, then turn your eyes to the menu bar and hit the “Transform” tool.
It’s vital that we use Transform and not “Edit”; Edit will create an irregular shape whereas Transform will make sure that our shape retains the correct aspect ratio of our design.
Move the corners of the shape until you have the angle that you want. Perspective is assured if you’re using Transform.
It might be useful to save your favourite mockup shots in a single .sketch file so that you can use them as templates later on, or you download some of the mockups from the site: here’s a brilliant one.
Setting Up the Design to be Mirrored
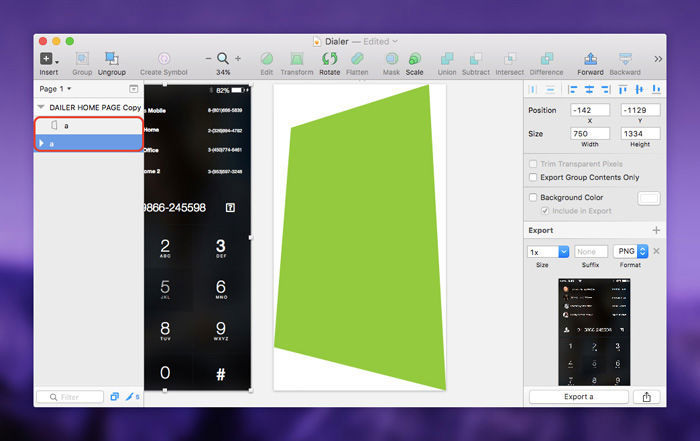
We now need to connect our shape to the design so that they can be mirrored, but that’s really easy. Just make sure that the shape layer is renamed to match the artboard.
Learning the Keyboard Shortcuts that Make It Happen
Press control+shift+m to start the mirroring (this works across “Pages” as well, like Shared Styles and Symbols). You might end up with something like this (below), but there are other keyboard shortcuts that we can utilise to achieve our aims.
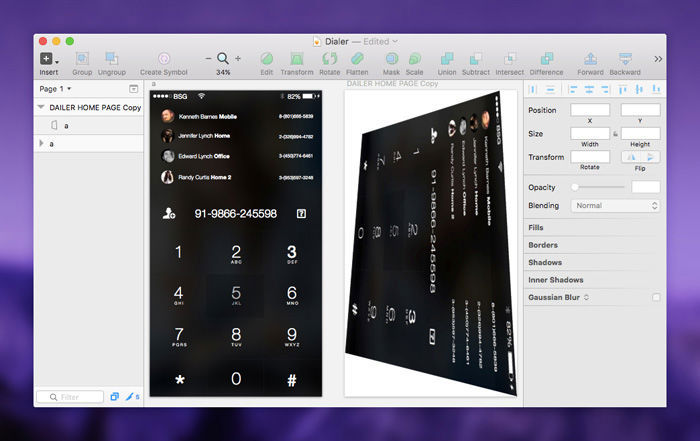
In our dilemma, we’ll need to select the rectangle shape and use command+control+shift+r (I know, that’s a crazy shortcut!) to rotate our design inside the shape; MagicMirror actually uses the “Fill” style to create a background image, but how they rotate it, I have no idea. It must be magic!
Here’re two other keyboard shortcuts to remember:
- Shift+Control+J: Jump from shape to original artboard
- Shift+Control+Command+F: Flips content (similar to rotate)
Conclusion
What we’ve accomplished today is rather basic. If you wanted to step it up, here’s two things to consider. Firstly, you can always import your own vector or bitmap devices and overlay your own smart objects – you don’t have to leave it bare. Personally, I think this method is fluff and a user interface design should only be showcased in this way as a means of showing off.
Secondly, you can totally have more than one mockup and use various perspective shots that will automatically update when you run the keyboard shortcut. In fact, there’s absolutely nothing stopping you from using MagicMirror as a general-purpose smart object tool, something that many Sketch fans have been requesting for a very long time.
Many of us have to deal with the impracticability of breaking our workflow and switching to Photoshop every time we want to show off our screens in a mockup, but with the MagicMirror Plugin, we can keep our workflow contained to a single design tool.
Hopefully!
Frequently Asked Questions about Creating Perspective Mockups with Sketch and MagicMirror
How can I create a realistic perspective mockup using Sketch and MagicMirror?
Creating a realistic perspective mockup using Sketch and MagicMirror involves several steps. First, you need to design your interface in Sketch. Once you’re satisfied with your design, you can use MagicMirror to create a perspective mockup. MagicMirror is a plugin that allows you to transform your design into a 3D perspective. You can adjust the perspective to your liking, and even apply different textures and backgrounds to make your mockup more realistic.
What are the benefits of using Sketch and MagicMirror for creating mockups?
Sketch and MagicMirror offer several benefits for creating mockups. Sketch is a powerful design tool that allows you to create detailed and accurate designs. MagicMirror, on the other hand, is a plugin that transforms your 2D designs into 3D mockups. This combination allows you to create realistic mockups that can help you visualize your design in a real-world context.
Can I use Sketch and MagicMirror for creating mockups if I’m a beginner?
Yes, Sketch and MagicMirror are user-friendly tools that are suitable for both beginners and experienced designers. They offer a variety of features and tools that can help you create professional-looking mockups. Plus, there are plenty of tutorials and resources available online to help you get started.
How can I add textures and backgrounds to my mockups in Sketch and MagicMirror?
Adding textures and backgrounds to your mockups in Sketch and MagicMirror is quite straightforward. In Sketch, you can add textures and backgrounds to your design using the Fill tool. In MagicMirror, you can apply different textures and backgrounds to your mockup using the Texture and Background options.
What are some tips for creating effective mockups in Sketch and MagicMirror?
When creating mockups in Sketch and MagicMirror, it’s important to pay attention to details. Make sure your design is accurate and realistic. Use textures and backgrounds to add depth to your mockup. Also, consider the perspective and lighting to make your mockup more convincing.
Can I use Sketch and MagicMirror for creating mockups for mobile apps?
Yes, Sketch and MagicMirror are excellent tools for creating mockups for mobile apps. They allow you to design your app interface and transform it into a 3D mockup. This can help you visualize how your app will look and function on a mobile device.
How can I share my mockups created in Sketch and MagicMirror with others?
Sharing your mockups created in Sketch and MagicMirror is easy. You can export your mockup as an image file and share it via email or cloud storage. Alternatively, you can also share your Sketch file with others, allowing them to view and edit your design.
Are there any alternatives to Sketch and MagicMirror for creating mockups?
Yes, there are several alternatives to Sketch and MagicMirror for creating mockups. Some popular ones include Adobe XD, Figma, and InVision. However, each tool has its own strengths and weaknesses, so it’s important to choose the one that best fits your needs.
Can I use Sketch and MagicMirror on both Mac and Windows?
Currently, Sketch is only available for Mac. However, there are similar tools available for Windows, such as Adobe XD and Figma. MagicMirror, being a Sketch plugin, is also only available for Mac.
How can I learn more about creating mockups with Sketch and MagicMirror?
There are plenty of resources available online to help you learn more about creating mockups with Sketch and MagicMirror. You can find tutorials, guides, and articles on various design websites and blogs. Additionally, you can also join design communities and forums to learn from other designers.
 Daniel Schwarz
Previously, design blog editor at Toptal and SitePoint. Now Daniel advocates for better UX design alongside industry leaders such as Adobe, InVision, Marvel, Wix, Net Magazine, LogRocket, CSS-Tricks, and more.