Create a Movie Recommendation App with Prediction.io – Implementation

In part one, we covered the basics of Prediction IO and installed its dependencies. In this part, we’re going to build the app.
Key Takeaways
- Start by integrating Prediction IO SDK and configuring dependencies such as Flight, MongoDB, and Guzzle for data handling and API requests.
- Import data efficiently from TMDB by looping through API calls to fetch movie details like IDs, titles, and posters, and store them in MongoDB using Prediction IO’s `create_item` method.
- Implement user session management and random movie display functionality, allowing users to interact with the app through likes and dislikes, which are recorded for recommendation refinement.
- Leverage Flight’s routing capabilities to handle web requests and serve pages, ensuring smooth user navigation within the app.
- Utilize Prediction IO’s machine learning algorithms to generate movie recommendations based on user interactions, enhancing the app’s personalization.
- Enhance the front-end with Handlebars templates and AJAX for dynamic content loading, providing a responsive and engaging user experience.
Importing Data from TMDB
We will be importing the data using the Prediction IO SDK, so we first need to tell Flight to use it. In the beginning of your index.php file add the following code:
<?php
session_start(); //start a session
require 'vendor/autoload.php'; //autoload dependencies
use PredictionIO\PredictionIOClient; //import the prediction IO client
Next, register the Prediction IO Client to Flight so that we can use it throughout our app:
Flight::register('prediction', 'PredictionIO\PredictionIOClient');While we’re here let’s also register the MongoDB class so that we can query MongoDB later on:
Flight::register('mdb', 'Mongo', array('mongodb://localhost'));Next, we map the factory method to a Flight method and call it prediction_client. We will be using this later on to make calls with the Prediction IO client.
Flight::map('prediction_client', function(){
  $client = Flight::prediction()->factory(array("appkey" => "YOUR_PREDICTION_IO_APP_KEY"));
  return $client;
});
Lastly, we also let Flight know of Guzzle. This way we don’t need to initialize Guzzle every time we need to use it. We can just call Flight::guzzle()->some_guzzle_method() and be done with it.
Flight::register('guzzle', 'GuzzleHttp\Client');We can now start writing the code for importing data from TMDB. First, declare a route to the movies/import path. We will access this from the browser later on to begin importing.
Flight::route('GET /movies/import', array('Admin', 'import'));In the code above, we’re specifying the controller and the method that Flight will use inside an array. Go ahead and create a controllers directory inside the root of your project folder. Then create an admin.php file, which will serve as the controller. Open up the file and declare a class to be the same name as the name of the file:
<?php
class Admin {
    public static function import() {
    }
}
Inside the import method, initialize the Prediction IO client. Then create a for loop that would loop 100 times. Inside the loop, we call the TMDB API to return the data on the most popular movies for us. Each API call returns 20 movies so if we loop for 100 times we get a total of 2000 movies.
$client = PredictionIOClient::factory(array("appkey" => "YOUR_PREDICTIONIO_APP_KEY"));
    $index = 0;
    for($x = 3; $x <= 100; $x++){
      $movies_url = 'https://api.themoviedb.org/3/movie/popular?api_key=YOUR_TMDB_API_KEY&page=' . $x;
      $movies_response = Flight::guzzle()->get($movies_url); //get most popular movies
      $movies_body = $movies_response->getBody(); //get response body
    }
In the code above, we’re using Guzzle to fetch some movies from the TMDB API for us. We then convert the returned data which is in JSON format into an array using json_decode:
$movies_result = json_decode($movies_body, true);
$movies = $movies_result['results'];
Once that’s done, we can loop through all of the movies and extract the fields that we want. In this case we want the id, title and the path to the movie poster:
if(!empty($movies)){
  //loop through all the movies
  foreach($res as $row){
    $id = $row['id'];
    $title = $row['title'];
    $poster_path = '';
    if(!empty($row['poster_path'])){
      $poster_path = $row['poster_path'];
    }
  }
To get more details we need to make a separate call for each movie by using its id. We then convert the returned JSON data to an array the same way we did earlier:
$moviedetails_url = 'https://api.themoviedb.org/3/movie/' . $id . '?api_key=YOUR_TMDB_API_KEY';
$moviedetails_response = Flight::guzzle()->get($moviedetails_url);
$movie_details_body = $moviedetails_response->getBody();
$movie = json_decode($movie_details_body, true);
The call to the movie resource returns a whole bunch of data about the movie, but for this app we’re only going to use the overview and release date:
$overview = $movie['overview'];
$release_date = $movie['release_date'];
Now that we have all the data we need, we can save it to the database using the create_item method from the Prediction IO SDK. This call accepts 2 arguments: pio_iid and pio_itypes. pio_iid is the ID of the item; in this case, we’re simply going to use $movie_id, the variable that we declared earlier. We’ll just increment this variable for each iteration of the loop so we have a unique id for each movie. The other required argument is the pio_itypes. This is where we specify the type of the item. You can use any descriptive name for this like movie. But for this app, we’re just going to set the pio_itypes to 1. Next, we set the movie details using the set method. Once that’s done we just call the execute method to add the movie into the database. Then we use print_r to print out the response that we get to make sure the operation was successful.
$command = $client->getCommand('create_item',  array('pio_iid' => $movie_id, 'pio_itypes' => 1));
$command->set('tmdb_id', $id);
$command->set('title', $title);
$command->set('poster_path', $poster_path);
$command->set('overview', $overview);
$command->set('release_date', $release_date);
$client_response = $client->execute($command);
print_r($client_response);
Lastly, we increment the $movie_id by 1.
$movie_id += 1;Putting everything together, we have the following code:
$client = PredictionIOClient::factory(array("appkey" => "YOUR_PREDICTIONIO_APP_KEY"));
$index = 41;
for($x = 3; $x <= 100; $x++){
  $movies_url = 'https://api.themoviedb.org/3/movie/popular?api_key=YOUR_TMDB_API_KEY&page=' . $x;
  $movies_response = Flight::guzzle()->get($movies_url);
  $movies_body = $movies_response->getBody();
  $movies_result = json_decode($movies_body, true);
  $movies = $movies_result['results'];
  if(!empty($movies)){
    foreach($movies as $row){
      $id = $row['id'];
      $title = $row['title'];
      $poster_path = '';
      if(!empty($row['poster_path'])){
        $poster_path = $row['poster_path'];
      }
      $moviedetails_url = 'https://api.themoviedb.org/3/movie/' . $id . '?api_key=YOUR_TMDB_API_KEY';
      $moviedetails_response = Flight::guzzle()->get($moviedetails_url);
      $movie_details_body = $moviedetails_response->getBody();
      $movie = json_decode($movie_details_body, true);
      $overview = $movie['overview'];
      $release_date = $movie['release_date'];
      $command = $client->getCommand('create_item', array('pio_iid' => $index, 'pio_itypes' => 1));
      $command->set('tmdb_id', $id);
      $command->set('title', $title);
      $command->set('poster_path', $poster_path);
      $command->set('overview', $overview);
      $command->set('release_date', $release_date);
      $client_response = $client->execute($command);
      print_r($client_response);
      echo "<br><br>";
      $index++;
    }
  }
}
Once that’s done, open upindex.php at the root of the project directory and put in the following on the last line. This will start the Flight framework. As a convention, this should always be located at the last line of the file:
Flight::start();
After that, you can now access the /movies/import path in the browser to begin importing some movies from TMDB. This might take a while to complete so go grab a coffee or watch an episode of your favorite show.
Picking Random Movies
Now that we have some movies, we’re ready to show some random ones to the user. First, create a route for the index page:
Flight::route('GET /', array('Home', 'index'));This makes use of the Home controller so go ahead and create a home.php inside the controllers directory with an index method.
<?php
class Home {
  public static function index() {
  }
}
Inside the index method, generate a unique id using the uniqid method, then assign it to the user_id session item. Also, initialize movies_viewed with a value of 0. This will represent the number of movies that we have shown the user so far. We will increment it later on as random movies get suggested to the user. Next, we use the prediction client to save the user into the database. The Prediction IO SDK provides us with the create_user method which will interact with the user API. The create_user method needs the pio_uid as its argument. This is pretty much all the information we need so we just call the execute method once we’ve added the user id. If you want to add more user information you can just use the set method to set custom user information.
$user_id = uniqid();
$_SESSION['user_id'] = $user_id;
$_SESSION['movies_viewed'] = 0;
$client = Flight::prediction_client();
$command = $client->getCommand('create_user', array('pio_uid' => $user_id));
$client->execute($command);
Once the new user is added into the database we can render the index page using the render method provided by Flight. Here we’re rendering two views, the first one is the actual page and the second one is the layout. We need to call render on the actual page first because the layout depends on the content variable that we’re setting. In the render call for the layout, we’re setting the title of the page and the base path for the CSS and JS files that we’re linking in the page:
Flight::render('index', array(), 'content');
Flight::render('layout', array('title' => 'Home', 'base_path' => '/movie_recommender'));
The render method expects the name of the view as its first argument. Views in Flight are expected to be in the views directory relative to the root directory of the project. So in the example above, the file name used for the view is index.php and it will contain the following HTML:
<div class="row">
  <div id="movie-container" class="col-md-10 col-centered">
  </div>
</div>
<div class="row">
  <div id="recommended-movie-container" class="col-md-12 col-centered">
  </div>
</div>
<script id="movie-template" type="text/x-handlebars-template">
  <div class="col-md-8">
    <img src="http://image.tmdb.org/t/p/w500{{ca_poster_path}}">
  </div>
  <div class="col-md-4">
    <h3>{{ca_title}}</h3>
    <div class="release-date">
      {{ca_release_date}}
    </div>
    <div class="overview">
      {{ca_overview}}
    </div>
    <div class="button-container">
      <button class="btn btn-success btn-block btn-next" data-id="{{_id}}" data-action="like">Like</button>
      <button class="btn btn-danger btn-block btn-next" data-id="{{_id}}" data-action="dislike">Dislike</button>
      <a href="/movie_recommender/movies/recommended" class="show-recommendations">Show Recommendations</a>
    </div>
  </div>
</script>
<span class="label label-success"></span>
<script id="recommended-movie-template" type="text/x-handlebars-template">
  <div class="col-md-4">
    <img src="http://image.tmdb.org/t/p/w500{{ca_poster_path}}" class="rm-image">
    <h5>{{ca_title}}</h5>
    <div class="release-date">
      {{ca_release_date}}
    </div>
    <div class="overview">
      {{ca_overview}}
    </div>
  </div>
</script>
As you can see from the above code, we’re mainly using client-side templating to render the details for the movie. For this app, we’re using handlebars. Each subsequent movie will be loaded via AJAX so we’re also going to load the first movie via AJAX once the page has loaded.
For the layout, the file name would be layout.php. The layout file contains the following:
<!DOCTYPE html>
<html lang="en">
<head>
  <meta charset="UTF-8">
  <title><?= $title; ?></title>
  <link rel="stylesheet" href="<?= $base_path; ?>/assets/css/bootstrap.min.css">
  <link rel="stylesheet" href="<?= $base_path; ?>/assets/css/style.css">
</head>
<body>
  <div id="wrapper">
    <div class="navbar navbar-default">
      <div class="navbar-header">
        <button type="button" class="navbar-toggle" data-toggle="collapse" data-target=".navbar-responsive-collapse">
          <span class="icon-bar"></span>
          <span class="icon-bar"></span>
          <span class="icon-bar"></span>
        </button>
        <a class="navbar-brand" href="<?= $base_path; ?>">Movie Recommender</a>
      </div>
      <div class="navbar-collapse collapse navbar-responsive-collapse">
        <ul class="nav navbar-nav">
          <li><a href="/">Home</a></li>
        </ul>
      </div>
    </div>
    <div class="container">
    <?= $content; ?>
    </div>
  </div>
  <script src="<?= $base_path; ?>/assets/js/jquery.min.js"></script>
  <script src="<?= $base_path; ?>/assets/js/bootstrap.min.js"></script>
  <script src="<?= $base_path; ?>/assets/js/handlebars.min.js"></script>
  <script src="<?= $base_path; ?>/assets/js/main.js"></script>
</body>
</html>
From the above code you can see that we’re using Bootstrap as a framework for the styling. We also have basic styling for the whole app which is added in the style.css file:
.col-centered {
  float: none;
  margin: 0 auto;
}
.button-container {
  margin-top: 20px;
}
.show-recommendations {
  display: none;
}
#recommended-movies > div {
  height: 1000px;
}
For the scripts, we use jQuery, Bootstrap’s JavaScript file, Handlebars and the main JavaScript file for the app.
For the main JavaScript we add the following code:
var movie_src = $("#movie-template").html();
var movie_template = Handlebars.compile(movie_src);
function getRandomMovie(request_data){
  request_data = typeof request_data !== 'undefined' ? request_data : {};
  $.post('movie/random', request_data, function(response){
    var data = JSON.parse(response);
    var movie_html = movie_template(data);
    $('#movie-container').html(movie_html);
    if(data.has_recommended){
      $('.show-recommendations').show();
    }
  });
}
getRandomMovie();
$('#movie-container').on('click', '.btn-next', function(){
  var self = $(this);
  var id = self.data('id');
  var action = self.data('action');
  getRandomMovie({'movie_id' : id, 'action' : action});
});
Breaking it down, we first compile the Handlebars template which is stored in the div with the ID of movie-template:
var movie_src = $("#movie-template").html();
var movie_template = Handlebars.compile(movie_src);
We then declare the getRandomMovie method. This takes the request_data as an optional parameter. Inside the function we use jQuery’s post method to issue a POST request to the movie/random path. This returns random movie data from the server in JSON format. We then convert it to an object that can be used by JavaScript using the JSON.parse method. Once that’s done we just supply it to the Handlebars template that we have compiled earlier and then update the contents of movie-container div. If the returned data has the has_recommended item we show the link which will lead the user to the page where the movies recommended by Prediction IO are displayed:
function getRandomMovie(request_data){
  request_data = typeof request_data !== 'undefined' ? request_data : {};
  $.post('movie/random', request_data, function(response){
    var data = JSON.parse(response);
    var movie_html = movie_template(data);
    $('#movie-container').html(movie_html);
    if(data.has_recommended){
      $('.show-recommendations').show();
    }
  });
}
Once the script is loaded we execute the function to load the first random movie:
getRandomMovie();We then listen for the click event on the button with the btn-next class. If you remember the overview of the app earlier we have two buttons: like and dislike. Those buttons have the btn-next class. So every time those are clicked, the code below is executed. What it does is call the getRandomMovie function and supply the movie id and the action. The action can have a value of either like or dislike:
$('#movie-container').on('click', '.btn-next', function(){
  var self = $(this);
  var id = self.data('id');
  var action = self.data('action');
  getRandomMovie({'movie_id' : id, 'action' : action});
});
Going back to the server side, we’re now ready to write the code for getting a random movie from the database. First, declare a new route that responds to POST requests to the movie/random path:
Flight::route('POST /movie/random', array('Home', 'random'));In the above code, we’re using the the same controller that we used earlier for rendering the home page of the app. But this time we’re using the random method. So go ahead and declare it in your controllers/Home.php file:
public static function random() {
}
Inside the random method, we get the details of the request and then check if a user session has been set. If there’s a user session we get the movies that have been viewed by the current user. Next, we connect to the MongoDB database using the mdb variable that we assigned to Flight earlier. We then generate a random number from 1 to 2000. 1 represents the initial movie id that we used earlier, 2000 is the total number of movies that we have imported. I have just hard coded it in there since we already know the total number of movies and we won’t really be increasing it. After that, we just make a query to MongoDB and tell it to find all the items which has an itypes value of 1. Then we use the random number that we generated as an offset and tell it to limit the result to 1. Executing the query returns an iterator object, so we still need to convert the iterator to an array using the iterator_to_array method. Once that’s done, we call the array_values method to convert the associative array to a numeric one so we can get to the data we need by accessing the first index of the array.
$request = Flight::request();
if(!empty($_SESSION['user_id'])){
  $movies_viewed = $_SESSION['movies_viewed'];
  $dbname = 'predictionio_appdata';
  $mdb = Flight::mdb();
  $db = $mdb->$dbname;
  $first_movie_id = 1;
  $last_movie_id = 2000;
  $skip = mt_rand($first_movie_id, $last_movie_id); //generate a random number that is between the first and last movie id
  $items = $db->items;
  //offset using the random number
  $cursor = $items->find(array('itypes' => '1'))->skip($skip)->limit(1);
  $data = array_values(iterator_to_array($cursor)); //convert iterator object to an array then convert associative array to numeric
  $movie = $data[0];
Next, we check if the request data contains a movie_id. If you remember from the main JavaScript file earlier, we did not supply any data to the getRandomMovie function on the first time the page is loaded. But when the user starts interacting with the app with the like and dislike button we pass on the movie_id and the action. And that’s what we’re checking here. Ifmovie_id exists, then we use the Prediction IO client to save that user interaction in the database. But first we have to extract the movie id as Prediction IO adds a prefix to the movie id that we have supplied when we imported some movies earlier. Movie ids are prefixed with the app id followed by an underscore. So we use the substr method to extract the movie id. We do this by getting the position of the underscore and then adding 1 to it.
if(!empty($request->data['movie_id'])){
  $params = $request->data;
  $client = Flight::prediction_client();
  $user_id = $_SESSION['user_id'];
  $movie_id = substr($params['movie_id'], strpos($params['movie_id'], '_') + 1);
  $action = $params['action'];
Once that’s done, call the identify method from the Prediction IO SDK. This tells Prediction IO to assign a specific user to the actions that we’re going to perform. Next, we use the getCommand method to create a command that will execute the record_action_on_item method in the Prediction IO API. What this does is just exactly as it sounds: record a user action. Valid values for this include: like, dislike, rate, view, and conversion. The record_action_on_item method requires the pio_action which is the user action and the pio_iid which is the movie id. Once we have assigned those, all that’s needed is to call the execute method to commit the user action.
$client->identify($user_id);
$user_action = $client->getCommand('record_action_on_item', array('pio_action' => $action, 'pio_iid' => $movie_id))
$res = $client->execute($user_action);
Next, we increment the movies viewed by 1. Then we check for the current movies viewed total. If 20 have already been viewed, we set the has_recommended item to true. If you remember from the main JavaScript file earlier, we are checking for the existence of this item. If it exists then we show the link to the recommended movies page. After that, we just update the movies_viewed session to store the incremented movies viewed.
$movies_viewed += 1;
if($movies_viewed == 20){
  $movie['has_recommended'] = true;
}
$_SESSION['movies_viewed'] = $movies_viewed;
Outside the condition for checking the existence of the movie_id, we just echo out the JSON string representation of the movie data using Flight’s json method. This is pretty much the same as the json_encode method that’s available for PHP:
if(!empty($request->data['movie_id'])){
  ...
}
Flight::json($movie);
Putting everything together we get the following:
public static function random() {
  $request = Flight::request();
  if(!empty($_SESSION['user_id'])){
    $movies_viewed = $_SESSION['movies_viewed'];
    $dbname = 'predictionio_appdata';
      $mdb = Flight::mdb();
      $db = $mdb->$dbname;
      $skip = mt_rand(1, 2000);
    $items = $db->items;
    $cursor = $items->find(array('itypes' => '1'))->skip($skip)->limit(1);
    $data = array_values(iterator_to_array($cursor));
    $movie = $data[0];
    if(!empty($request->data['movie_id'])){
      $params = $request->data;
      $client = Flight::prediction_client();
      $user_id = $_SESSION['user_id'];
      $movie_id = substr($params['movie_id'], strpos($params['movie_id'], '_') + 1);
      $action = $params['action'];
      $client->identify($user_id);
      $user_action = $client->getCommand('record_action_on_item', array('pio_action' => $action, 'pio_iid' => $movie_id));
      $client->execute($user_action);
      $movies_viewed += 1;
      if($movies_viewed == 20){
        $movie['has_recommended'] = true;
      }
      $_SESSION['movies_viewed'] = $movies_viewed;
    }
    Flight::json($movie);
  }
}
Recommending Movies
Now that we’re done with the learning phase, it’s time to proceed with writing the code for the recommendation phase. The part that actually recommends relevant movies to the user. Note that the relevance of the results that Prediction IO returns depends on the settings that we have supplied to the movie recommendation engine earlier and the actual data that has been collected. The more data, the better the results will be. But we can’t really ask the user to rate a whole bunch of movies just to get there. I believe 20 is an ideal number.
Create a new route that will respond to GET requests on the /movies/recommended path:
Flight::route('GET /movies/recommended', array('Home', 'recommended'));
This route uses the recommended method in the Home controller.
Inside the method, initialize a connection to the database and then get the items collection. Also, initialize the Prediction IO client then assign an empty array to the $recommended_movies array. This is where we will store the data for the recommended movies later on.
$dbname = 'predictionio_appdata';
$mdb = Flight::mdb();
$db = $mdb->$dbname;
$items = $db->items; //get the items collection
$client = Flight::prediction_client();
$recommended_movies = array();
Next, create a try catch statement. Inside the try block, get the current user id from the session and then use the identify method to assign the current user. Then, use the getCommand method to create a command that will call the itemrec_get_top_n method in the Prediction IO API. This method returns the top recommended movies for the user that we identified it with. This method accepts the pio_engine and pio_n as its parameters. The pio_engine is the name we assigned to the engine that we created earlier. pio_n is the number of results that you want to return. In this case we’re just going to recommend nine movies. Once that’s done we just call the execute method to make the actual request.
If the call is successful it returns an array with the pio_iids item. This contains the IDs of the recommended movies. Since we specified 9 for the pio_n, we should get 9 movie IDs. We then use array_walk to prefix the movie IDs with the app id. We need to prefix the movie IDs because Prediction IO only returns the actual movie IDs. This is not good because what actually gets saved in the database as the value for the movie ID is prefixed with the app id followed by an underscore. That’s why we need to add the prefix before making a query to MongoDB. If you don’t know what the app ID is, access the Prediction IO web admin interface from your browser, then select the app that you created earlier and click on any of the engines that you have. Once on the engine page the URL will look something like this:
http://localhost:9000/web/?appid=4&engineid=4&engineinfoid=itemrec#engineThe value of the appid in the query parameters is the id of your app. You can use that as the prefix. In this case the appid is 4.
Once we have prefixed each of the array items with the app id, we can query MongoDB to get the data for each of those movie ID’s. We do that using the $in operator. The $in operator expects an array of items that we want to match. Next, we convert the iterator to an array. If we somehow find ourselves under the catch block we just echo out that there’s a problem:
try{
$user_id = $_SESSION['user_id'];
$client->identify($user_id);
$command = $client->getCommand('itemrec_get_top_n', array('pio_engine' => 'movie-recommender', 'pio_n' => 9));
$recommended_movies_raw = $client->execute($command);
$movie_iids = $recommended_movies_raw['pio_iids'];
array_walk($movie_iids, function(&$movie_iid){
$movie_iid = '4_' . $movie_iid;
});
$cursor = $items->find(array('itypes' => '1', '_id' => array('$in' => $movie_iids)));
$recommended_movies = array_values(iterator_to_array($cursor));
}catch(Exception $e){
echo "Sorry there's a problem";
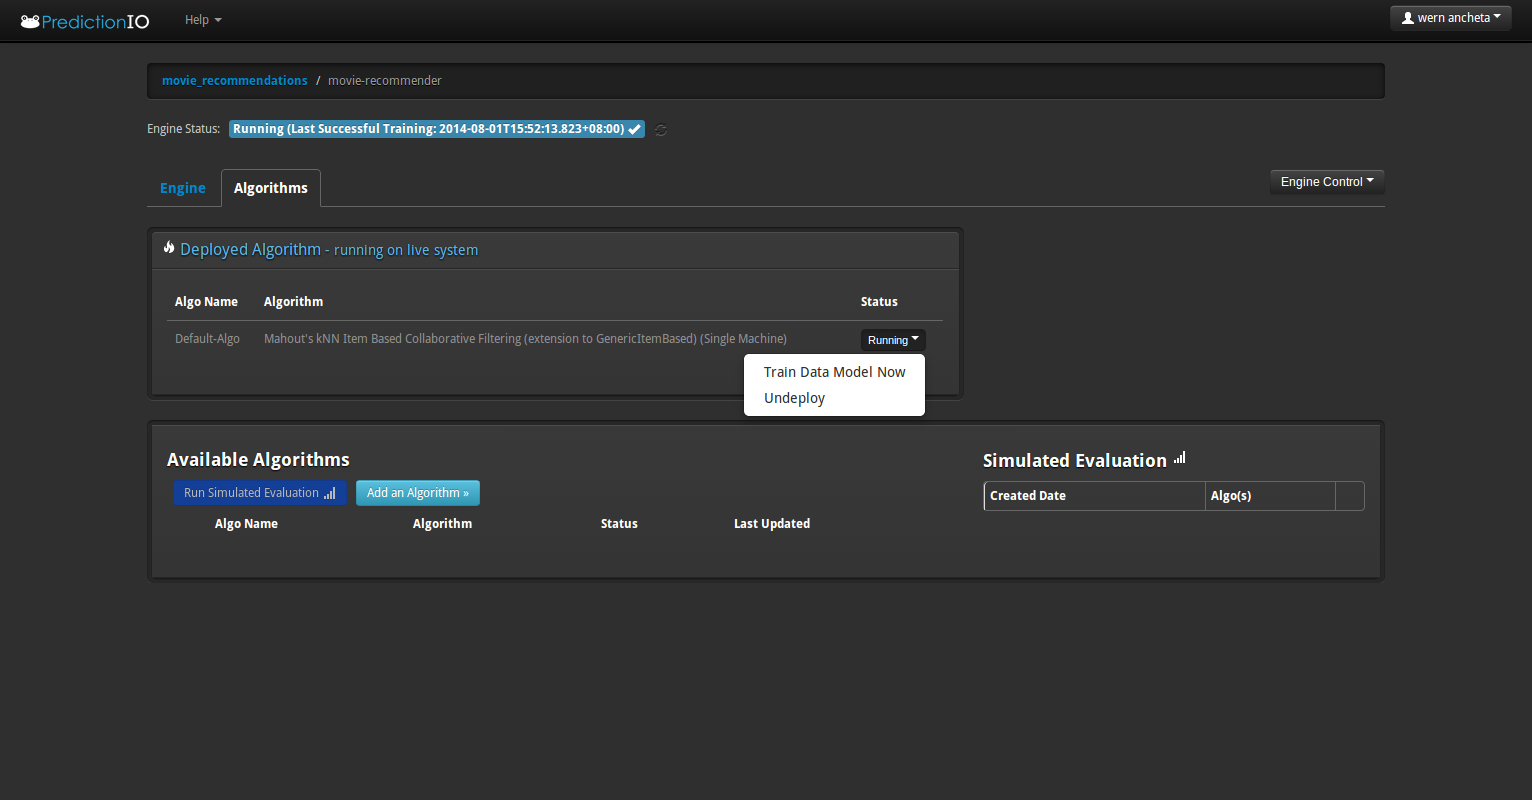
}If you find yourself inside the catch block that means that the data we provided hasn’t been ‘trained’ yet. This means that Prediction IO still hasn’t done the number crunching when the user finished rating the movies. There are two solutions to this. The first is increasing the number of movies that the user has to rate. 60 is pretty safe since there are 60 seconds in a minute. We have set the training schedule to execute every minute so this is a pretty good number, not unless the user immediately clicks a random button when a movie is shown. The second method is to manually tell Prediction IO to train the data model. You can do that by clicking on the ‘Algorithms’ tab on your engine page. And on the default algorithm used, click on the ‘running’ button. A drop-down will show up and all you have to do is to click on the ‘train data model now’. This will tell Prediction IO to train the data model immediately.
Lastly, we reset the values for the movies_viewed and the user_id in the session and then render the page for the recommended movies passing along the data that we got from the database:
$_SESSION['movies_viewed'] = 0;
$_SESSION['user_id'] = '';
Flight::render('recommended', array('recommended_movies' => $recommended_movies), 'body_content');
Here’s the HTML for the recommended movies page:
<div class="row">
  <h1>Recommended Movies</h1>
  <div id="recommended-movies" class="col-md-12">
  <?php
  foreach($recommended_movies as $rm){
  ?>
  <div class="col-md-6">
    <img src="http://image.tmdb.org/t/p/w500<?= $rm['ca_poster_path'] ?>" alt="<?= $rm['ca_title'] ?>">
    <h4><?= $rm['ca_title'] ?></h4>
    <div class="release-date">
    <?= $rm['ca_release_date'] ?>
    </div>
    <div class="overview">
    <?= $rm['ca_overview'] ?>
    </div>
  </div>
  <?php
  }
  ?>
  </div>
</div>
What we’re doing is looping through the $recommended_movies array and then echoing out the values for the relevant fields; namely the title, release date, overview and the image.
Conclusion
That’s it! In this tutorial you have learned how to use Prediction IO to provide machine learning capabilities to your app. You can check this project out in its Github repo.
We have barely scratched the surface in this series and there’s much more that you can do with it. I recommend that you check out the official docs for Prediction IO if you want to learn more.
If you know of any alternatives to Prediction IO or some interesting use cases, let us know in the comments!
Frequently Asked Questions (FAQs) about Creating a Movie Recommendation App
How does a movie recommendation app work?
A movie recommendation app works by using machine learning algorithms to analyze a user’s past behavior and preferences to suggest movies they might like. The app takes into consideration factors like the genres of movies the user has watched, the ratings they’ve given, and the feedback they’ve provided. It then compares these factors with the data of other users who have similar tastes to provide personalized movie recommendations.
What is Prediction.io and how is it used in creating a movie recommendation app?
Prediction.io is an open-source machine learning server that allows developers to create predictive features, such as recommendation systems, in their applications. In the context of a movie recommendation app, Prediction.io can be used to build and deploy a machine learning model that can predict a user’s movie preferences based on their past behavior.
How can I improve the accuracy of my movie recommendation app?
The accuracy of a movie recommendation app can be improved by refining the machine learning model it uses. This can be done by training the model with more data, tuning the model’s parameters, and using more sophisticated algorithms. Additionally, incorporating user feedback into the model can also help improve its accuracy.
Can I use Prediction.io to create other types of recommendation apps?
Yes, Prediction.io is a versatile machine learning server that can be used to create a wide range of recommendation apps. Besides movie recommendation apps, it can also be used to create book recommendation apps, music recommendation apps, product recommendation apps, and more.
What are the benefits of creating a movie recommendation app with Prediction.io?
Prediction.io offers several benefits for creating a movie recommendation app. It provides a flexible and scalable platform for building and deploying machine learning models. It also supports a wide range of machine learning algorithms, allowing developers to choose the one that best fits their needs. Moreover, being open-source, it allows developers to customize and extend its functionality as needed.
How can I make my movie recommendation app more user-friendly?
There are several ways to make a movie recommendation app more user-friendly. This includes designing an intuitive and easy-to-navigate interface, providing personalized recommendations, allowing users to easily provide feedback and rate movies, and offering features like watchlists and social sharing.
How can I monetize my movie recommendation app?
There are several ways to monetize a movie recommendation app. This includes in-app advertising, premium subscriptions, affiliate marketing, and partnerships with movie studios or streaming platforms.
How can I ensure the privacy and security of users’ data in my movie recommendation app?
Ensuring the privacy and security of users’ data in a movie recommendation app involves implementing strong data encryption, using secure APIs, regularly updating and patching the app, and complying with data protection laws and regulations.
What are the challenges in creating a movie recommendation app?
Some of the challenges in creating a movie recommendation app include collecting and processing large amounts of data, building and refining the machine learning model, ensuring the app’s scalability and performance, and maintaining the privacy and security of users’ data.
How can I promote my movie recommendation app?
Promoting a movie recommendation app can be done through various channels, such as social media, content marketing, app store optimization, influencer marketing, and partnerships with movie studios or streaming platforms.
Wern is a web developer from the Philippines. He loves building things for the web and sharing the things he has learned by writing in his blog. When he's not coding or learning something new, he enjoys watching anime and playing video games.


Published in
·automation·Cloud·Debugging & Deployment·Meta·Miscellaneous·Patterns & Practices·PHP·September 13, 2014