Mobile devices have become extremely popular, so web designers — just like software developers — are focusing in the transition to mobile apps. The popularity of mobile applications has created intense competition, and any opportunity to help your app stand out from the crowd is worth pursuing. A stylish, sharp-looking app icon is one obvious way to help your app shine in the app store and on the devices themselves. Attractive app icons can subtly lead to increased purchases, more downloads, and a more active user base.
In this tutorial, I’ll show you how to create an appealing camera icon in Illustrator. We’ll use various shape tools, gradient tool, and different options in the effect menu to achieve the final outcome. I hope you will learn some handy tips along the way. So, let’s get started!
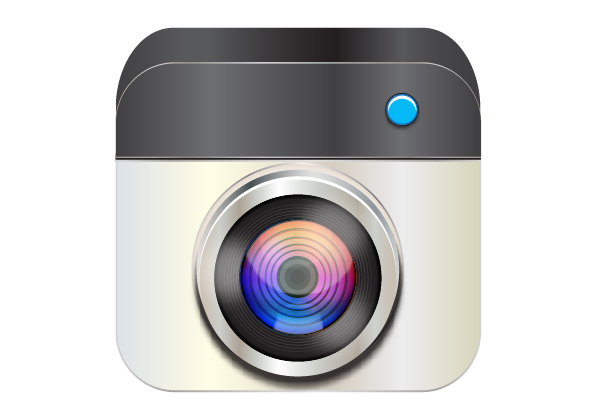
Final result: (Download the completed Illustrator file.)

Step 1
Create a new document in Illustrator with a 500px width and a 400px height.
Step 2
Select the rounded rectangle tool and click on the canvas. Enter a 30px value for corner radius in the options window to draw the rectangle shown below. You can use any fill color for now. Set your stroke to none.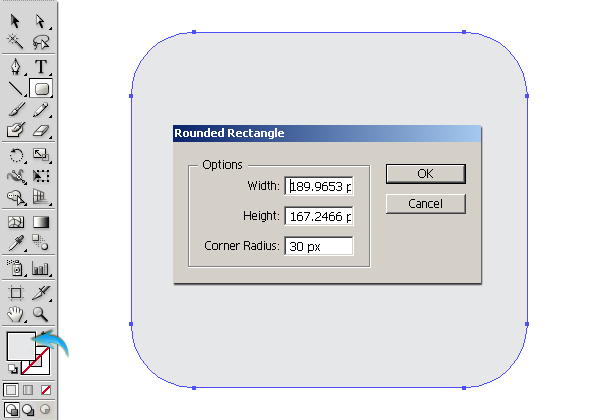
Step 3
Draw a thin rectangle using the rectangle tool to divide the previous rectangle into two portions. After that, select both rectangles by clicking the ring-shaped target present at right side of the respective layers and go to “Window” > “Pathfinder” (Shift + Ctrl + F9) and choose the “Minus Front” shape mode. Keep that group selected and go to “Object” > “Expand” to completely split them.
Step 4
Now, select the lower portion and apply following gradient on it using the gradient tool (G).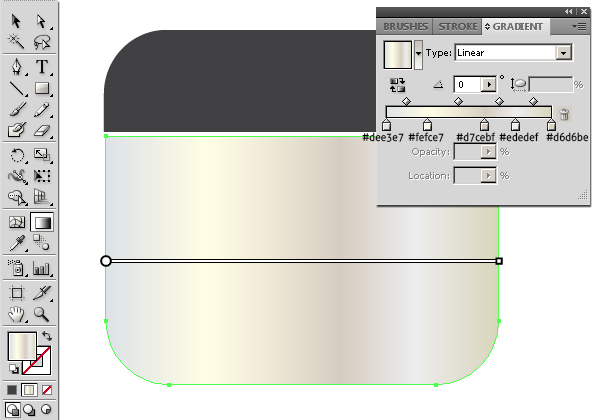 Duplicate this layer, slightly increase the size of it to make a stroke, and apply following gradient to it.

Step 5
Select the top portion now and apply the following gradient to it.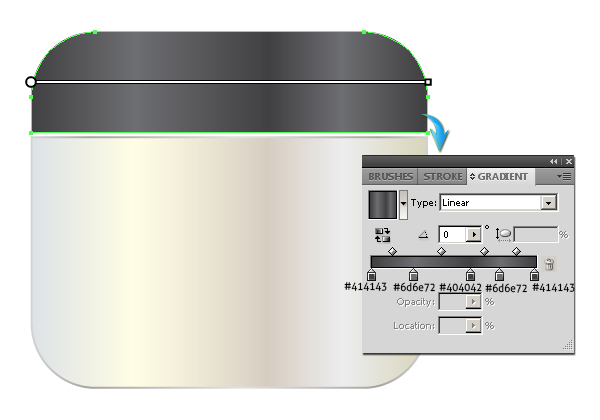 To make a shiny stroke around it, duplicate it, increase its size a bit, and apply the same gradient as used for the lower portion’s stroke. Now, draw a thin black rectangle below the rest of the layers to cover the gap between the camera portions.

Step 6
To give your icon a 3D look, duplicate the top portion layer, place it below the rest of the layers and increase its size with the help of the selection tool (V). Apply the following gradient to it.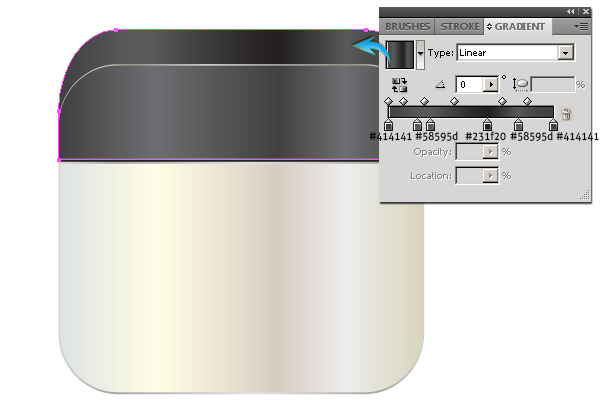
Step 7
Next, we’ll make the camera lens. Draw an ellipse using the ellipse tool and apply a “Silver” gradient to it. You can find this gradient by going to “Window” > “Swatch Libraries” > “Gradients” > “Metals” and choosing “Silver” from the options. Draw another ellipse a bit smaller than the previous one. Use #efe8df as your fill color and set stroke to none.

Step 8
To make lens shadow, draw the darker gray ellipse shown below and apply a 2.8px Gaussian blur effect by following the path “Effect” >“Blur” > “Gaussian Blur.” Duplicate this ellipse, drag it 2-3 steps downward, and reduce its opacity to 75% in the transparency panel (Shift + Ctrl + F10).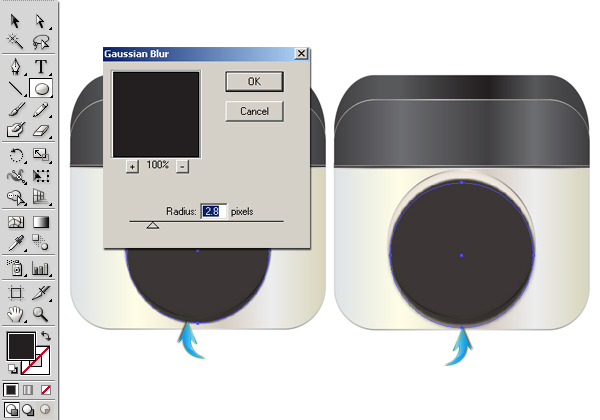
Step 9
Now, we’ll draw three ellipses over each other. Draw the first ellipse and apply a “Steel” gradient to it, which you can find in the default metal gradients. Duplicate it, change its fill color to white, and drag it downward 3-4 steps. Duplicate this ellipse, apply a “Neutral 14” gradient on it, which you can find in the default neutral gradients, and drag it downward 1-2 steps.
Step 10
Draw a smaller ellipse above the rest, select it, and apply the following settings to achieve an inner glow (“Effect” > “Stylize” > “Inner Glow”).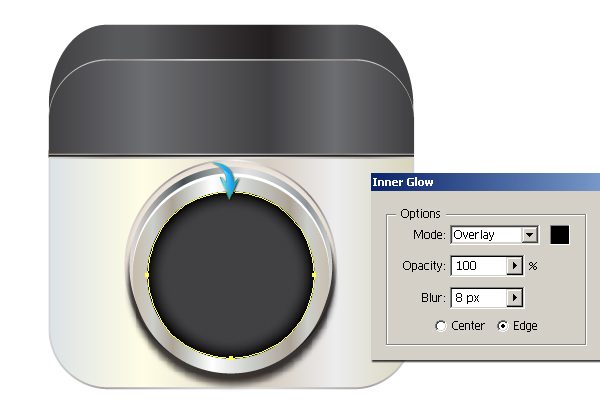
Step 11
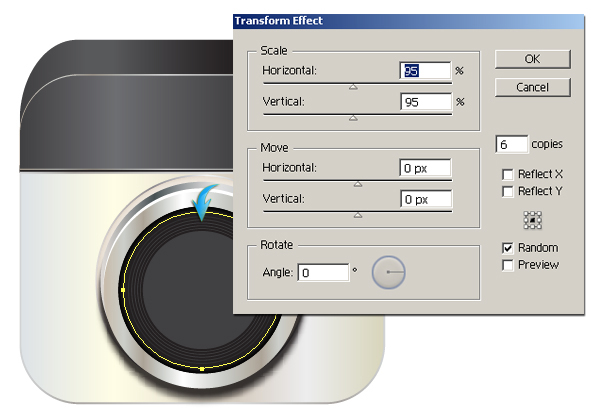
Next, draw a circle inside the previous one, set its fill color to none, and choose a black stroke with a 1pt stroke weight. Select the stroke layer and go to “Effect” > “Distort & Transform” > “Transform.” Apply the following settings here to make few rings.
Step 12
To make a light glow, draw the white ellipse shown below and apply a 20px Gaussian blur effect to it. After that, reduce its opacity to 40%. Duplicate and position the glow spot at some distance away from the original.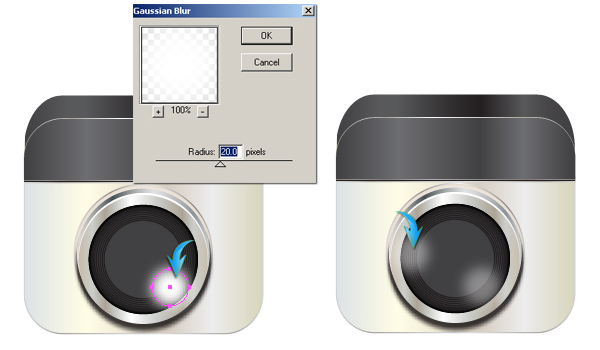
Step 13
Now, draw a circle above the rest of the layers, apply a “Split complimentary 1” gradient to it, and add a gray 1pt stroke. You can find this gradient in the default color harmonies. After that, select this ellipse and apply the same inner glow effect ised in step 10.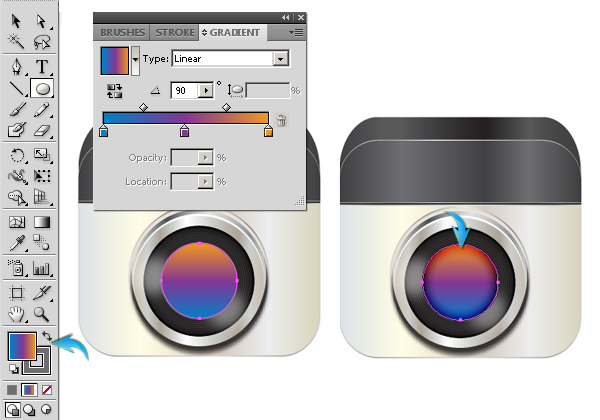 Duplicate this ellipse and hide the inner glow effect in the appearance panel (Shift + F6). Now, select it and double-click the gradient tool to open the gradient window and change the angle from 90 to 0 degrees. After that, change the blending mode of this layer to “Color Dodge” and reduce its opacity to 50%.

Step 14
Now, draw an ellipse over the colored area, set its fill color to none, and add a black stroke with a 0.5pt weight. Select it and apply following Transform settings to get more rings. After that, reduce its opacity to 60%.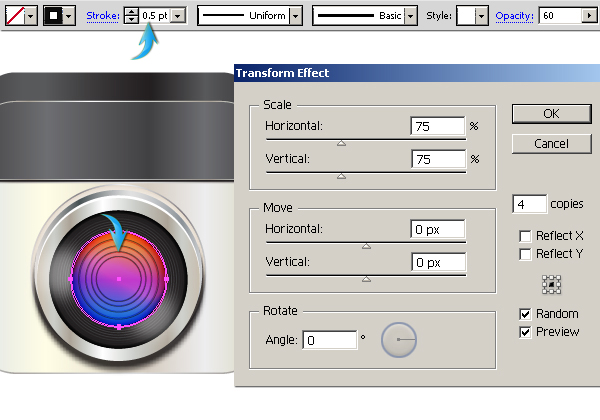
Step 15
Make few more ellipses in different shades of gray to fill the central part of the lens. I’ve duplicated the glow layer and brought it to the top.
Step 16
Next, we’ll create few highlights over the lens. Draw a few shapes (shown below) using the pencil or pen tool. Also, make an irregular shape in black between these highlights. Select them and collect them into a new layer. Now, apply a 2-3px Gaussian blur effect. To confine the highlights inside the lens, draw a circle and set its fill and stroke to none. Select the highlights and this new ellipse layer and go to “Object” > “Clipping Mask” > “Make.” After that, change its blending mode to “Hard Light” and reduce the opacity to 40%.
Step 17
To make the camera button, draw three ellipses of different sizes (shown below) and position them over each other to make the button. To create a highlight, duplicate the lighter blue ellipse twice and change their color to white. Drag one white ellipse 1-2 steps downward. Now, select the white ellipses and hit “Minus Front” in the pathfinder panel to create half-moon shape. Reduce this crescent shape’s opacity to 40%. Make a shadow for the button using the same technique that we used for the lens.
Step 18
To make the viewfinder, draw few rectangles and place them over each other as shown below. Apply a “Neutral 15” gradient on the background rectangle with a 1pt black stroke.
Step 19
Now, draw a circle as shown below and apply a “Silver” gradient to it. Change its blending mode to “Color Dodge” and reduce opacity to 40%. Make highlights using pen tool and reduce the opacity to 40%.

Step 20
To make flash bulb, draw a rectangle and apply a “Chrome” gradient to it. Change its blending mode to “Hard Light” and set opacity to 60%. Duplicate it and change its gradient to “Chrysoprase,” which you can find by going to “Window” > “Swatch Libraries” > “Gradients” > “Gems and Jewels.” Change its blending mode to “Screen” and set opacity to 75%. Now, make an elongated ellipse with a sky blue fill color within the rectangle and apply an 8px Gaussian Blur effect to it. Change its blending mode to “Screen.” Lastly, make its shadow using the same techniques that we used for the button.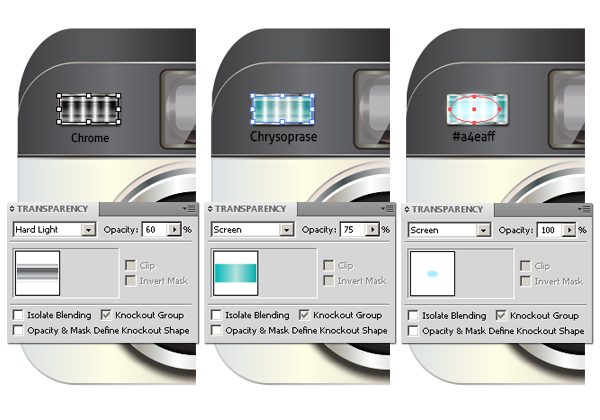
Step 21
Now, we’ll make the shadow of the icon. Draw an ellipse with a black fill color below the rest of the layers. Select it and apply an 8px Gaussian blur effect to it.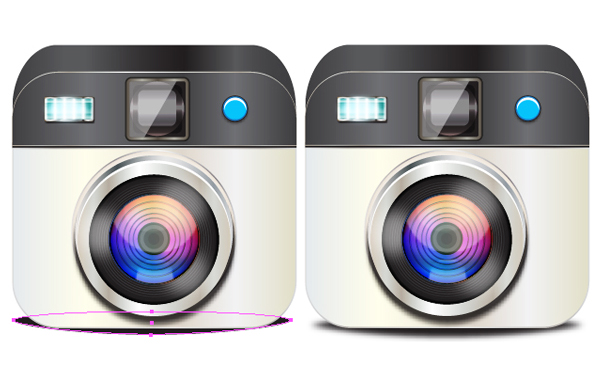
 That’s it guys. I hope you enjoyed the tutorial and learned something useful. Let me know what you think.
Frequently Asked Questions about Creating a Sharp, Stylish Camera Icon in Illustrator
What are the basic tools in Illustrator that I need to create a camera icon?
To create a camera icon in Illustrator, you will need to familiarize yourself with several tools. The Rectangle Tool (M) is essential for creating the basic shape of the camera. The Ellipse Tool (L) is used to create the lens and other circular elements. The Rounded Rectangle Tool is useful for creating buttons and other rounded features. The Direct Selection Tool (A) allows you to manipulate individual points on your shapes, and the Pen Tool (P) is used for creating custom shapes or adding details.
How can I add depth and dimension to my camera icon in Illustrator?
Adding depth and dimension to your camera icon can be achieved by using gradients and shadows. Gradients can be applied to your shapes to give the illusion of light and shadow, making your icon appear more three-dimensional. You can also use the Gradient Mesh Tool to create more complex gradients. Shadows can be added by duplicating shapes, filling them with black or grey, and adjusting their opacity.
Can I customize the color scheme of my camera icon in Illustrator?
Yes, you can customize the color scheme of your camera icon in Illustrator. You can use the Color Picker tool to select any color you want, or you can use the Swatches panel to choose from pre-made color palettes. You can also adjust the hue, saturation, and brightness of your colors using the Color Guide panel.
How can I make my camera icon look more realistic in Illustrator?
To make your camera icon look more realistic, you can add details such as buttons, dials, and text. You can use the Type Tool (T) to add text, and the Ellipse Tool (L) or Rounded Rectangle Tool to create buttons and dials. You can also use the Gradient Mesh Tool to create more complex gradients and shadows, giving your icon a more three-dimensional appearance.
What file format should I save my camera icon in Illustrator?
The file format you should save your camera icon in depends on how you plan to use it. If you’re going to use it in another Adobe program, such as Photoshop or InDesign, you should save it as an AI file. If you’re going to use it on the web, you should save it as an SVG file. If you’re going to print it, you should save it as a PDF or EPS file.
How can I create a camera icon in Illustrator without any drawing skills?
Illustrator is a vector-based program, which means you can create shapes and designs without needing to draw them by hand. You can use the various shape tools, such as the Rectangle Tool and the Ellipse Tool, to create the basic shape of your camera icon. You can then use the Direct Selection Tool to adjust the points on your shapes and the Pen Tool to add details.
Can I use Illustrator to create other types of icons?
Yes, Illustrator is a versatile tool that can be used to create a wide variety of icons. You can use the same techniques you learned to create a camera icon to create other types of icons, such as a phone icon, a mail icon, or a heart icon. The possibilities are endless!
How can I make my camera icon unique in Illustrator?
To make your camera icon unique, you can experiment with different shapes, colors, and details. You can also add your own personal touch by incorporating elements that reflect your style or the theme of your project. For example, you could use a specific color palette, add a pattern, or include a logo or monogram.
Can I use my camera icon in other Adobe programs?
Yes, you can use your camera icon in other Adobe programs. If you save your icon as an AI file, you can open it in programs like Photoshop or InDesign and use it in your designs. You can also copy and paste your icon directly from Illustrator into another Adobe program.
How can I improve my skills in Illustrator?
The best way to improve your skills in Illustrator is through practice. Try creating different types of icons, experimenting with different tools and techniques, and challenging yourself with more complex projects. You can also watch tutorials, take online courses, or read books on Illustrator to learn new skills and techniques.
 Anum Khan
Anum is Web and Graphic designer. Addicted to Photoshop and crazy for pixel perfection. She is also an active blogger, sharing her passions, skills and creative details on her blog Websoulz. She loves to connect with the community, sharing the latest design gossips and rolling her eyes on boring trends.