
When you begin working with SVG, it is important to understand how to create, export, and optimize your SVG files for the browsers that will render them.
However, before we start, you need to understand one thing clearly. The optimization of an SVG file begins with its creation and continues all the way to export. Like any HTML web page, it’s difficult to fix a poorly built SVG file after it’s completed.
Sure, you can use optimization tools after export, but this automated approach can break your file in all kinds of unexpected ways. Having a solid working knowledge of good manual SVG optimization concepts will hold you in good stead from the start.
This is exactly what you will learn today.
Creating SVGs in Illustrator
When you create a graphic in Illustrator—which is intended for SVG export—you need to perform some steps and considerations required to make the final output properly optimized for web. Let’s explore them now.
Set the Correct Color Space
Illustrator — as most vector illustration software — was originally designed for print production, and therefore its color space is set to CMYK by default. RGB is much more appropriate for web and screen use, and has a wider gamut (range of colors) than CMYK. So, when you create new document, make sure the color mode is set to RGB – as you can see in the image below.
Give your drawing a proper structure
An SVG file is not like a regular bitmap image — a grid of pixels. It’s a text document that has a specific structure.
Like an HTML document, you can select and manipulate individual elements separately. To do this, you’ll need to use their names as a reference. I’ve found it’s always much easier to create these labels during visual editing in Illustrator, rather than later.
For that reason, it’s important to give a meaningful name to each graphic element as you make it. Here is what you need to know when you create a graphic in Illustrator:
-
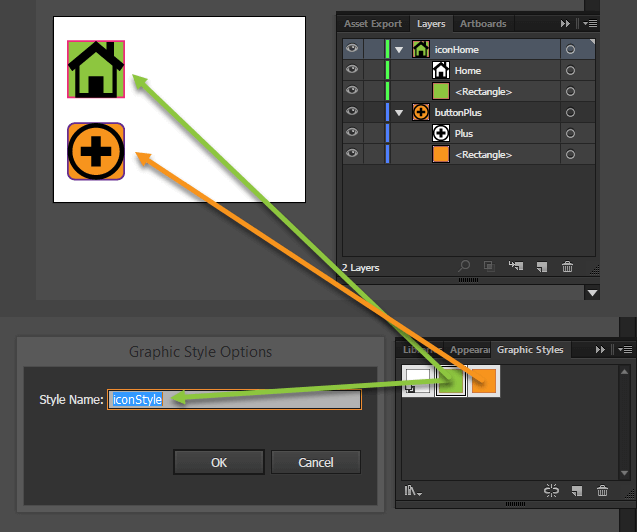
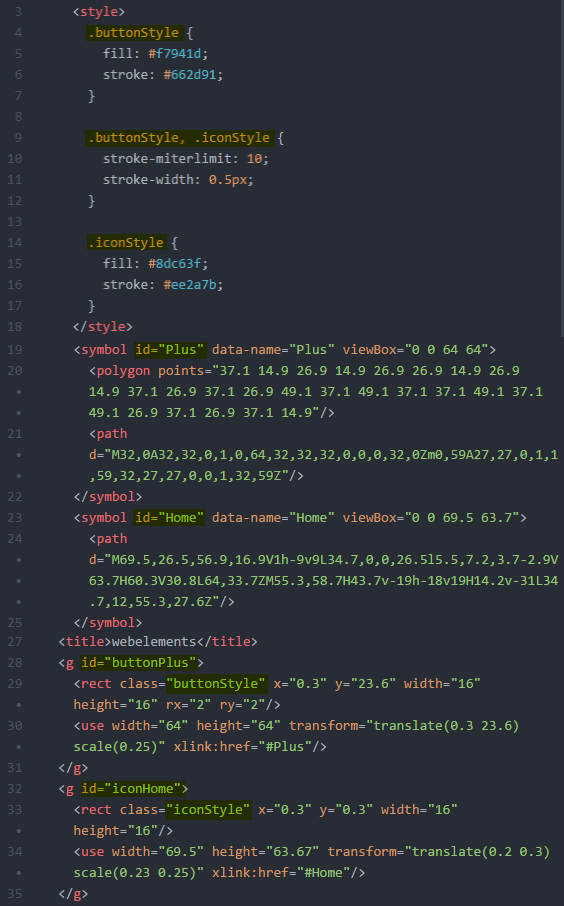
Illustrator Layers and Layers Groups names are used as IDs for SVG groups
-
Illustrator Symbols names are used as IDs for SVG symbols
-
Illustrator Graphic Styles names are used as CSS classes
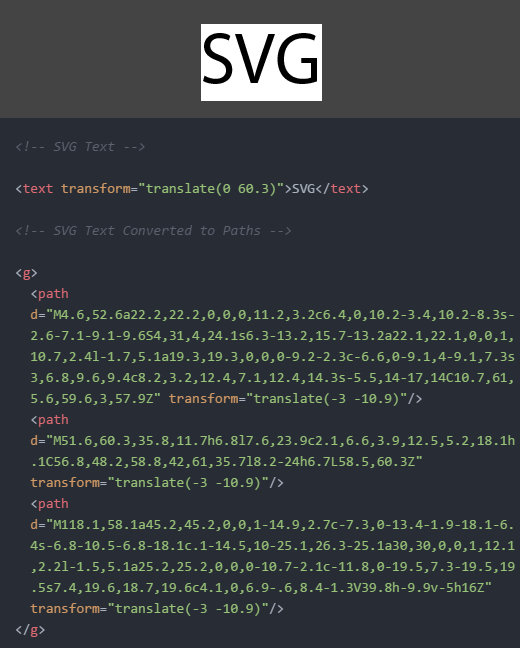
In the images below, you can see in action how names from an Illustrator file reflect to the exported SVG.
Simplify your shapes whenever possible
The shapes in an SVG drawing are described with coordinate points. The more points a drawing has, the larger the file size and more difficult it is to edit and maintain. Creating small, efficient files makes your life easier later. To solve this issues, you need to use the fewest possible number of points to create the shapes you need. This can be achieved in several ways.Use Primary SVG shapes instead of SVG paths whenever possible
Using simple elements like line, rect, and circle has some significant advantages.
x, y, cx, cy, instead of point coordinates as it is with paths.
To see what I mean, in the image below you can see a simple circular shape defined once as a SVG circle element and once as a SVG path. Though they render identically, it’s clear that the SVG shape is smaller and more versatile. Be aware that some graphics editors – Fireworks’s SVG export extension was an example – automatically convert SVG shapes to paths when you export. Obviously, try hard to avoid this.

Simplify your paths
A path is nothing more than an array of coordinate points. To simplify a path means to cut out some of its points, which will lead to less path data and smaller file size. To do so you can useObject > Path > Simplify… command or Warp Tool. In both cases, the main point is to reduce the path’s points maximally without loosing the quality of visual appearance.
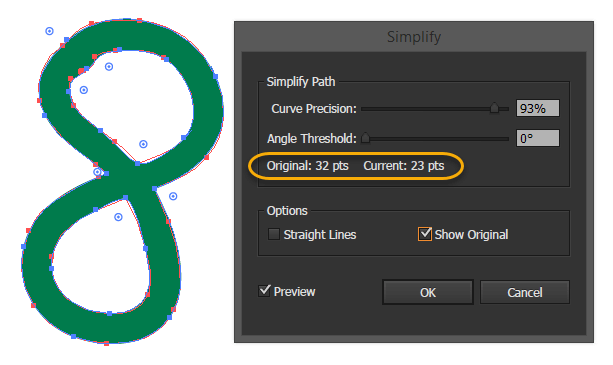
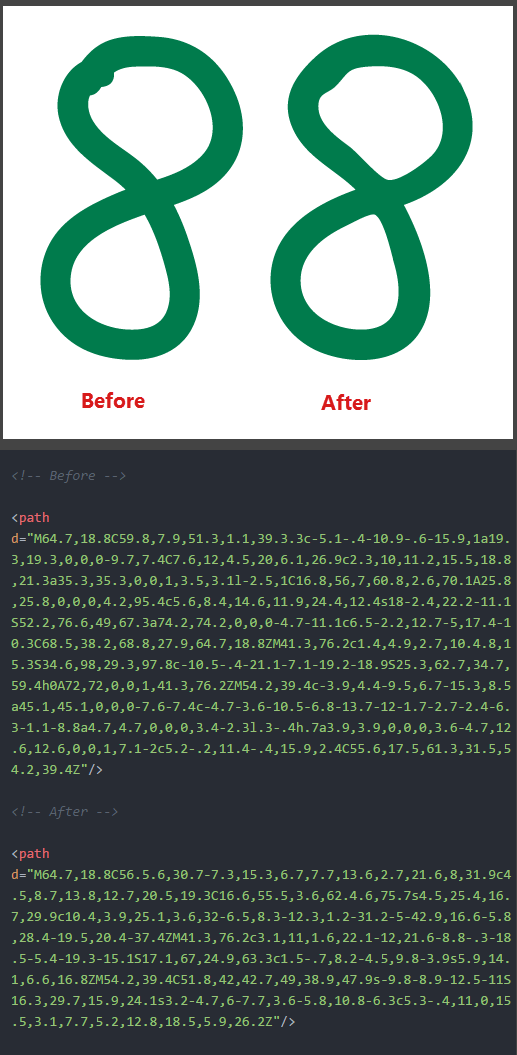
In the images below, you can see how Illustrator’s simplify process reduces path points from 32 to 23 — which is about 25% — and how this reflects to the code. The path data is decreased while the visual quality still remains at a good level.
Decide whether to convert text to paths
In SVG graphics, text is a standalone element and as such it is searchable, accessible, and easily re-editable. This is a valuable quality for text to have. However, if you want to guarantee your text looks exactly the way you designed it everywhere, your end-user will need to have access to the correct fonts. This means choosing a common fonts — which limits your creativity — or providing a web font.If precise text rendering is more important than editability — for example, in a logo — you can convert it into paths by using Type > Create Outlines command or by setting this option in the export panel as you’ll see later on.
Bear in mind that convert a lot of text to paths, the file size can increase drastically – so think carefully before converting.
Use ‘SVG filters’ in preference to Illustrator or Photoshop Filter Effects
Illustrator offers a set of SVG Filters that are applied live in the browser (Effect > SVG Filters). While Illustrator or Photoshop Effects are always permanently ‘baked into’ your raster images embedded inside the SVG, SVG filters can be changed or removed at any time with a few keystrokes.
You can also create re-usable filters and/or edit them via Apply SVG Filter dialog.

Fit artboard to drawing
If you want your SVG to be displayed predictably, it’s good habit to always to trim your artboard to the drawing before. The artboard dimensions are the dimensions of the exported SVG viewport, and any white space in the artboard will be generated as white space inside the viewport. Depending on situation you can useObject > Artboards > Fit to Artwork Bounds or Object > Artboards > Fit to Selected Art command.
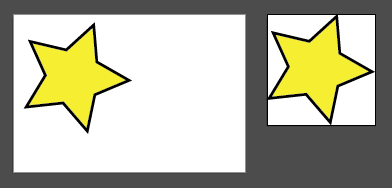
In the image below, the left star will be exported with the surrounding white space, while the right star will be exported with its proper dimensions.
Exporting SVG in Illustrator
Since version 2015.2, Illustrator CC has shipped with a new export panel created for web-optimized SVG files. In this section we’ll see how to use it.
Note: For those of you using older version of Illustrator here is an appropriate tutorial.
When your graphic is ready for production, select File > Export > Export As… command, then select SVG as option for the file type and hit Export button. You should see the following panel:
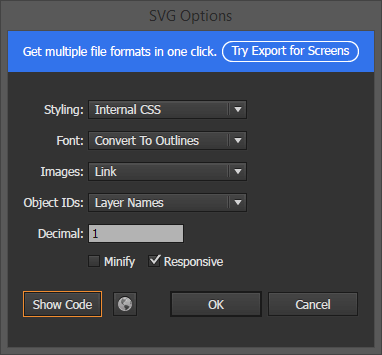
Let’s explore the options presented in more detail.
Styling
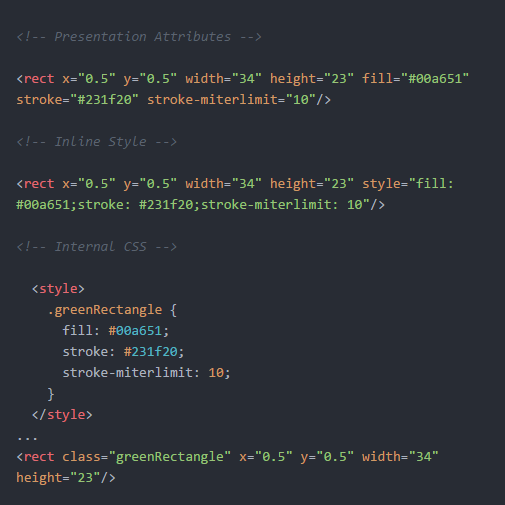
There are three way to style your SVG and they are presented in the first dropdown list.
- The first is to use internal CSS (i.e. a
<style>block), which is generally considered the best option following the Separation of Concerns principle. - The second method is to use inline CSS styles (i.e.
). - And the third method is to use SVG presentation attributes
.
In the image below, you can see the difference between these three options.
Font
If you want to convert your text to outlines, here you can instruct Illustrator to do so. If you want to preserve your text editability, then select SVG option. Outlined text gives you complete visual control of your typography, but at a significant cost – file sizes blow out and text loses editability and searchability.
Note: SVG fonts will be removed from SVG 2 and is considered as a deprecated feature with support being removed from browsers.
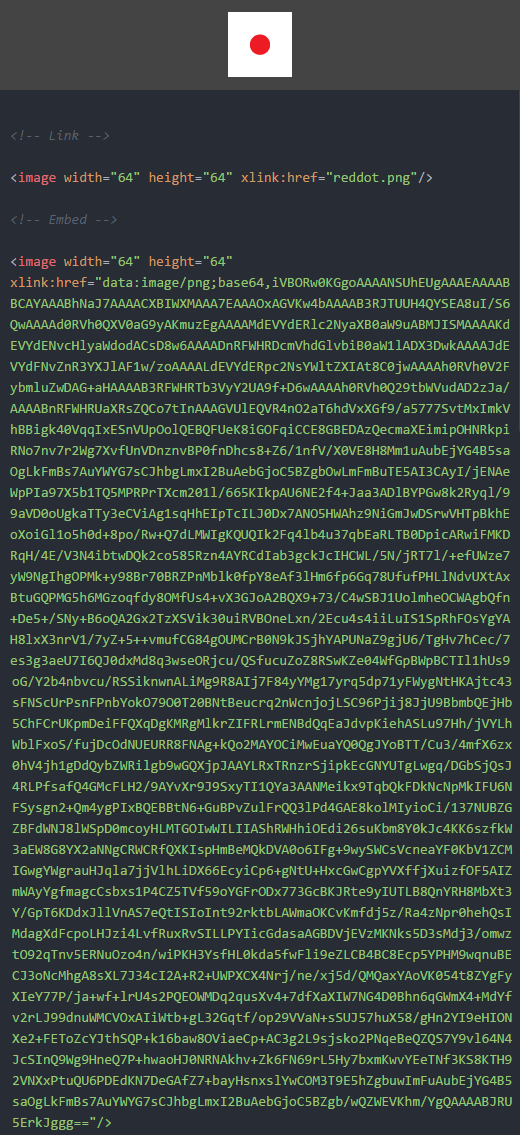
Images
Here you can choose how you treat any raster images in your SVG. You can choose to keep them as external files, or to embed them into the SVG as DataURIs. Often Link is a useful choice as it makes the parent SVG file dramatically smaller and, as such, far more manageable in your code editor.
However, the Embed option does have one great, overriding advantage: embedded images can never become unlinked/separated from their ‘parent SVG’. SVGs using linked resources will show the missing image icon the first time the SVG is downloaded, uploaded or moved without its ‘child images’.
Keep this in mind if you require portability in your SVG.As a general rule, you’ll avoid many future headaches if you can simply avoid using pixel-based graphics in your SVGs whenever you can.
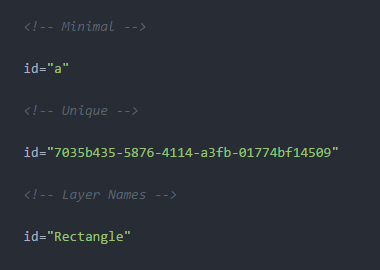
Object IDs
Generally the best option is to select Layer Names, because this will give you meaningful names for your individual SVG elements. Minimal uses random letter-numbers, and Unique uses large random combination of characters.
Decimal
This option defines how many decimal places your coordinates will have filled after the decimal point. Higher numbers means more precise paths, while lowest number produces less verbose code and small file size.
As you can see from the graphic below, the path with 5 decimal places if far larger than the same path with 1 decimal – yet visually identical. Keep in mind that we’re talking about 100ths and 1000ths of a pixel here. Higher values will only ever be necessary only if your graphic is very small or requires incredible precision. In most cases, sticking to value of 1 decimal place – will be the best option.

Minify
Check this option only if you’re exporting a final version of your graphic for production and you are sure that the file won’t be edited anymore.
Responsive
In theory, this option removes the width and height attributes from your SVG document – making it more responsive. However, in most cases, this is not enough to make your SVG truly responsive for all browsers and especially for IE. We’ll explore a fix for this problem in a follow up tutorial.
TIP: It’s always a good idea to keep your original .ai file as your source, and then to export SVG copies with different settings from that parent file.
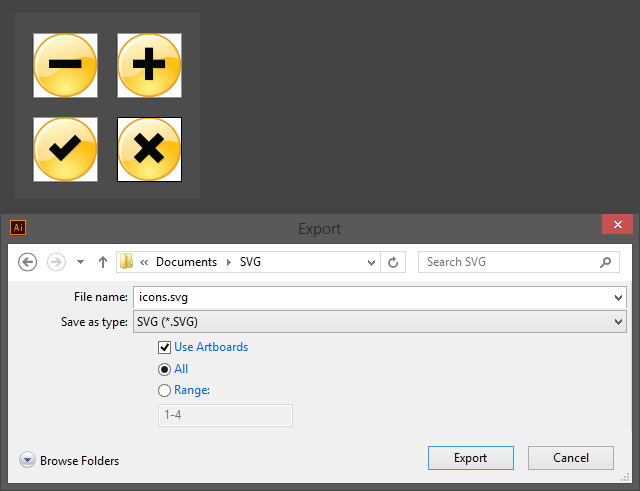
When you choose Export As… command, in the appearing export dialog you may have noticed an additional option called Use Artboards. It becomes useful when you use multiple artboards—for example, when you create a set of icons—and you want each artboard to be exported as a separate SVG file.
As you’ve seen above, a lot of optimization takes place during the creation and export of your SVG. However, you may want to further optimize your file with some specialized tool, such as SVGO or its web GUI-fied version SVGOMG.
 Be aware that you do need to be careful when using these tools. They can easily break your document functionality. My advice is to use manual optimization whenever it’s possible and use automated optimization tool only if it’s necessary and with caution.
Conclusion
I don’t think I’m going out on a limb to pronounce SVG as the future of web vector graphics. It’s hard to see a situation where SVG doesn’t continue to gain more power along the time. If you haven’t dived in yet, it will be good and wise investment to start learn it now.
We have SVG 2 appearing on the horizon with lots of powerful, new features to play with will. Exciting times ahead.
Frequently Asked Questions on Optimizing and Exporting SVGs in Adobe Illustrator
What are the benefits of optimizing SVG files in Adobe Illustrator?
Optimizing SVG files in Adobe Illustrator can significantly reduce the file size without compromising the quality of the image. This is particularly beneficial for web developers as it helps in improving the loading speed of web pages, thereby enhancing user experience and SEO ranking. Additionally, optimized SVG files are easier to manage and edit, making them a preferred choice for graphic designers.
How can I reduce the file size of my SVG image in Adobe Illustrator?
Adobe Illustrator provides several options to reduce the file size of SVG images. You can simplify the paths, remove unnecessary metadata, and use the ‘Save for Web’ feature to optimize the SVG file. Additionally, you can also use online SVG optimization tools for further reduction in file size.
What is the ‘Save for Web’ feature in Adobe Illustrator and how does it help in SVG optimization?
The ‘Save for Web’ feature in Adobe Illustrator is a powerful tool for optimizing SVG files. It allows you to adjust various parameters such as color, quality, and format to reduce the file size. Moreover, it provides a real-time preview of the optimized image, enabling you to make necessary adjustments for the best output.
Can I use online tools for SVG optimization? Are they reliable?
Yes, there are several online tools available for SVG optimization. These tools work by removing unnecessary data from the SVG file, thereby reducing its size. While most of these tools are reliable, it’s always recommended to keep a backup of the original file before using such tools.
How does SVG optimization improve the loading speed of web pages?
SVG optimization reduces the file size of the images, which in turn reduces the amount of data that needs to be loaded when a user visits a web page. This significantly improves the loading speed of the web page, providing a better user experience.
What is the difference between ‘Save as’ and ‘Export’ in Adobe Illustrator when dealing with SVG files?
When you ‘Save as’ an SVG in Adobe Illustrator, it retains all the Illustrator editing capabilities, which can increase the file size. On the other hand, ‘Export’ creates a flat file with reduced editing capabilities, which is typically smaller in size.
How can I ensure the quality of my SVG image after optimization?
While optimizing an SVG image, it’s important to maintain a balance between file size and image quality. You can ensure the quality of your SVG image by previewing it after optimization. If you notice any loss in quality, you can adjust the optimization parameters accordingly.
Can I optimize SVG files in other software apart from Adobe Illustrator?
Yes, there are several other software and online tools available for SVG optimization. However, Adobe Illustrator is widely preferred due to its advanced features and ease of use.
What are the common mistakes to avoid while optimizing SVG files?
Some common mistakes to avoid while optimizing SVG files include over-optimization, which can lead to loss of image quality, not keeping a backup of the original file, and not previewing the image after optimization.
How can I learn more about SVG optimization in Adobe Illustrator?
There are several resources available online to learn about SVG optimization in Adobe Illustrator. You can refer to Adobe’s official documentation, online tutorials, and forums for detailed information and guidance.
 Ivaylo Gerchev
I am a web developer/designer from Bulgaria. My favorite web technologies include SVG, HTML, CSS, Tailwind, JavaScript, Node, Vue, and React. When I'm not programming the Web, I love to program my own reality ;)