How I Built a Windows Store App With HTML5 and SVG

Paint 4 Kids is a Windows Store app, specifically designed for kids. A simple app for coloring and drawing. You can read of the consumer’s features directly from the Windows Store site, where you can also see some screen shots. For this article, you can simply think of it as an app that has several drawings and you can interact with them.
From a technical perspective, it is entirely built using standard web technologies like HTML, CSS, JavaScript and SVG. Consider an important aspect here: with Windows 8, we are writing an app reusing our web skill and we are developing for the web platform, using the underlying HTML5 support of the Internet Explorer 10 rendering engine. So, one immediate benefit is that we don’t have to test and support all the different browser versions and don’t have to use polyfills to emulate the new API features in old browsers. We can use the best of the web platform and use some specific API of Windows 8 directly in JavaScript.
This article is about to discuss the use of Scalable Vector Graphics (SVG) in Paint 4 Kids, starting with some requirements of the project and going on to address them and some pitfalls using SVG. I hope that some of these considerations could apply to your apps as well.
Key Takeaways
- Utilizing SVG in the Paint 4 Kids app allows for scalable graphics that maintain quality across different resolutions and devices, crucial for Windows Store apps.
- HTML5, CSS, and JavaScript are employed to build the app within the Windows 8 environment, leveraging Internet Explorer 10’s HTML5 support and avoiding browser compatibility issues.
- SVG’s ability to instantly fill paths with color enhances the user experience in the coloring app, making interactions immediate and visually appealing.
- The viewBox and viewport attributes in SVG are essential for adapting the app’s drawings to different screen sizes, ensuring a consistent user experience on various devices.
- Performance considerations are necessary when using SVG due to potential slowdowns from DOM manipulation as more objects are added, highlighting the need for optimization.
- Alternative graphic methods like Canvas were considered for Paint 4 Kids, but SVG was chosen for its scalability and ease of use, despite some limitations like converting SVG to Canvas for image saving.
Requirements and why using SVG
Windows Store apps give you a great opportunity in terms of markets where you can distribute and sell your apps and in terms of devices where your app can run. Your app can be used on devices with different screen sizes, different screen resolutions and pixel densities. This must be considered and looking through this article gives you a very good technical understanding on how to scale your app to different screens, and how to test your app using the Windows Simulator.
One of the requirements is that we want to have a single drawing that will show well at different resolutions. We ended up using SVG, a vector image format for two-dimensional graphics. Our approach is to create a drawing at a specific resolution of 2560×1440, scaling down to the current user’s resolution.
An advantage is that is very simple and fast to fill a path with a color in SVG, and that is one of the main feature of the app. When a user taps the screen, it’s simple to intercept the corresponding portion of the drawing and fill the path with a specific color.
Another requirement is that we want to reuse some drawings made in XAML and have a good tooling support so that we can create and add new drawings to the app in a simple and fast way. Inkscape suits very well for this purpose. You can import an XAML drawing and export it into an SVG file and, because the two vector based formats are very similar, the export always works quite successfully.
One disadvantage of using SVG is that the DOM manipulation can become slow with the increase in the number of objects added to the DOM, so some performance testing and optimization is often necessary. You can read a good account of the pros and cons of using SVG as opposed to Canvas on this Internet Explorer blog post.
Another Paint 4 Kids requirement is that the user should be able to save their drawing. Unfortunately, at the time of writing, it isn’t possible to create an image from an SVG file, so we ended up converting the SVG file into a Canvas object.
An alternative approach could be to use Canvas instead of SVG. With Canvas, you have to create different raw images for different resolutions – at least if you want your drawing to look good at different resolutions, otherwise the lines will look pixelated.
Another consideration is how to fill a shape in a drawing. When you use Canvas with touch points, you are dealing with a raw image, made only of pixels; you cannot deal with shapes like a rectangle, circle and path in an easy way. If you want to have a shape bordered by a black line, you have to implement a flood fill (or seed fill) algorithm to accomplish the purpose, and if the area to fill is big (relative to the screen size) you will see the area gradually filling up, whereas with SVG the fill effect is quite instantaneous.
Adapting the drawing to different form factors: viewport and viewBox
As outlined, we start our SVG drawing with a specific resolution of 2560 x 1440 pixels, and every drawing is loaded dynamically into the DOM from a file inside the Windows Store app. This specific value has been chosen for convenience – you could use other starting points. In Paint 4 Kids we want to use a single drawing and make it scale at different resolutions. Look at the following images of the same drawing running in the Windows Simulator at different resolutions.
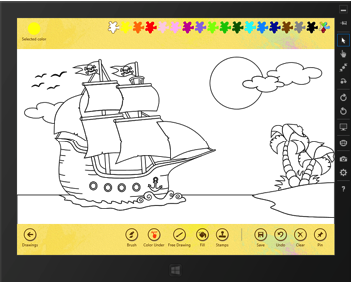
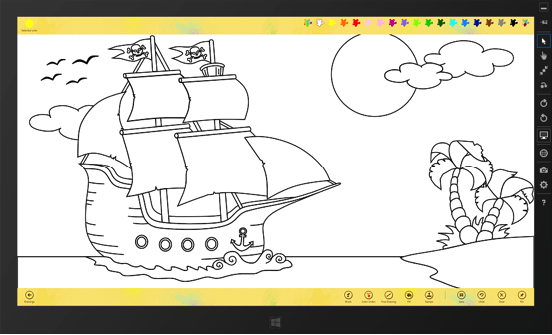
The first one is taken simulating a 10-inch monitor at the resolution of 1024 x 768 pixels and the second one on a 27-inch monitor at the resolution of 2560 x 1440.
This fixed resolution give us a sort of virtual space coordinate system. In SVG we can set this coordinate system using the viewBox attribute. If you use a tool to draw using this coordinate system, all the graphical elements are relative to it.
You can scale down (or up) from this resolution to another specific one. Suppose, for example, that your tablet has a resolution of 1366 x 768, you have only to set the width and height attributes on the SVG element that contains your drawing. These two attributes define the viewport of the SVG, i.e. the actual resolution of the device.
The value of the viewBox consists of four numbers that represent the minimum x-coordinate, minimum y-coordinate, width and height of the coordinate system that you want to map and scale on the viewport. So, combining the viewBox, width and height attributes give us the expected result.
The following is the root SVG element of every drawing, a simple XML file. The coordinate system starts at the top left corner of the screen, as you would expect if you have already worked with SVG.
<svg viewbox="0 0 2560 1440">...
When the drawing is loaded into DOM that happens when the user select a drawing to color, we can set the viewport attributes.
To find the root of an unnamed SVG element we use document.querySelector API, using a pseudo-class selector to find the first SVG element. Because this API is called only once, when user select an element to draw, we can overlook any performance lag.
var svgd;

svgd = document.querySelector("svg:first-of-type");

svgd.setAttribute("width", window.innerWidth);

svgd.setAttribute("height", window.innerHeight);
The code sample also use the window object and its properties inner* to get the actual resolution in pixel at runtime.
Another consideration when dealing with viewport and viewBox is aspect ratio. If the two coordinate systems have different ratio of width and height, sometime you want that the resulting image fit non-uniformly. In other scenarios, you may want that the aspect ratio is preserved and the image scaled uniformly. SVG use the preserveAspectRatio attribute to decide if the image have to be scaled uniformly or not. We will discuss this later when we speak about “stamps”. For the drawings the default behavior that scale the viewBox uniformly to fit the viewport just works as we want.
How to fill a path with colors and images
Fill a SVG shape, like a path, a rectangle or others is a very easy step and it is quite instantaneous, because it is like setting a style property in CSS, so you don’t need to write the code to find every single pixel surrounded by a line. You can look at the code below that it is the call back function when a tap event is fired inside the SVG area.
var el = document.elementFromPoint(e.x, e.y);

var selectedColor = "255,0,0,1";

el.setAttribute("style", "fill:rgba(" + selectedColor + "); stroke-width:3;);
In the code above the e is an object of type MSPointerEvent. This object is very important, you can get this object if you subscribe to some of the MSPointer* events (like MSPointerDown). With a single line of code you can subscribe to an event that comes from mouse, touch and even from a pen! Also inside the MSPointerEvent you can, if needed, read the pointerType property that give you the detailed information of which kind of device generate the event. If you are interested on this topic, you can read this blog post on the APIs for the touch input on IE 10 and Windows Store apps.
Back to the code, the e object here is only used to get the x, y point coordinates from the input device, using the elementFromPoint API. el now is the specific shape we want to fill with a color, and it is of type SVGPathElement. The rest of the code is straightforward, setting the fill color and the line stroke width of the SVGPathElement, regardless of the actual shape that it really is.
Instead of using the setAttirbute API you could also directly set the fill and strokeWidth property on the SVGPathElement, avoiding the string parsing can give you more performance; even though will not be perceived by the user in this scenario.
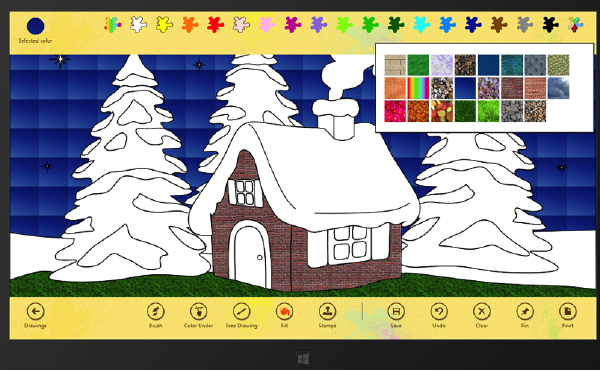
In the sample, the color is a standard solid RGBA color that the user can chose from a colors’ palette, but you can also fill the shape with a path coming from an image or using gradients. Paint 4 Kids defines not only a common set of colors, but also some images, like stones, grass etc. To do that in SVG you can define some patterns as in the code below:
<pattern id="imgPatterns_1" patternUnits="userSpaceOnUse" width="128" height="128">

    <image xlink:href="../images/BRICK.PNG" width="128" height="128" />

</pattern>
Two things to note in the code: first, we are defining a SVGPatternElement that it based on the imaged contained. Second, you can define the patternUnits property that define how to fill a shape with the pattern itself. The userSpaceOnuse simply repeat the image more and more times without padding between them. Once the pattern is defined, we can use in the fill property used above using the following syntax:
var selectedColor = "url(#imgPatterns_1)";

el.setAttribute("style", "fill:" + selectedColor + "; stroke-width:3;);
Looking at the code, you can notice that the fill property it is now a url that use the id of the pattern element defined above, preceded by the # symbol (e.g. #imgPattern_1).
See the images below so see some pattern effects in use.
Reusing SVG elements for the “Stamps”
Paint 4 Kids give you also the possibility to insert some shapes into your drawing as stamps that you can attach to the painting. For the user a stamp is a shape like a pumpkin, or a ball that they can put into the drawing wherever they want, they can also decide the size of the shape; and they can insert the same shape more and more times into the drawing.
From an SVG perspective, every shape could be complex, as you want, so inserting the same shape more and more times, could eventually make your DOM bigger and bigger and at the end making your app to some performance lags on slow devices. It is crucial here to optimize how manage this scenario.
To implement that feature we have used a combination of a symbol and a use element in SVG. The symbol element provide a way to group element, but when a symbol element is added to the DOM of the page it isn’t displayed, so you can use it as something that you can re-use. Therefore, we can insert a complex SVG shape onetime and reuse it more and more times using the use keyword. In the following example, you see some SVG code.
<symbol id="bottiglia" viewBox="0 0 40 40" preserveAspectRatio="xMinYMin meet" >

    <path …>

</symbol>

<use id="onlyforimg" xlink:href="#bottiglia" height ="80" width="80"></use>
A path – omitted for brevity – that contains the actual shape is contained into a symbol element that also defines a viewBox to set the size of the shape when it was originally drawn. The viewBox here is necessary because we can resize the shape in the use element underneath, where we set the height and width doubling the original size – this was another desideratum as explained above. The use element has a reference to the id attribute of the symbol element as you can easily notice from the code above. Furthermore, the use is very small and thank to this, we can reuse it more and more times, eventually changing the size of the drawing, reducing the size of the DOM.
In the real app, the use element is created dynamically in JavaScript setting not only the width and height, but also the x and y coordinate to position the shape in a way that the center of the shape is where the use tap the screen. To do this some math – that it is not explained here – is necessary to set these two coordinates. To make all the stuff work, we need to use the preserveAspectRatio using the meet attribute to obtain a uniform scaling, so that the viewBox is fully contained, not sliced when mapped on the viewport and also set the alignment. xMin aligns the minimum x of viewBox with left corner of viewport and yMin aligns the minimum y of viewBox with top edge of viewport. You can get the full reference of these values from the SVG specs here.
Loading SVG files
The preceding part of the article discussed about standard SVG that could eventually run directly into a modern browser. From now on, we will mix some Windows Store APIs that can be used for build a Windows Store app that are specific of the Windows 8 platform, and could eventually be called from other supported languages.
Because Paint 4 Kids uses many drawings, a single drawing is loaded asynchronously when needed from the appx file and then put into the DOM of the page. The async loading is done using Windows 8 load async API as it shown in the code. A Windows Store app prevents us from loading dynamic code into the DOM, this is because in general this code can come from an external call and eventually create some security issues in your app if the code is malignant. However, the code that we are loading is trusted, because it already in appx file and it is provided by us. You can safely call the WinJS.Utilities.setInnerHTMLUnsafe function that allow us to load the drawing into the DOM when needed.
svgfolder.getFileAsync("drawing.svg").then(function (file) {

    file.openAsync(Windows.Storage.FileAccessMode.read).then(function (stream) {

        inputStream = stream.getInputStreamAt(0);

        reader = new Windows.Storage.Streams.DataReader(inputStream);

        size = stream.size;

        reader.loadAsync(size).then(function () {

            svg = reader.readString(size);

            WinJS.Utilities.setInnerHTMLUnsafe(document.getElementById("s1"), svg);

        });

    });

});
The svgFolder is an object of type StorageFolder, you can call an async method for searching a storageFile object – here error handling is omitted – on which we can open a stream and a dataReader object for reading the content. At the end, the svg variable contains a string that represents the entire SVG drawing. As explained above we can call the setInnerHTMLUnsafe to add the drawing to the s1 DOM element.
Nice here is that the SVG can be inspected into DOM Explorer in Visual Studio 2012, as show below:
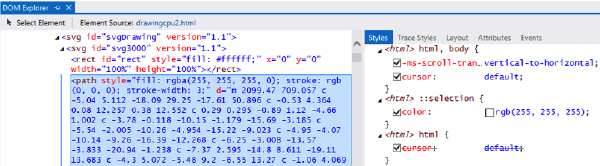
You can select, for example, a specific shape from the app at runtime – it also works from the Simulator – and the DOM Explorer will show you the associated SVG at runtime, the one that could be the result of the dynamic loading and subsequent transformation applied to it. Very cool stuff!
Converting the SVG drawing into Canvas and saving to an image
Something you need a jpeg of the drawing, for example if you want to save the drawing to the file system or if you want to use the Windows 8 Share Charm or in general in other parts of the app. To do that we have used the canvg library that converts an SVG file to a Canvas object. The conversion can takes some times, depending of the SVG file size and your hardware platform, so you can notify the user that something it is going on, we use flyout with a progress ring that shows up when the conversion starts.
Now that you have the Canvas object you can get a reference to the entire byte array, then you can use Windows encoding API to get an image of the desired format and size. Below a sample function:
function doSaveDrawingToFileEnd (fil) {

    var Imaging = Windows.Graphics.Imaging;

    var stream, encoderId, cc, offset, outputPixelData;

    fil.openAsync(Windows.Storage.FileAccessMode.readWrite).then(function (_stream){

        stream = _stream;

        return Imaging.BitmapEncoder.createAsync(jpegEncoderId, stream);

    }).then(function (encoder) {

        cc = document.getElementById('canvas');

        //ignore the realBRectHeight variable below

        //it is not important to understanding the logic

        offset = (height - realBRectHeight) / 2;

        outputPixelData =

cc.getContext("2d").getImageData(0, offset, cc.width,cc.height - offset);

        encoder.setPixelData(Imaging.BitmapPixelFormat.rgba8, Imaging.BitmapAlphaMode.straight, width, realBRectHeight, 90, 90, outputPixelData.data);

        return encoder.flushAsync();

    }).then(null, function (error) {

    console.log(error.message);

    }).then(function () {

    if (stream) stream.close();

    })

}
First you get a reference to a storageFile object – not outlined into the code – the fil variable, that will be our final jpeg image; than you open a stream for writing and create a BitmapEncoder object setting the encoding type to jpegEncoderId, this is used to encode the byte array into your desired image. The cc variable is a reference to the canvas object that contains the converted SVG file. Using the standard getImageData method, we get the bytes that we want to convert – in the code you can see an offset value used to clip a specific part of the drawing, but you can ignore this value here because it is not particularly useful to understand the logic. Now using the setPixelData API with the encoder you can set some values for the image to be generated, the image is actually generated when the flushAsync is called.
Wrapping Up
Throughout this article, we have seen some technical consideration about SVG and how it has been used in Paint 4 Kids. SVG is a very fun and powerful web technology that you can leverage to build amazing Windows Store apps with JavaScript. You can also play with SVG directly into the browser searching some funny samples on IE Test drive site. I hope this helps if you have a similar scenario.
If you want to learn more about how to build Windows Store app, check out Generation App.
Frequently Asked Questions (FAQs) about Building a Windows Store App with HTML5 and SVG
How can I distribute my HTML5 application as a desktop application?
There are several ways to distribute your HTML5 application as a desktop application. One of the most popular methods is using a framework like Electron.js. Electron.js allows you to build cross-platform desktop apps with JavaScript, HTML, and CSS. It is compatible with Mac, Windows, and Linux. You can package your HTML5 application into an executable file that can be run on any desktop.
What are the marketing guidelines for publishing an app on the Apple App Store?
Apple has a set of marketing guidelines that developers must follow when publishing an app on the App Store. These guidelines cover everything from the use of Apple’s logo and trademark, to the design and content of your app. It’s important to read and understand these guidelines before submitting your app to the App Store to avoid any potential issues or rejections.
Can I use HTML5 to build a desktop application?
Yes, you can use HTML5 to build a desktop application. HTML5, along with CSS3 and JavaScript, can be used to create rich, interactive applications that can run on any platform. There are several frameworks available, such as Electron.js and NW.js, that allow you to package your HTML5 application into a standalone desktop application.
How can I use SVG in my HTML5 application?
SVG, or Scalable Vector Graphics, can be used in your HTML5 application to create high-quality, scalable graphics and animations. SVG is an XML-based vector image format that is supported by all modern web browsers. You can embed SVG directly into your HTML5 code, or you can link to an external SVG file.
What are some solutions for distributing HTML5 applications as desktop applications?
There are several solutions available for distributing HTML5 applications as desktop applications. These include using a framework like Electron.js or NW.js, which allow you to package your HTML5 application into a standalone desktop application. You can also use a service like PhoneGap or Cordova, which allow you to package your HTML5 application into a native mobile app.
How can I download the Apple App Store logo in SVG format?
You can download the Apple App Store logo in SVG format from several online resources, such as SVG Repo. However, it’s important to note that Apple has strict guidelines on how their logo can be used, so be sure to read and understand these guidelines before using the logo in your application or marketing materials.
What are the benefits of using HTML5 and SVG to build a Windows Store app?
Using HTML5 and SVG to build a Windows Store app has several benefits. HTML5 is a universal language that is supported by all modern web browsers, making it a great choice for cross-platform development. SVG allows for high-quality, scalable graphics that look great on any screen size. Together, they allow for the creation of rich, interactive applications that can run on any platform.
How can I get started with building a Windows Store app with HTML5 and SVG?
To get started with building a Windows Store app with HTML5 and SVG, you’ll first need to have a basic understanding of HTML, CSS, and JavaScript. From there, you can learn more about the specific features of HTML5 and SVG, and how they can be used to create interactive applications. There are many online resources and tutorials available to help you get started.
Can I use HTML5 and SVG to build a mobile app?
Yes, you can use HTML5 and SVG to build a mobile app. HTML5 is a universal language that is supported by all modern web browsers, making it a great choice for cross-platform development. SVG allows for high-quality, scalable graphics that look great on any screen size. There are several frameworks and services available that allow you to package your HTML5 and SVG application into a native mobile app.
What are some challenges I might face when building a Windows Store app with HTML5 and SVG?
While HTML5 and SVG offer many benefits, there are also some challenges you might face when using them to build a Windows Store app. These include browser compatibility issues, performance issues, and the learning curve associated with mastering these technologies. However, with the right resources and support, these challenges can be overcome.
Pietro Brambati is a passionate developer ninja. He likes working with different kind of languages and frameworks, working on different size applications, scaling from mobile device apps to large, enterprise- ready applications. He has been working with Microsoft as Technical Evangelist