In the previous part we have examined the step-by-step process of back-end implementation for the module serving the infinite scrolling list. We also added some code for the controller but it didn’t bring any clear-cut result at that moment.
This second part will help you finish the remaining tasks to achieve an infinite scrolling list. Let’s see how to work with the new template and JavaScript code to handle the logic of infinite scrolling. I will then show you the proper way of activating a new module, and will include some hints that will keep you away from unexpected issues.
Customizing the OXID locator bar
It feels pretty good to find out you only have to replace some blocks of the current template. Sometimes, you don’t get that lucky, and you need to have a whole template file replaced.
Please open the template /application/views/azure/tpl/page/list/list.tpl, copy its content and paste it into the new file /modules/aho_infinitescroll/views/page/list/aho_infinitescroll_list.tpl.
Open the file aho_infinitescroll_list.tpl, and search for the line containing the following code:
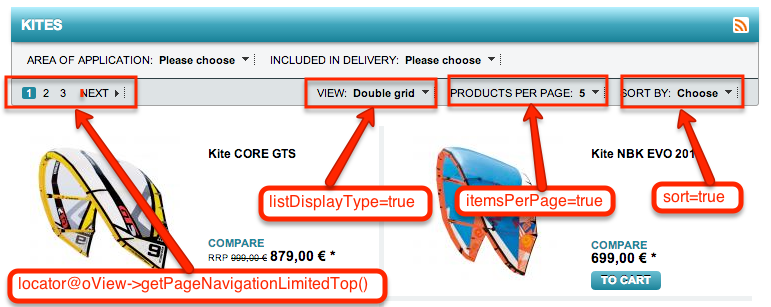
[{include file="widget/locator/listlocator.tpl" locator=$oView->getPageNavigationLimitedTop() attributes=$oView->getAttributes() listDisplayType=true itemsPerPage=true sort=true }]locator=$oView->getPageNavigationLimitedTop()will display the traditional pagination that will no longer be necessary.listDisplayType=truelists out all available view options. We don’t need this either. The new module will use the view type defined in the module’s settings.itemsPerPage=truedetermines whether the user can select how many articles to display per page. In this tutorial, we also turn off this feature.sort=truecontrols the sorting conditions. We’ll leave this on.
Let’s examine the below figure to study the locator’s elements with their corresponding position:
Please replace the above line with the below line to drop unnecessary elements:
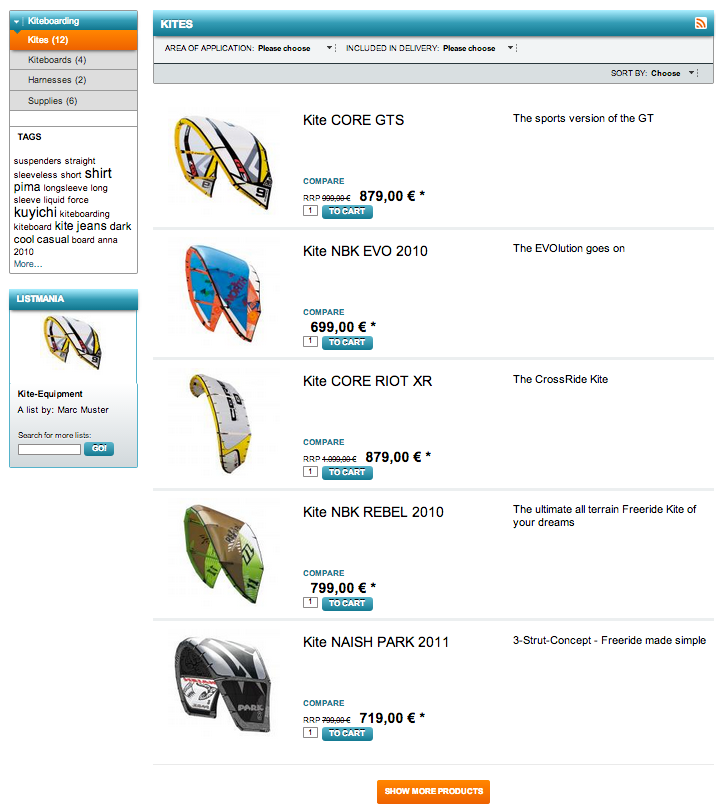
[{include file="widget/locator/listlocator.tpl" attributes=$oView->getAttributes() listDisplayType=false itemsPerPage=false sort=true }]We also look for and remove the following line to turn off the bottom locator:
[{include file="widget/locator/listlocator.tpl" locator=$oView->getPageNavigationLimitedBottom() place="bottom"}]Here is the result:

Implementing Infinite Scrolling Load
1- Preparing the stylesheet
Open the file /modules/aho_infinitescroll/out/css/infiniteloading.css and paste the following code:
.loader-container{
    border-top: 2px solid #EAEAEA;
    margin:20px 0;
    text-align: center;
    width:100%;
}
#loader-btn{
    border-radius: 3px;
    color:#FFF;
    cursor:pointer;
    padding:10px;
    margin:20px 0;
    -moz-border-radius: 3px;
    -webkit-border-radius: 3px;
    -khtml-border-radius: 3px;
}
.endlist{
    background-color: #F5F5F5;
    color: #909090 !important;
    cursor: not-allowed !important;
}
#loader-icon{
    display:none;
}
2- HTML elements
Reopen aho_infinitescroll_list.tpl. After the line of including the template locator.tpl, we put the following lines:
[{assign var="sModuleUrl" value=$oViewConf->getModuleUrl('aho_infinitescroll')}]
[{oxstyle include="`$sModuleUrl`out/css/infiniteloading.css"}]

<div id="newList"></div>

<div class="loader-container">
    <img src="[{$sModuleUrl}]out/img/ajax-loader.gif" border=0 id="loader-icon" />
    <button id="loader-btn" class="FXgradOrange">[{oxmultilang ident="BTN_LOAD_MORE"}]</button>
</div>- The first line defines a variable to get the proper module’s URL. If you have several JavaScript or CSS files to include, this will be really useful. Please note that you should never add any raw URL for such files, they may fail to load due to different OXID versions.
- The second line will include a stylesheet for this module.
- The third line adds a div that will temporarily hold next-page loaded articles.
- The next block will create a wrapper with two subsequent elements: loader icon and button to trigger an Ajax request.
The result after applying CSS will be:
3- Adding JavaScript code
Put the below JavaScript code into the opening aho_infinitescroll_list.tpl, just after div.loader-container
[{assign var="pages" value=$oView->getPageNavigationLimitedBottom() }]

[{capture assign="js_infiniteloading"}]
    $(document).ready(function(){
        var oBtn = $('#loader-btn');
        var oLoaderImg = $('#loader-icon');
        var oList = $('#productList');
        var oNewList = $('#newList');
        var iCurPgNr = parseInt("[{$pages->actPage}]");
        var iMaxPgNr = parseInt("[{$pages->NrOfPages}]");
        if(iCurPgNr == iMaxPgNr){
            oBtn.remove();
            return false;
        }
        var sUrl = "[{$pages->firstpage}]" ;
        var blFlag = true;
        oBtn.on('click', function(e){
            e.preventDefault();
            var iNextPgNr = iCurPgNr + 1;
            if(iNextPgNr <= iMaxPgNr ){
                oBtn.hide();
                oLoaderImg.show();
                blFlag = false;
                oNewList.load(sUrl + iNextPgNr +" #productList", function(response, status){
                    if(status == 'success'){
                        oList.append(oNewList.find('ul').html());
                        oNewList.html("");
                        iCurPgNr += 1;
                        if(iCurPgNr == iMaxPgNr){
                            oBtn.removeClass("FXgradOrange")
                                .addClass("endlist")
                                .text("[{oxmultilang ident="NO_MORE_ARTICLE"}]");
                        }else{
                            blFlag = true;
                        }
                        oBtn.show();
                        oLoaderImg.hide();
                    }
                });
            }else{
                oBtn.removeClass("FXgradOrange")
                    .addClass("endlist")
                    .text("[{oxmultilang ident="NO_MORE_ARTICLE"}]");
            }
        });
    });
[{/capture}]
[{oxscript add=$js_infiniteloading priority=12}]-
The first line defines an important template variable. It will fetch essential values such as total pages, current page, next page, first page, last page and URLs for each page returned. You can use
[{$pages|var_dump}]to examine all values of$pages. -
The remaining code implements the logic of infinite loading with the below workflow.
- We will have an extra button to trigger the request to load articles of the next page.
- A hidden loading image toggles to prevent re-clicking.
- New articles will be appended to the end of the list.
- Every click of the button will repeat that process until there are no more articles to be loaded. At that moment, the button is disabled.
4- Front-end translation
Please go to /modules/aho_infinitescroll/translations/.
For bothen/aho_infinitescroll_lang.php and de/aho_infinitescroll_lang.php, we add the following:
<?php
$sLangName = 'Deustch'; // 'English' for en file OR 'Deustch' for de file

$aLang = array(
    'charset' => 'UTF-8',
    'BTN_LOAD_MORE' => 'SHOW MORE PRODUCTS',
    'NO_MORE_ARTICLE' => 'NO MORE ARTICLE FOUND'
);
Please assign the correct value of variable $sLangName for each file. The name of the front-end language file always follows this formula:
module folder name+_+lang.php
Activating the module
Activating the module usually seems totally effortless with a couple of clicks in the back-end. Sometimes, however, the module might not work for an unknown reason. If you encounter such a problem, please check the following steps:
-
If you make any changes in
metadata.php, you have to disable the module, then re-enable it. -
If you have made any changes relating to the database, you have to update the database view. You can do it via Service > Tools > Update DB Views now.
-
You have to clear the tmp folder after any changes.
-
You should always set proper permission mode for
/log/EXCEPTION_LOG.txtto inspect the logs.
To help your testing to go well, you can go to the back-end and decrease the number of items per page.
Go to Extensions > Themes > {Pick active theme} > Settings > Display, change the value as in the follwing figure:
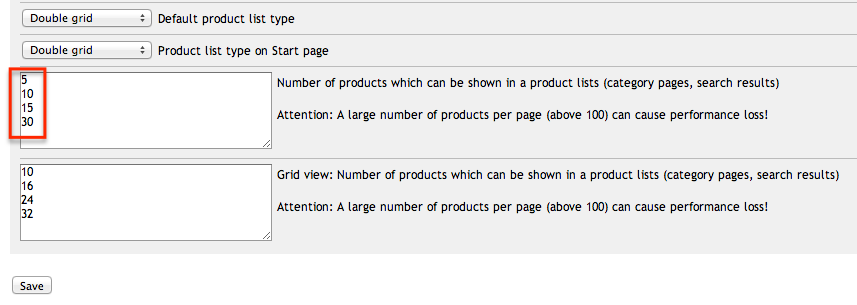
The above adjustment is just for OXID’s default data, which has few articles . If you already have a long-list of articles of your own data installed, that change is unnecessary.
Further Enhancements
There will be a variety of approaches to implement infinite scrolling for OXID eShop. We’ve attempted to bring you an essential implementation from back-end to front-end. There will be a lot of improvements that you can do for this module:
-
Using a third party jQuery plugin to achieve infinite scrolling effect instead of using manual trigger. You can grab a good plugin from infinite-scroll.com by Paul Irish.
-
We have set the view option to
lineas default value. You can customize this to make it work for all view options. -
Applying the SEO-friendly approach for your module. This article seems very helpful for reference.
-
Extending the functionality to the search page.
Conclusion
You can watch the final result on YouTube and download the code from GitHub.
Despite the old-fashioned appearance of the back-end, OXID eShop is flexible enough to achieve as much functionality as other e-commerce systems. I hope this tutorial taught you something new, and that you may find out that OXID is a worthy option to consider for your next e-shop.
Please feel free to share your perspectives with me in the comments below!
 Anh Ho
A full-stack web developer and freelance writer. At the moment, he plays the role of a Technical Lead for the PHP department at Tanner Vietnam, which provides a web-shop solution for European clients with the OXID eSales system; he is also passionate about developing Chrome Extensions and Chrome Apps. The rest of his time is for freelance writing.