
This Angular authentication article was originally published on the Auth0.com blog, and is republished here with permission.
In this tutorial, we’re going to build an Angular application and add login functionality using token-based authentication with Auth0.
You can check out the completed code example from our GitHub repo.
The Angular Ecosystem
AngularJS 1.x was highly regarded as a robust framework for building single-page applications (SPAs). It did a lot of things well, fell short on some, but overall allowed developers to quickly build powerful applications.
While AngularJS (1.x) is a framework, Angular is an entire platform for building modern applications. Alongside the core Angular library, the platform ships with a powerful command line interface (CLI) called Angular CLI that allows developers to easily scaffold their applications as well as control the build system. Angular Platform Server brings server-side rendering to Angular applications. Angular Material is the official implementation of Google’s Material Design, which allows developers to build beautiful applications with ease.
Our App: Daily Deals
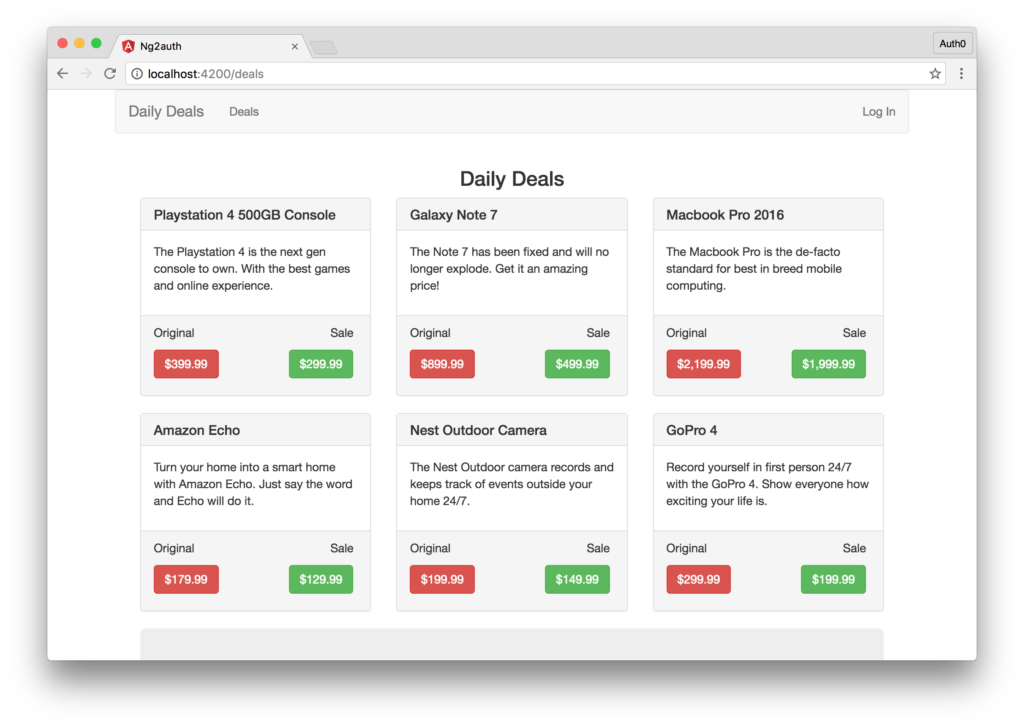
The app we’re building today is called Daily Deals. The Daily Deals app displays a list of deals and discounts on various products. We’ll have a list of publicly available deals that anyone can see and a list of private deals available only to registered members. The private deals are exclusive to registered members, and should hopefully be better.
Serving the Daily Deals
We’ll have to get our daily deals from somewhere. Let’s build a very simple Node.js back end to serve the deals. We’ll have a publicly accessible route serving public deals and a protected route that can only be called by authenticated users. For now, we’ll make both of the routes public and worry about the authentication piece later. Take a look at our implementation below:
'use strict';
// Load dependencies
const express = require('express');
const app = express();
const cors = require('cors');
const bodyParser = require('body-parser');

app.use(bodyParser.json());
app.use(bodyParser.urlencoded({ extended: true }));
app.use(cors());

// Public route
app.get('/api/deals/public', (req, res)=>{
  let deals = [
    // Array of public deals here
  ];
  res.json(deals);
})

// Private route
app.get('/api/deals/private', (req,res)=>{
  let deals = [
    // Array of Private Deals here
  ];
  res.json(deals);
})

app.listen(3001);
console.log('Serving deals on localhost:3001');
Both our server and the Angular app we are building will require Node.js and NPM, so be sure to have those installed before continuing. Check out the GitHub repo to get our list of daily deals or create your own. The model for each deal will be as follows:
 {
    id: 1234,
    name: 'Name of Product',
    description: 'Description of Product',
    originalPrice: 19.99, // Original price of product
    salePrice: 9.99 // Sale price of product
}
When you’re happy with the public and private deals, launch the server by running node server and navigate to both localhost:3001/api/deals/public and localhost:3001/api/deals/private to make sure you can see the list of deals you added. Next, let’s set up our Angular front end.
Angular Front End Setup
One of the best ways to start building a new Angular app is with the official Angular CLI. The CLI can take care of scaffolding the initial app, adding additional components, takes care of the build system and much more. In this tutorial, we’ll scaffold our initial app with the CLI.
If you don’t already have it installed, run:
npm install @angular/cli -g
This installs the Angular CLI globally. We’ll interact with the CLI using the ng command. To create a new application, choose a directory and run:
ng new ng2auth --routing --skip-tests
This will create a new Angular application with routing and no initial test files for the root component. The app will be created in its own folder in the current directory, and the CLI will download all of the required npm packages and basically set everything up for us.
Once ng new is finished, enter the new directory and run the ng serve command and the Webpack based build system will take care of compiling our app from TypeScript to JavaScript and will serve our app on localhost:4200. The ng serve command will also kick off a live sync process, so any time we make a change our app will automatically recompile.
Let’s head over the localhost:4200 for now to make sure that everything is working as expected so far. If you see a message saying “app works!”, you’re golden. Next, let’s examine how our Angular app is scaffolded.
The ng new command scaffolded our Angular app and added a lot of files. Many of these we can ignore for now like the e2e folder, which would contain our end-to-end tests. Open up the src directory. In the src directory, we can see some familiar files like index.html, styles.css, and so on. Open up the app directory.
The app directory contains the bulk of our application. By default, we’re presented with the following files:
app.component.css– Holds the CSS styles for our root componentapp.component.html– Holds the HTML view for our root componentapp.component.ts– Holds the TypeScript logic for our root component classapp.module.ts– Defines our global app dependenciesapp-routing.module.ts– Defines our app’s routes.
Each Angular component we write will have at a minimum the *.component.ts file, the others are optional. Our application is going to have three components. The main or root component, a component to display the public deals, and a component to display private deals. For our root component, we’ll inline the template and styles. Let’s make the following edits and run the following CLI commands:
- Delete
app.component.cssandapp.component.htmlfiles. We’ll define all we need for our root component in theapp.component.tsfile. - Create a
public-dealscomponent by runningng g c public-deals --no-spec. This component will take care of getting and displaying the public deals data. - Create a
private-dealscomponent by runningng g c private-deals --no-spec. This component will take care of getting and displaying the private deals data. - Create a
callback.component.tsfile by runningng g c callback --it --is --flat --no-spec. - Create a
dealfile by runningng g class deal --no-spec. This file will hold ourdealclass, which will let Angular know the structure of adeal. - Create a
deal.service.tsfile by runningng g s deal --no-spec. Here we’ll add the functionality to get and retrieve the deal data from our API.
Note: g is a shortcut for generate, and c and s are shortcuts for component and service, respectively. Therefore, ng g c is equivalent to ng generate component. The --no-spec flag indicates that *.spec.ts files should not be generated. The --it and --is flags stand for “inline template” and “inline styles” and --flat indicates that a containing folder should not be created.
Adding HTTP Client Module
We’re going to be making HTTP requests to our API in our Angular app. To do so, we need to add the correct module to our app.module.ts file. Let’s do so now by importing the HttpClientModule and adding it to our @NgModule’s imports array like so:
// app.module.ts
...
import { HttpClientModule } from '@angular/common/http';

@NgModule({
  declarations: [
    ...
  ],
  imports: [
    ...,
    HttpClientModule
  ],
  providers: [],
  bootstrap: [AppComponent]
})
export class AppModule { }
Adding Bootstrap CSS
We’re going to use Bootstrap to style our application, so let’s include the CSS in the <head> of our index.html file like so:
<!-- src/index.html -->
...
<link href="https://maxcdn.bootstrapcdn.com/bootstrap/3.3.7/css/bootstrap.min.css" rel="stylesheet">
...
Building the Root Component
Every Angular application must have a root component. We can name it whatever we want, but the important thing is that we have one. In our application, the app.component.ts file will be our root component. Let’s take a look at our implementation of this component.
// app.component.ts
import { Component } from '@angular/core';

@Component({
  selector: 'app-root',
  template: `
    <div class="container">
      <nav class="navbar navbar-default">
        <div class="navbar-header">
          <a class="navbar-brand" routerLink="/dashboard">{{ title }}</a>
        </div>
        <ul class="nav navbar-nav">
          <li>
            <a routerLink="/deals" routerLinkActive="active">Deals</a>
          </li>
          <li>
            <a routerLink="/special" routerLinkActive="active">Private Deals</a>
          </li>
        </ul>
        <ul class="nav navbar-nav navbar-right">
          <li>
            <a>Log In</a>
          </li>
          <li>
            <a>Log Out</a>
          </li>
        </ul>
      </nav>
      <div class="col-sm-12">
        <router-outlet></router-outlet>
      </div>
    </div>
  `,
  styles: [
    `.navbar-right { margin-right: 0px !important}`
  ]
})
export class AppComponent {
  title = 'Daily Deals';

  constructor() {}
}
We’ve created our root component. We added an inline template and some inline styles. We haven’t added all the functionality yet, so every user will be able to see all the links and the login and logout buttons. We’ll wait to implement those a little bit. We’re also displaying the <router-outlet> element. This is where our routed components will show.
Routing
Since we initialized our app with the --routing flag, the architecture for routing is already set up for us. Let’s update it so that our Deals component shows by default. We’ll also set up all the routes necessary for our app.
Open the app-routing.module.ts file and add the following:
// app-routing.module.ts
import { NgModule } from '@angular/core';
import { Routes, RouterModule } from '@angular/router';
import { CallbackComponent } from './callback.component';
import { PublicDealsComponent } from './public-deals/public-deals.component';
import { PrivateDealsComponent } from './private-deals/private-deals.component';

const routes: Routes = [
  {
    path: '',
    redirectTo: 'deals',
    pathMatch: 'full'
  },
  {
    path: 'deals',
    component: PublicDealsComponent
  },
  {
    path: 'special',
    component: PrivateDealsComponent
  },
  {
    path: 'callback',
    component: CallbackComponent
  }
];

@NgModule({
  imports: [RouterModule.forRoot(routes)],
  exports: [RouterModule]
})
export class AppRoutingModule { }
We can just navigate to localhost:4200 in the browser and see our app displayed. We won’t see much yet, just the top navbar and a message saying that the deals component works.
The Deal Type
TypeScript allows us to define the structure or type of our objects. This serves a bunch of useful purposes. For one, if we define the structure of an object, we’ll be able to get all of the object’s data via IntelliSense. We can additionally test our components easier by knowing the data structure or type of object we are dealing with.
For our app, we’ll create one such type. In the deal.ts file, we’ll define a type of Deal. Let’s see how we’ll accomplish this.
// deal.ts
export class Deal {
  id: number;
  name: string;
  description: string;
  originalPrice: number;
  salePrice: number;
}
Now we can declare objects in our Angular application to be a type of deal. These objects will gain all of the properties and methods of the deal type. We’re only defining properties here; we won’t have any methods.
Public and Private Deals components
The public and private deals components are very similar. In fact, the only difference between the two implementations is that one will display deals from the public API and the other will display deals from the private API. For brevity, we’ll just show one of the component implementations. Let’s implement the public-deals.component.ts:
// public-deals.component.ts
import { Component, OnInit, OnDestroy } from '@angular/core';
import { Subscription } from 'rxjs/Subscription';
import { Deal } from '../deal';
// We haven't defined these services yet
import { AuthService } from '../auth.service';
import { DealService } from '../deal.service';

@Component({
  selector: 'app-public-deals',
  // We'll use an external file for both the CSS styles and HTML view
  templateUrl: 'public-deals.component.html',
  styleUrls: ['public-deals.component.css']
})
export class PublicDealsComponent implements OnInit, OnDestroy {
  dealsSub: Subscription;
  publicDeals: Deal[];
  error: any;

  // Note: We haven't implemented the Deal or Auth Services yet.
  constructor(
    public dealService: DealService,
    public authService: AuthService) {
  }

  // When this component is loaded, we'll call the dealService and get our public deals.
  ngOnInit() {
    this.dealsSub = this.dealService
      .getPublicDeals()
      .subscribe(
        deals => this.publicDeals = deals,
        err => this.error = err
      );
  }

  ngOnDestroy() {
    this.dealsSub.unsubscribe();
  }
}
We’ll use an RxJS subscription to subscribe to the observable created by our HTTP request (to be defined in the Deal Service, which we’ll create shortly), and take some action once a value is available to either set the publicDeals member, or to define an error. We need to add the OnDestroy life-cycle hook with an ngOnDestroy() method that unsubscribes when the component is destroyed to prevent memory leaks.
Next, let’s build the view of our public deals component. We’ll do this in the public-deals.component.html file. Our view will be a mixture of HTML and Angular sugar. Let’s take a look at our implementation.
<h3 class="text-center">Daily Deals</h3>

<!-- We are going to get an array of deals stored in the publicDeals variable. We'll loop over that variable here using the ngFor directive -->
<div class="col-sm-4" *ngFor="let deal of publicDeals">
  <div class="panel panel-default">
    <div class="panel-heading">
      <h3 class="panel-title">{{ deal.name }}</h3>
    </div>
    <div class="panel-body">
      {{ deal.description }}
    </div>
    <div class="panel-footer">
      <ul class="list-inline">
        <li>Original</li>
        <li class="pull-right">Sale</li>
      </ul>
      <ul class="list-inline">
        <li><a class="btn btn-danger">${{ deal.originalPrice | number }}</a></li>
        <li class="pull-right"><a class="btn btn-success" (click)="dealService.purchase(deal)">${{ deal.salePrice | number }}</a></li>
      </ul>
    </div>
  </div>
</div>

<!-- We are going to use the authService.isLoggedIn method to see if the user is logged in or not. If they are not logged in we'll encourage them to login, otherwise if they are authenticated, we'll provide a handy link to private deals. We haven't implemented the authService yet, so don't worry about the functionality just yet -->
<div class="col-sm-12" *ngIf="!authService.isLoggedIn">
  <div class="jumbotron text-center">
    <h2>Get More Deals By Logging In</h2>
  </div>
</div>

<div class="col-sm-12" *ngIf="authService.isLoggedIn">
  <div class="jumbotron text-center">
    <h2>View Private Deals</h2>
    <a class="btn btn-lg btn-success" routerLink="/special">Private Deals</a>
  </div>
</div>

<!-- If an error occurs, we'll show an error message -->
<div class="col-sm-12 alert alert-danger" *ngIf="error">
  <strong>Oops!</strong> An error occurred fetching data. Please try again.
</div>
Finally, let’s add a custom style. In the public-deals.component.css file add the following:
.panel-body {
  min-height: 100px;
}
This will ensure that each of the products displays nicely on our page.
Our private deals component will look very similar. For brevity, we won’t display the scaffold. We’ll cover the changes a little later on. If you’d like to see what it looks like, you can view it from our GitHub repo.
Accessing our Deals API
Earlier in the tutorial we wrote a very simple API that exposed two routes. Now, let’s write an Angular service that will interact with these two endpoints. We’ll do this in the deal.service.ts file. The implementation is as follows:
// deal.service.ts
import { Injectable } from '@angular/core';
import { HttpClient, HttpErrorResponse } from '@angular/common/http';
import { Observable } from 'rxjs/Observable';
import { catchError } from 'rxjs/operators';
import 'rxjs/add/observable/throw';

@Injectable()
export class DealService {
  // Define the routes we are going to interact with
  private publicDealsUrl = 'http://localhost:3001/api/deals/public';
  private privateDealsUrl = 'http://localhost:3001/api/deals/private';

  constructor(private http: HttpClient) { }

  // Implement a method to get the public deals
  getPublicDeals() {
    return this.http
      .get(this.publicDealsUrl)
      .pipe(
        catchError(this.handleError)
      );
  }

  // Implement a method to get the private deals
  getPrivateDeals() {
    return this.http
      .get(this.privateDealsUrl)
      .pipe(
        catchError(this.handleError)
      );
  }

  // Implement a method to handle errors if any
  private handleError(err: HttpErrorResponse | any) {
    console.error('An error occurred', err);
    return Observable.throw(err.message || err);
  }

  // Create a shared method that shows an alert when someone buys a deal
  purchase(item) {
    alert(`You bought the: ${item.name}`);
  }
}
Now you can see where the getPublicDeals() method fits in from our public-deals.component.ts file. We also have written a getPrivateDeals() method that will get our list of private deals. Implement this method in your private-deals.component.ts file. Finally, we handle errors and implement the purchase() method that’s used in both of the deals components.
Once this service has been created, we need to import it in our app.module.ts file and provide it like so:
// app.module.ts
import { DealService } from './deal.service';
...
@NgModule({
  ...
  providers: [
    DealService
  ],
  ...
Now the service is available to use throughout our application.
Adding Authentication to Your Angular App
Navigate to localhost:4200 and you should see be redirected to the deals page automatically. Notice that you can freely navigate to the /special route and see the exclusive deals as well. You can do this because we haven’t added user authentication yet. Let’s do that now.
The majority of apps require some type of authentication. Our application today is no different. In the next section, I’m going to show you how to add authentication to your Angular application the right way. We’re going to be using Auth0 as our identity platform. We’ll use Auth0 as it allows us to easily issue JSON Web Tokens (JWTs), but the concepts we’ll cover can be applied to any token-based authentication system. If you don’t already have an Auth0 account, sign up for a free one now.
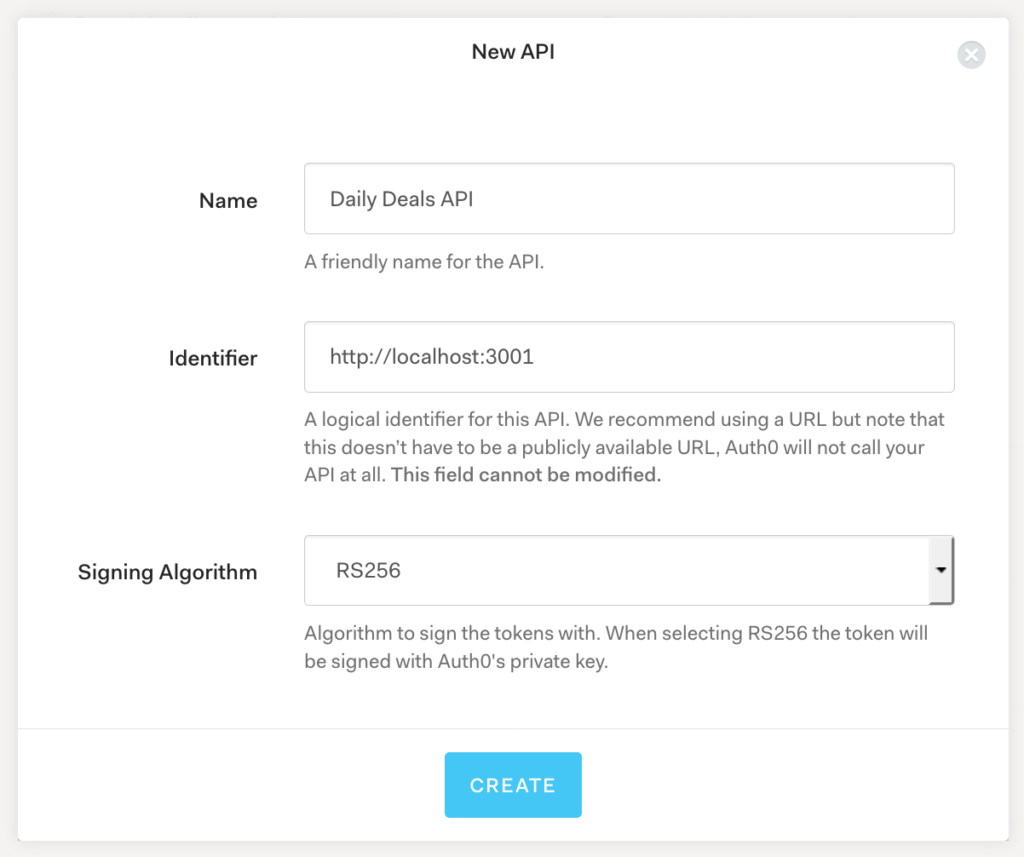
From here, click on the APIs menu item and then the Create API button. You’ll need to give your API a name and an identifier. The name can be anything you choose, so make it as descriptive as you want. The identifier will be used to identify your API, and this field cannot be changed once set. For our example, I’ll name the API Daily Deals API and for the identifier I’ll set it as http://localhost:3001. We’ll leave the signing algorithm as RS256 and click on the Create API button.
This is all we need to do for now. Let’s secure our server using this new API that we created.
Securing our Server
Before we implement authentication on the front end in our Angular application, let’s secure our back-end server.
First, we’ll install dependencies:
npm install express-jwt jwks-rsa --save
Open up the server.js file located in your server directory and make the following edits:
// server.js
'use strict';

const express = require('express');
const app = express();
// Import the required dependencies
const jwt = require('express-jwt');
const jwks = require('jwks-rsa');
const cors = require('cors');
const bodyParser = require('body-parser');

app.use(bodyParser.json());
app.use(bodyParser.urlencoded({ extended: true }));
app.use(cors());

// We're going to implement a JWT middleware that will ensure the validity of our token. We'll require each protected route to have a valid access_token sent in the Authorization header
const authCheck = jwt({
  secret: jwks.expressJwtSecret({
    cache: true,
    rateLimit: true,
    jwksRequestsPerMinute: 5,
    jwksUri: "https://{YOUR-AUTH0-DOMAIN}.auth0.com/.well-known/jwks.json"
  }),
  // This is the identifier we set when we created the API
  audience: '{YOUR-API-AUDIENCE-ATTRIBUTE}',
  issuer: "{YOUR-AUTH0-DOMAIN}", // e.g., you.auth0.com
  algorithms: ['RS256']
});

app.get('/api/deals/public', (req, res)=>{
  let deals = [
    // Array of public deals
  ];
  res.json(deals);
})

// For the private route, we'll add this authCheck middleware
app.get('/api/deals/private', authCheck, (req,res)=>{
  let deals = [
    // Array of private deals
  ];
  res.json(deals);
})

app.listen(3001);
console.log('Listening on localhost:3001');
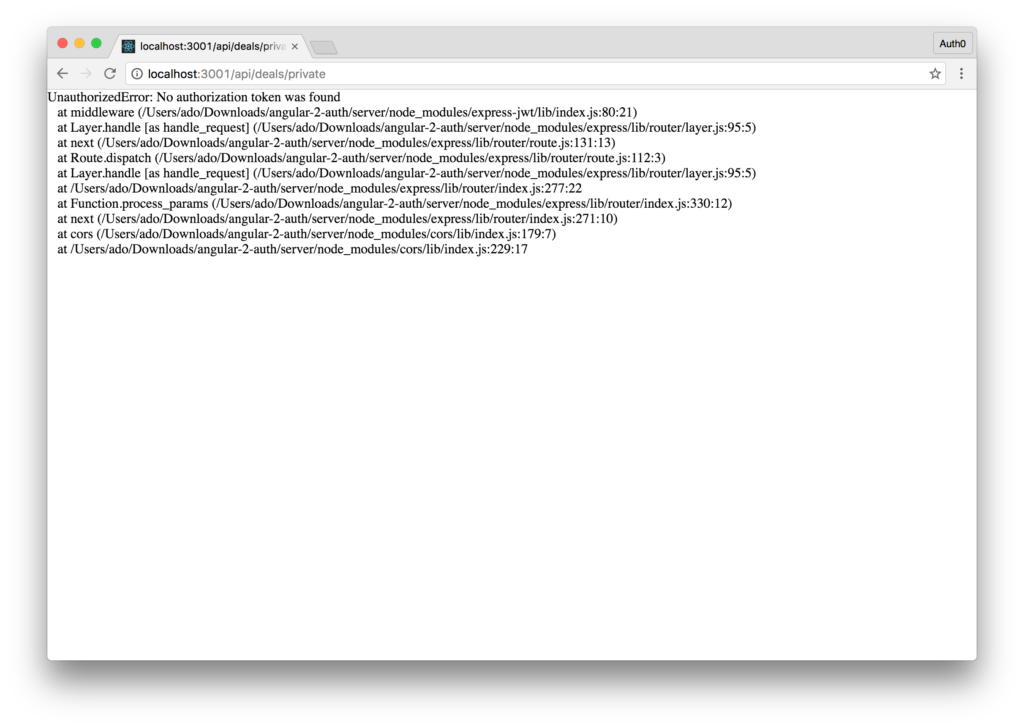
That’s all we’ll need to do on the server. Restart the server and try to navigate to localhost:3001/api/deals/private and you’ll see an error message saying missing authorization header. Our private API route is now secured. Let’s get to implementing authentication in our Angular app.
Adding Authentication to the Front End
Log into your Auth0 management dashboard and let’s make some updates to our client by clicking the Clients item in the sidebar. Find the test client that was created automatically when we made our API. It should be called something like Daily Deals (Test Client).
Change the Client Type to Single Page Application. Then add http://localhost:4200/callback to the Allowed Callback URLs field.
Finally, click on the Advanced Settings link at the bottom and select the OAuth tab. Make sure that the JsonWebToken Signature Algorithm is set to RS256.
Make note of the Client ID; we’ll need this to set up the configuration for our Angular app’s authentication.
Auth0.js Library
Now we need to install the auth0-js library. We can do so like this in our Angular app’s root folder:
npm install auth0-js --save
Auth0 Environment Config
Open your src/environments/environment.ts file and add an auth property to the constant with the following information:
// environment.ts
export const environment = {
  production: false,
  auth: {
    clientID: 'YOUR-AUTH0-CLIENT-ID',
    domain: 'YOUR-AUTH0-DOMAIN', // e.g., you.auth0.com
    audience: 'YOUR-AUTH0-API-IDENTIFIER', // e.g., http://localhost:3001
    redirect: 'http://localhost:4200/callback',
    scope: 'openid profile email'
  }
};
This file provides the authentication configuration variables so we can use Auth0 to secure our front end. Be sure to update the YOUR-AUTH0-CLIENT-ID, YOUR-AUTH0-DOMAIN, and YOUR-AUTH0-API-IDENTIFIER to your own information from your Auth0 Client and API settings.
Authentication Service
Next we’ll create an authentication service that we can use throughout our app:
ng g s auth/auth --no-spec
This will create a new folder at src/app/auth with an auth.service.ts file inside it.
Open this file and modify it to the following:
// auth.service.ts
import { Injectable } from '@angular/core';
import * as auth0 from 'auth0-js';
import { environment } from './../../environments/environment';
import { Router } from '@angular/router';

@Injectable()
export class AuthService {
  // Create Auth0 web auth instance
  auth0 = new auth0.WebAuth({
    clientID: environment.auth.clientID,
    domain: environment.auth.domain,
    responseType: 'token',
    redirectUri: environment.auth.redirect,
    audience: environment.auth.audience,
    scope: environment.auth.scope
  });
  // Store authentication data
  userProfile: any;
  accessToken: string;
  authenticated: boolean;

  constructor(private router: Router) {
    // Check session to restore login if not expired
    this.getAccessToken();
  }

  login() {
    // Auth0 authorize request
    this.auth0.authorize();
  }

  handleLoginCallback() {
    // When Auth0 hash parsed, get profile
    this.auth0.parseHash((err, authResult) => {
      if (authResult && authResult.accessToken) {
        window.location.hash = '';
        this.getUserInfo(authResult);
      } else if (err) {
        console.error(`Error: ${err.error}`);
      }
      this.router.navigate(['/']);
    });
  }

  getAccessToken() {
    this.auth0.checkSession({}, (err, authResult) => {
      if (authResult && authResult.accessToken) {
        this.getUserInfo(authResult);
      } else if (err) {
        console.log(err);
        this.logout();
        this.authenticated = false;
      }
    });
  }

  getUserInfo(authResult) {
    // Use access token to retrieve user's profile and set session
    this.auth0.client.userInfo(authResult.accessToken, (err, profile) => {
      if (profile) {
        this._setSession(authResult, profile);
      }
    });
  }

  private _setSession(authResult, profile) {
    const expTime = authResult.expiresIn * 1000 + Date.now();
    // Save authentication data and update login status subject
    localStorage.setItem('expires_at', JSON.stringify(expTime));
    this.accessToken = authResult.accessToken;
    this.userProfile = profile;
    this.authenticated = true;
  }

  logout() {
    // Remove auth data and update login status
    localStorage.removeItem('expires_at');
    this.userProfile = undefined;
    this.accessToken = undefined;
    this.authenticated = false;
  }

  get isLoggedIn(): boolean {
    // Check if current date is before token
    // expiration and user is signed in locally
    const expiresAt = JSON.parse(localStorage.getItem('expires_at'));
    return Date.now() < expiresAt && this.authenticated;
  }

}
Once the authentication service has been created, we need to import it into our app.module.ts file and provide it like so:
// app.module.ts
import { AuthService } from './auth/auth.service';
...
@NgModule({
  ...
  providers: [
    ...,
    AuthService
  ],
  ...
Now the service is available to use throughout our application.
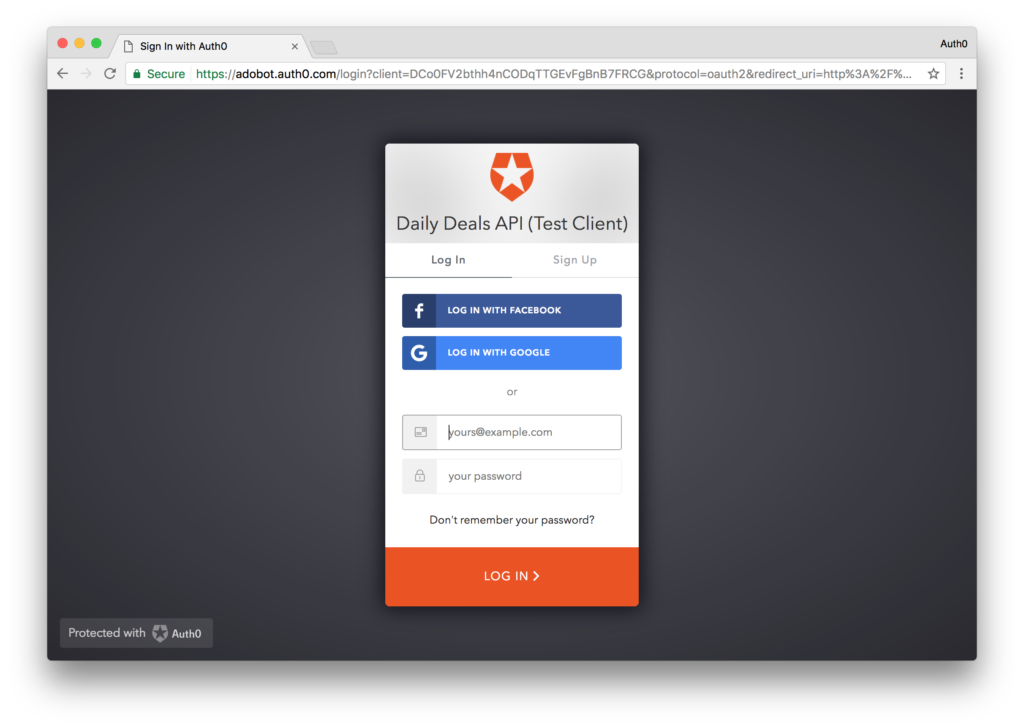
We’ll use the Auth0 login page to authenticate our users. This is the most secure way to authenticate a user and get an access token in an OAuth compliant manner. With our authentication service created, let’s continue building our authentication workflow.
Angular Authentication All In
The Angular router comes with a powerful feature called route guards that allows us to programmatically determine whether a user can access the route or not. Route guards in Angular can be compared to middleware in Express.js, for example.
We’ll create an authentication route guard that will check to see if a user is logged in before displaying the route. Create a new guard by running the following CLI command:
ng g guard auth/auth --no-spec
Open the generated auth.guard.ts file and make the following changes:
// auth.guard.ts
import { Injectable } from '@angular/core';
import { CanActivate, ActivatedRouteSnapshot, RouterStateSnapshot } from '@angular/router';
import { Observable } from 'rxjs/Observable';
import { AuthService } from './auth.service';
import { Router } from '@angular/router';

@Injectable()
export class AuthGuard implements CanActivate {

  constructor(
    private authService: AuthService,
    private router: Router
  ) {}

  canActivate(
    next: ActivatedRouteSnapshot,
    state: RouterStateSnapshot): Observable<boolean> | Promise<boolean> | boolean {
    if (!this.authService.isLoggedIn) {
      this.router.navigate(['/']);
      return false;
    }
    return true;
  }
}
To implement this route guard in our routes, let’s go ahead and open our app-routing.module.ts file. Here, we’ll include our auth guard service and enable it on our secret route. Let’s take a look at the implementation.
// app-routing.module.ts
...
// Import the AuthGuard
import { AuthGuard } from './auth/auth.guard';

const routes: Routes = [
  ...,
  {
    path: 'special',
    component: PrivateDealsComponent,
    // Add this to guard this route
    canActivate: [
      AuthGuard
    ]
  },
  ...
];

@NgModule({
  ...,
  // Add AuthGuard to the providers array
  providers: [AuthGuard],
  ...
})
export class AppRoutingModule { }
That’s all there is to it. Our route is now protected at the routing level.
If you recall, we included a stub for the AuthService in our deal components. Since the authentication service is now implemented, our placeholder functionality will just work. We’ll see the correct behavior displayed based on user state.
We’ll need to update our root component, though, as we didn’t include authentication-specific functionality there. I did this on purpose so we could go through the example line by line. Let’s do that next.
// app.component.ts
import { Component } from '@angular/core';
import { AuthService } from './auth/auth.service';

@Component({
  selector: 'app-root',
  template: `
    <div class="container">
      <nav class="navbar navbar-default">
        <div class="navbar-header">
          <a class="navbar-brand" routerLink="/">{{ title }}</a>
        </div>
        <ul class="nav navbar-nav">
          <li>
            <a routerLink="/deals" routerLinkActive="active">Deals</a>
          </li>
          <li>
            <a routerLink="/special" *ngIf="authService.isLoggedIn" routerLinkActive="active">Private Deals</a>
          </li>
        </ul>
        <ul class="nav navbar-nav navbar-right">
          <li>
            <a *ngIf="!authService.isLoggedIn" (click)="authService.login()">Log In</a>
          </li>
          <li>
            <a (click)="authService.logout()" *ngIf="authService.isLoggedIn">Log Out</a>
          </li>
        </ul>
      </nav>
      <div class="col-sm-12">
        <router-outlet></router-outlet>
      </div>
    </div>
  `,
  styles: [
    `.navbar-right { margin-right: 0px !important}`
  ]
})
export class AppComponent {
  title = 'Daily Deals';

  constructor(public authService: AuthService) {}
}
We imported the AuthService and made it publicly available in our constructor (it needs to be public in order for the template to use its methods).
We added *ngIf="authService.isLoggedIn to our link to private deals so it will not be rendered if the user is not logged in. We also added *ngIf logic to our login and logout links to show the appropriate link depending on the user’s authentication state. When the user clicks on the login link now, they’ll be taken to a centralized login page on the Auth0 domain. They’ll enter their credentials here and, if correct, they’ll be redirected back to the application.
Callback Component
We’ll now code up the callback component that we generated at the beginning of the tutorial. This component will be activated when the localhost:4200/callback route is called, and it will process the redirect from Auth0 and ensure we received the right data back in the hash after a successful authentication. To do this, the component will make use of the AuthService we created earlier. Let’s take a look at the implementation:
// callback.component.ts
import { Component, OnInit } from '@angular/core';
import { AuthService } from './auth/auth.service';

@Component({
  selector: 'app-callback',
  template: `
    <p>
      Loading...
    </p>
  `,
  styles: []
})
export class CallbackComponent implements OnInit {

  constructor(private authService: AuthService) { }

  ngOnInit() {
    this.authService.handleLoginCallback();
  }

}
Once a user is authenticated, Auth0 will redirect back to our application and call the /callback route. Auth0 will also append the access token to this request, and our CallbackComponent will make sure to properly process and store the token and profile. If all’s well, meaning we received an access token, we’ll be redirected back to the home page and will be in a logged-in state.
Updating the Deal Service
There’s one final update we need to make. If you try to access the /special route now, even if you’re logged in, you won’t get the list of secret deals. This is because we’re not passing the access token to the back end. We’ll have to update our deal service.
We need to update the call to the /api/deals/private to include our access token. We need to import HttpHeaders to attach an authorization header with the bearer scheme to our request. We’ll also need to import our AuthService to gain access to the accessToken. Let’s see how we’re going to implement this in our application.
// deal.service.ts
...
// Import HttpHeaders
import { HttpClient, HttpHeaders, HttpErrorResponse } from '@angular/common/http';
// Import AuthService
import { AuthService } from './auth/auth.service';
  ...
  constructor(
    private http: HttpClient,
    private authService: AuthService
  ) { }
  ...

  // Implement a method to get the private deals
  getPrivateDeals() {
    return this.http
      .get(this.privateDealsUrl, {
        headers: new HttpHeaders().set('Authorization', `Bearer ${this.authService.accessToken}`)
      })
      .pipe(
        catchError(this.handleError)
      );
  }
We’ll add an Authorization header to our getPrivateDeals() request using the token from the authentication service. Now when a call is made to the private route in our API, we’ll automatically append the authService.accessToken to the call. Let’s try it out in the next section to make sure that it works.
Putting it all Together
That’s it. We’re now ready to test our application. If your Node.js server isn’t running, make sure to start it up first. Head over to localhost:4200 and you should automatically be redirected to localhost:4200/deals and see the list of public deals.
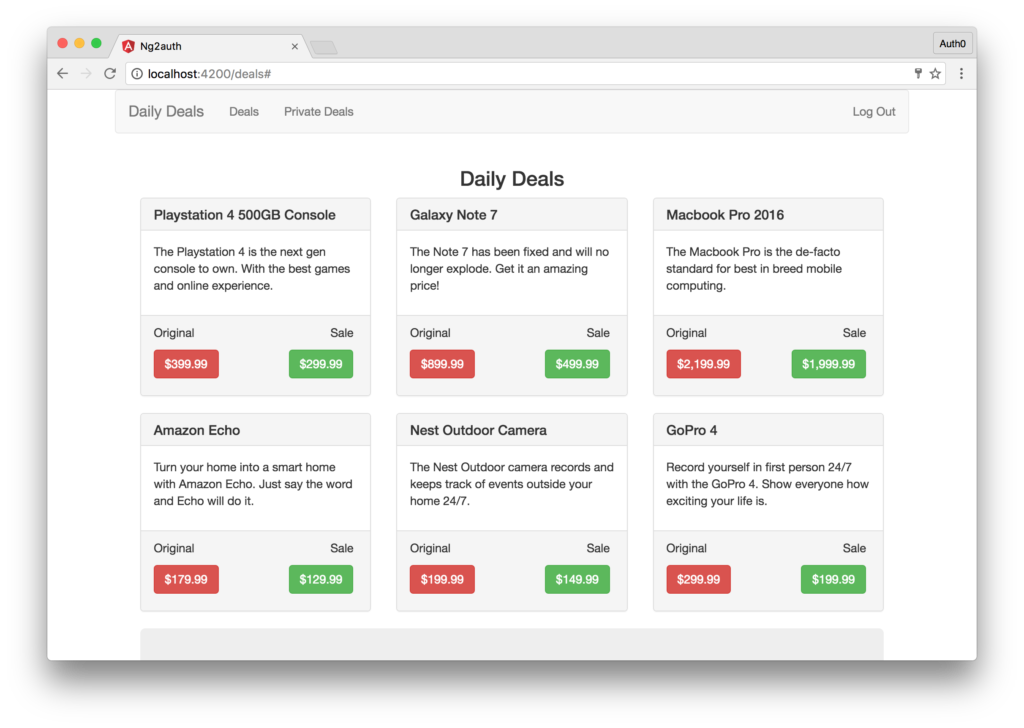
Next, click on the login screen and you’ll be redirected to your Auth0 domain and the login widget will be displayed. Log in or sign up and you’ll be redirected back to the callback route, and then the deals page, but now the UI will look slightly different. The main menu will have a new option for Private Deals, and the message at the bottom will also show you a link to the private deals. Instead of the Log In link in the navbar, you’ll also be presented with a Log Out link instead. Finally, click on the Private Deals link to see our list of exclusive private deals.
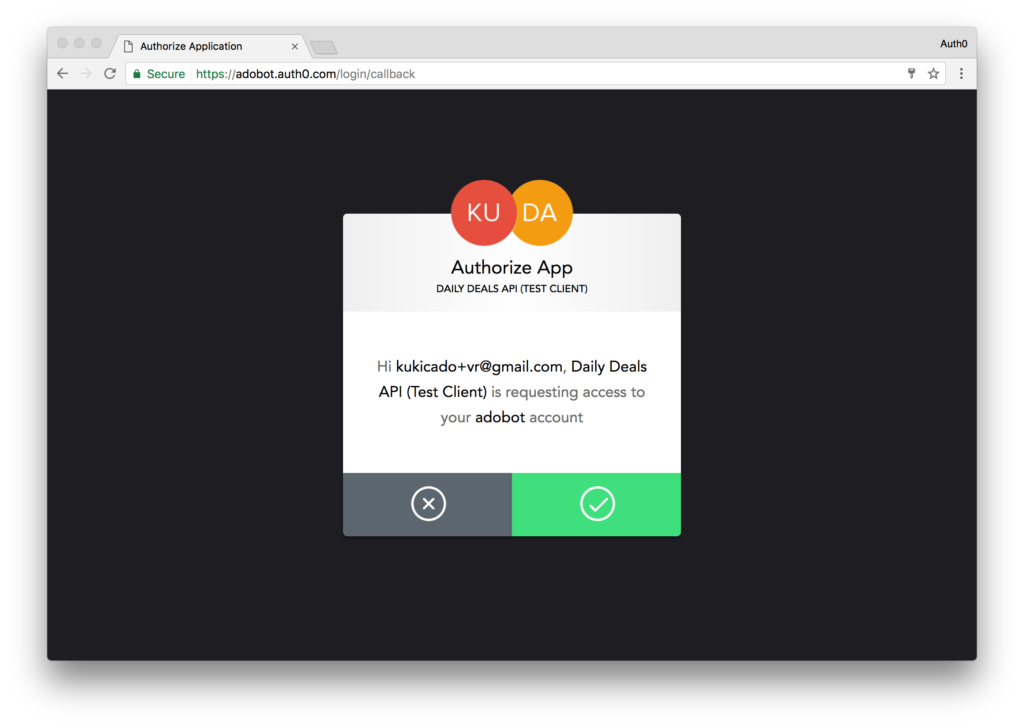
Note: Since we’re using localhost for our domain, once a user logs in the first time, or if the scope changes in the future, a consent dialog will be displayed asking the user if they wish to grant access to the API. This consent dialog will not be displayed if you’re using a non-localhost domain, and the client is a first-party client.

You just wrote and authenticated an Angular app. Congrats!
Conclusion
In this tutorial, we looked at some of the ways you can write Angular components and services. We implemented token-based authentication with Auth0. But that’s just scratching the surface.
Angular provides a lot of great features out of the box like pipes, i18n, and much more. Auth0 can help secure your Angular apps with not just state of the art authentication, but enhanced features like multifactor auth, anomaly detection, enterprise federation, single sign on (SSO), and more. Sign up today so you can focus on building features unique to your app.
Frequently Asked Questions (FAQs) on Angular Authentication with Auth0
How can I implement social login with Auth0 in my Angular application?
Implementing social login with Auth0 in your Angular application involves a few steps. First, you need to set up a social connection in your Auth0 dashboard. This involves selecting the social provider (like Google, Facebook, etc.) and configuring the connection settings. Once the social connection is set up, you can then add the Auth0 SDK to your Angular application. The SDK provides methods for logging in and logging out users, as well as retrieving user information. You can then use these methods in your application to implement social login.
How can I secure my Angular application with Auth0?
Securing your Angular application with Auth0 involves implementing authentication and authorization. Authentication verifies the identity of a user, while authorization determines what resources a user can access. Auth0 provides a variety of features to help secure your application, including multi-factor authentication, anomaly detection, and user management. You can also use the Auth0 SDK to implement secure routing in your Angular application, ensuring that certain routes are only accessible to authenticated users.
How can I handle token expiration with Auth0 in my Angular application?
Handling token expiration with Auth0 in your Angular application involves using the Auth0 SDK to check the expiration date of the token and refresh it if necessary. The SDK provides a method for checking the token’s expiration date, and if the token is expired, you can use the SDK’s refresh token method to get a new token. This ensures that your application always has a valid token and can continue to make authenticated requests.
How can I customize the Auth0 login page for my Angular application?
Customizing the Auth0 login page for your Angular application involves using the Auth0 dashboard to configure the look and feel of the login page. You can customize the logo, colors, and text on the login page to match your application’s branding. You can also add custom fields to the login form, allowing you to collect additional information from users when they log in.
How can I use Auth0 to manage users in my Angular application?
Using Auth0 to manage users in your Angular application involves using the Auth0 dashboard and SDK. The dashboard provides a user management interface where you can view, create, edit, and delete users. The SDK provides methods for retrieving user information, updating user profiles, and managing user roles and permissions. This allows you to implement robust user management functionality in your Angular application.
How can I implement multi-factor authentication with Auth0 in my Angular application?
Implementing multi-factor authentication with Auth0 in your Angular application involves configuring multi-factor authentication in your Auth0 dashboard and then using the Auth0 SDK in your application. The dashboard allows you to enable multi-factor authentication and choose the factors that users will need to authenticate. The SDK provides methods for handling multi-factor authentication, including prompting users for their second factor and verifying their responses.
How can I handle errors with Auth0 in my Angular application?
Handling errors with Auth0 in your Angular application involves using the Auth0 SDK’s error handling methods. The SDK provides methods for catching and handling errors that occur during authentication, authorization, and user management. You can use these methods to display error messages to users, log errors for debugging purposes, and recover from errors gracefully.
How can I implement role-based access control with Auth0 in my Angular application?
Implementing role-based access control with Auth0 in your Angular application involves using the Auth0 dashboard and SDK. The dashboard allows you to create roles and assign them to users. The SDK provides methods for retrieving a user’s roles and checking their permissions. You can then use these roles and permissions in your application to control access to resources.
How can I integrate Auth0 with other services in my Angular application?
Integrating Auth0 with other services in your Angular application involves using the Auth0 SDK and the APIs of the other services. The SDK provides methods for making authenticated requests to other services, and the APIs of the other services allow you to interact with their functionality. This allows you to integrate Auth0 with a wide range of services, including databases, cloud storage providers, and other authentication providers.
How can I test Auth0 functionality in my Angular application?
Testing Auth0 functionality in your Angular application involves using testing frameworks like Jasmine and Karma, along with the Auth0 SDK. The SDK provides methods for mocking Auth0 functionality, allowing you to test your application without making actual requests to Auth0. You can also use the testing frameworks to write unit tests and end-to-end tests for your application, ensuring that your Auth0 integration works as expected.
 Ado Kukic
Ado is a full-stack developer and technical writer at Auth0. Mixing his passion of programming and education, he creates tutorials, courses, and other educational content focusing on security, authentication, and much more. On the front-end, he prefers Angular 2, while on the backend he flip-flops between Node.js and Golang.