This tutorial will show you how to use Amazon DynamoDB as a storage facility for PHP sessions. This method becomes very useful when your applications take advantage of the Elastic Load Balancing and Autoscaling services. You will need Amazon AWS account enabled to use EC2, Elastic Load Balancer and DynamoDB as a prerequisite to play along the tutorial.
What is an Elastic Load Balancer
Elastic Load Balancer acts as a front end for one or many of your virtual servers. It accepts requests and distributes them among virtual servers. Virtual servers can be created by cloning a machine template (AMI) or can be destroyed if needed. Processing power if your application can be varied by adding or reducing the virtual servers dynamically.And Autoscaling?
When Autoscaling joins the game the system can also:- Start more clones of the web servers when there is high traffic
- Shutdown some of them when the traffic drops below a predefined threshold
- Terminate unhealthy instances and replace them if needed
How do I do it?
Can any of your applications work in this environment? Yes if it satisfies two critical requirements:- Since virtual servers are created dynamically, the servers should contain only the application code and not any data. This is easily doable with a DB service.
- Any user session state should be persisted outside of virtual server. This is a little more tricky, because by default the PHP Module stores these data into che web server’s filesystem.
What not to do: sticky sessions
Sticky session is a feature of the Elastic Load Balancer service that binds a user’s session to a specific application instance, so that all requests coming from the user during the session will be sent to the same virtual server. The session cookie can be generated by either the load balancer or the application, but: this is considered a bad practice. The ideal thing would be to design the application as stateless, but this is not always possible.Store your sessions in a database
Other option is: store our sessions inside a database. It could be the same external SQL database used by the application or a Memcache instance or another NoSQL database. In this case DynamoDB seems very interesting because it’s a powerful and fast NoSQL database, it’s managed by Amazon itself and is also easy accessible from our virtual servers. Also, AmazonDynamoDB class of the official PHP SDK is already equipped to register itself as session manager. If you never heard of DynamoDB I recommend you to watch this introductory video.The demo application
I’ve put together a simple application to test the entire mechanism, you can download the source code from our Github repository. We will run this application using an elastic load balancer and at least two instances. We will not use autoscaling for now.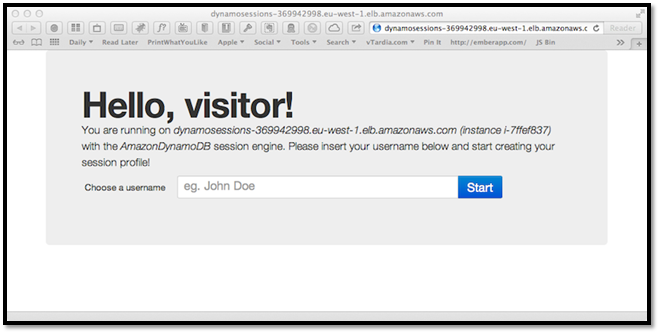 Fig.1 – Welcome screen
The application asks the user to choose a username that is stored into the current session and acts as a “login”. If a username is present in the session the application allows the user to insert a kind of “profile”, essentially a series of key/value information such as name, last name, email etc (both key and value are strings). All this logic is included in the
Fig.1 – Welcome screen
The application asks the user to choose a username that is stored into the current session and acts as a “login”. If a username is present in the session the application allows the user to insert a kind of “profile”, essentially a series of key/value information such as name, last name, email etc (both key and value are strings). All this logic is included in the index.php file.
 Fig.2 – Profile management
The
Fig.2 – Profile management
The session.php file contains a simple Session library. This library allows us to manage session data with friendly methods such as $session->read('some_var') and $session->write('some_key', 'some_value'). This session object can be configured to use the default PHP session mechanism (if we are an a local testing server) or a custom class. The first step of our application file is session startup:
require_once 'lib/session.php';
try {
 // Engine can be PHP or AmazonDynamoDB
 $session = new Session($config['session']['engine'], $config['session']['params']);
} catch (Exception $e) {
 exit($e->getMessage());
} // end tryswitch ($engine) {
case 'AmazonDynamoDB':
// Load AWS SDK
require_once 'AWSSDKforPHP/sdk.class.php';
// Create a list of credential sets that can be used with the SDK.
CFCredentials::set($params['credentials']);
// Instantiate a DynamoDB client
$dynamodb = new AmazonDynamoDB();
$dynamodb->set_region($params['region']);
// Instantiate, configure, and register the session handler
$this->handler = $dynamodb->register_session_handler(array(
'table_name' => $params['table_name'],
'lifetime' => $params['lifetime'],
));
break;config.php file is where we tell the application which engine we want to use, also our AWS credentials and DynamoDB settings are saved here. In the index.php I’ve also included a little utility function that, if we are not in the local server, fetches the name of the instance in which is currently running. This is useful to check that the session is kept consistent across our servers.
function getServerName() {
 $host = $_SERVER['SERVER_NAME'];
 if ('localhost' != $host) {
 // Maybe we are on EC2, trying to catch the current instance ID
 $ch = curl_init('http://169.254.169.254/latest/meta-data/instance-id');
 curl_setopt($ch, CURLOPT_FAILONERROR, true);
 curl_setopt($ch, CURLOPT_RETURNTRANSFER, true);
 curl_setopt($ch, CURLOPT_CONNECTTIMEOUT, 2);
 if ($ret = curl_exec($ch)) {
 $host .= ' (instance ' . $ret . ')';
 } // end if
 curl_close($ch);
 } // end if
 return $host;
} // end functiongetServerName() uses the EC2 Metadata API to find the instance’s name.
Run the app on your fleet
In order to test this application we need a fleet of at least two web servers behind a load balancer. The server I used is an Ubuntu GNU/Linux instance equipped with:
- the Apache web server,
- PHP 5.3 (both command line and apache module),
- the cURL program and PHP extension,
- the Pear package manager (needed to install the SDK easily),
- the AWS SDK for PHP (I suggest the installation by Pear).
Initialize the session storage
Go to your AWS console, select the DynamoDB service and your favorite region (mine is EU West – Ireland). Click on the “Create Table” button.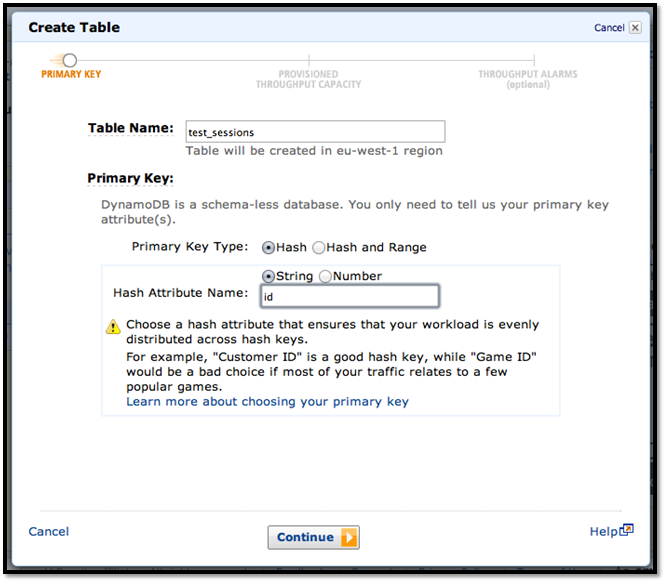 Fig.3 – Create the table, step 1
Enter “test_sessions” as table name and chose a string primary key called “id”, the key type must be “hash”. If you choose another name it must be copied in the
Fig.3 – Create the table, step 1
Enter “test_sessions” as table name and chose a string primary key called “id”, the key type must be “hash”. If you choose another name it must be copied in the config.php file later. Enter “10” for both the read and write capacity units fields (eg. how fast is your table), this is enough to test.
 Fig.4 – Create the table, step 2
Now you have a NoSQL table where each row have a mandatory id field but can have a variable number of other different fields of type string, number, string set or number set. The session manager object will use a string field named “data” to store the session’s variables and a number field named “expires” for the expiration timestamp of the session.
Fig.4 – Create the table, step 2
Now you have a NoSQL table where each row have a mandatory id field but can have a variable number of other different fields of type string, number, string set or number set. The session manager object will use a string field named “data” to store the session’s variables and a number field named “expires” for the expiration timestamp of the session.
Launch and configure the servers
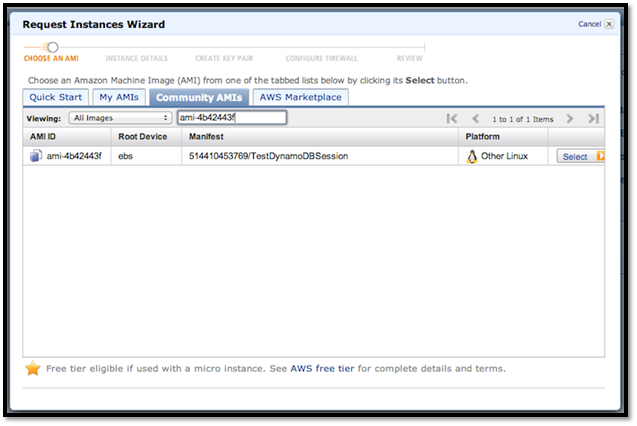 Fig.5 – Choose the AMI to launch
Now select the EC2 service and the same region you chose for the DynamoDB table. Click on the “Launch Instance” button from either the Dashboard or the “Instances” section. Select your custom AMI or, with the classic wizard, go to the “Community AMIs” tab and enter “ami–4b42443f”.
In the next screen enter at least “2” for the number of instances and choose your instance type, I chose Micro (t1.micro). You can leave “no preference” in the availability zone dropdown, but in a production environment it’s better if the various instances are distributed between two or more zones inside the same region. Accept the default settings for both the “Instance Details” and the “Storage Device” configuration panels, then continue. Enter one or more optional tags if you want. Choose a keypair or create a new one and choose a security group which allows at least HTTP on port 80 and SSH on port 22.
Fig.5 – Choose the AMI to launch
Now select the EC2 service and the same region you chose for the DynamoDB table. Click on the “Launch Instance” button from either the Dashboard or the “Instances” section. Select your custom AMI or, with the classic wizard, go to the “Community AMIs” tab and enter “ami–4b42443f”.
In the next screen enter at least “2” for the number of instances and choose your instance type, I chose Micro (t1.micro). You can leave “no preference” in the availability zone dropdown, but in a production environment it’s better if the various instances are distributed between two or more zones inside the same region. Accept the default settings for both the “Instance Details” and the “Storage Device” configuration panels, then continue. Enter one or more optional tags if you want. Choose a keypair or create a new one and choose a security group which allows at least HTTP on port 80 and SSH on port 22.
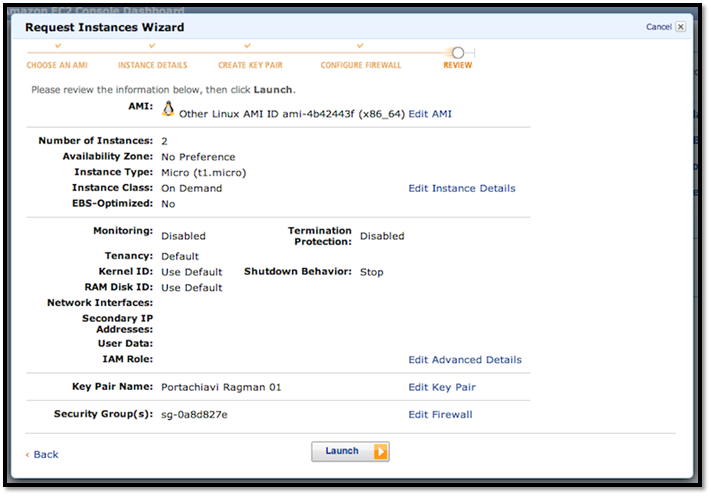 Fig.6 – Instance settings recap
Review your settings then launch the instances. When the instances state is “running” they can be configured via SSH. Each instance has a public DNS name similar to ec2-xxx-xxx-xx-xx.region.compute.amazonaws.com. You’ll need to edit the config.php file on each instance you created. Connect to the instance with SSH or with an SFTP client using your public key and the username “ubuntu” (if you used my public AMI):
Fig.6 – Instance settings recap
Review your settings then launch the instances. When the instances state is “running” they can be configured via SSH. Each instance has a public DNS name similar to ec2-xxx-xxx-xx-xx.region.compute.amazonaws.com. You’ll need to edit the config.php file on each instance you created. Connect to the instance with SSH or with an SFTP client using your public key and the username “ubuntu” (if you used my public AMI):
$ ssh -i /path/to/key.pem ubuntu@ec2-X-X-X-X.region.compute.amazonaws.com
Change the current directory to /var/www where the test application is located. Edit the config.php file inserting your AWS key and secret. Then check if your DynamoDB table settings matches, you will surely have to edit the region with the appropriate value that can be found in this reference.
Then create an empty file called ping.html inside /var/www: this file will be used by the load balancer to test the reachability of each instance.
Setting up the load balancer
With the database and all the instances in place we can now setup the frontend load balancer. In the EC2 navigation menu, under “Network & Security” choose “Load Balancers” and click on the “Create Load Balancer” button.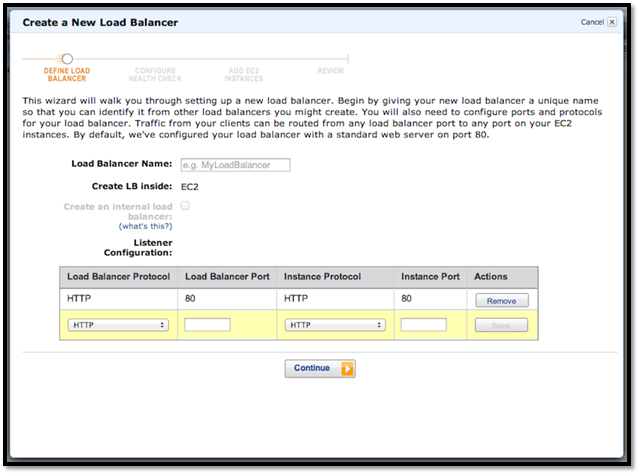 Fig.7 – Load balancer creation screen
Choose a name for the load balancer and verify that the listener configuration matches that of the screenshot, that basically says: forward all the HTTP traffic on port 80 of the load balancer to HTTP on port 80 of the instances.
Fig.7 – Load balancer creation screen
Choose a name for the load balancer and verify that the listener configuration matches that of the screenshot, that basically says: forward all the HTTP traffic on port 80 of the load balancer to HTTP on port 80 of the instances.
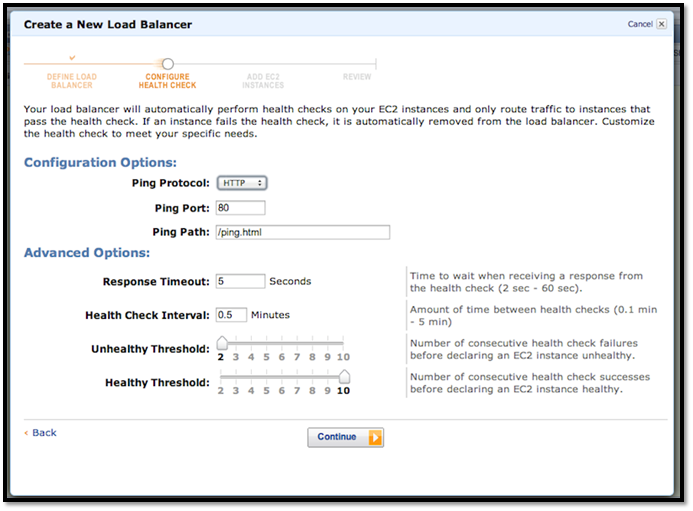 Fig.8 – Load balancer health settings
In the health check panel enter /ping.html in the ping path field and leave the other settings as default. This means: call the /ping.html resource of each instance every 30 seconds, if the response time is longer then 5 seconds the check fails, if the instance fails two consecutive health checks it’s unhealthy, if it passes 10 consecutive checks the instance is healthy. The load balancer will not forward traffic to an unhealthy instance and if autoscale is in place the unhealthy instances can be terminated and replaced by new fresh ones.
Fig.8 – Load balancer health settings
In the health check panel enter /ping.html in the ping path field and leave the other settings as default. This means: call the /ping.html resource of each instance every 30 seconds, if the response time is longer then 5 seconds the check fails, if the instance fails two consecutive health checks it’s unhealthy, if it passes 10 consecutive checks the instance is healthy. The load balancer will not forward traffic to an unhealthy instance and if autoscale is in place the unhealthy instances can be terminated and replaced by new fresh ones.
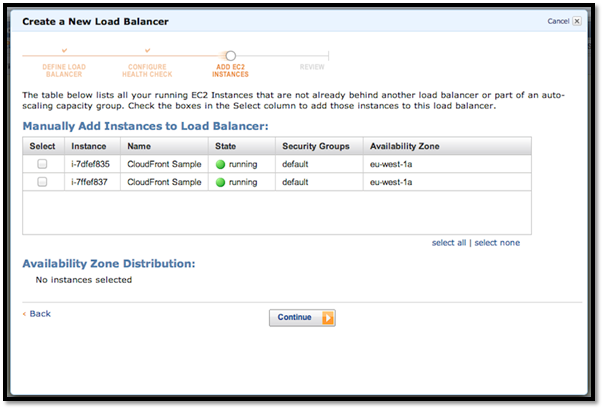 Fig.9 – Attach instances
The next screen lets you choose which of the currently running instances can be added to the load balancer. Select the two instances created previously and go on. Review the final configuration and confirm if it’s ok for you. Now, you should be able to see the load balancer’s details and the status of all the connected instances.
Fig.9 – Attach instances
The next screen lets you choose which of the currently running instances can be added to the load balancer. Select the two instances created previously and go on. Review the final configuration and confirm if it’s ok for you. Now, you should be able to see the load balancer’s details and the status of all the connected instances.
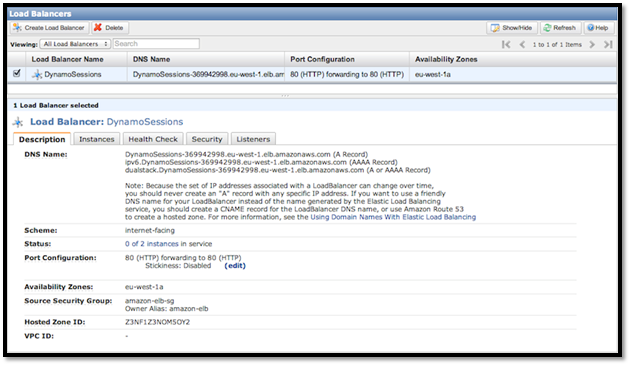 Fig.10 – ELB recap screen
You can test the application by putting the load balancer’s DNS name (something like yourname-12345678.region.elb.amazonaws.com) into a browser. You can also configure a domain or subdomain (eg. dynamo.yourdomain.com) by adding a CNAME in your DNS panel that points to the load balancer URL. It’s not recommended to use the IP with an A record because the IP can change overtime.
Fig.10 – ELB recap screen
You can test the application by putting the load balancer’s DNS name (something like yourname-12345678.region.elb.amazonaws.com) into a browser. You can also configure a domain or subdomain (eg. dynamo.yourdomain.com) by adding a CNAME in your DNS panel that points to the load balancer URL. It’s not recommended to use the IP with an A record because the IP can change overtime.
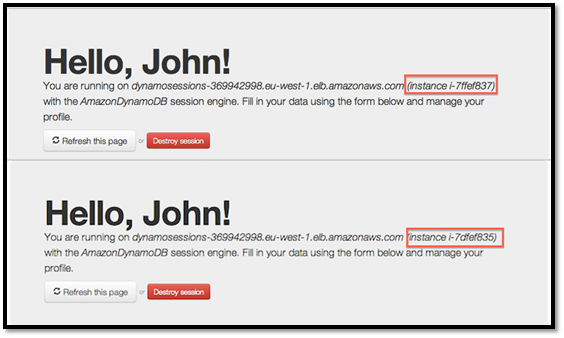 Fig.11 – Screenshot comparison
Each time you submit the form or refresh the page you request can be processed by a different instance. You can check which instance is serving you by the name displayed through the getServerName() utility.
Fig.11 – Screenshot comparison
Each time you submit the form or refresh the page you request can be processed by a different instance. You can check which instance is serving you by the name displayed through the getServerName() utility.
Summary
And that’s all for now. We’ve covered an important topic in the AWS ecosystem, but this is just the beginning. All this stuff is entirely programmable, for example: you can add autoscaling and design your instances to be self-configurable and download AWS credentials and other data from a trusted place. Or you can use Cloud Formation to create a reusable template for the entire infrastructure. The starting point to check is the AWS Homepage. And now if you’ve finished testing don’t forget to terminate all your stuff, if not Happy Coding!Frequently Asked Questions on Amazon DynamoDB and PHP Sessions
How does Amazon DynamoDB work with PHP sessions?
Amazon DynamoDB is a NoSQL database service that provides fast and predictable performance with seamless scalability. When it comes to PHP sessions, DynamoDB can be used as a session handler. This means that it can store session data, making it particularly useful in load-balanced environments. The PHP session data is stored in DynamoDB, and this data can be accessed from any server in the load-balanced environment, providing a seamless user experience.
What are the benefits of using Amazon DynamoDB for PHP session storage?
Using Amazon DynamoDB for PHP session storage offers several benefits. Firstly, it provides a highly scalable, fast, and flexible NoSQL database service for all applications that need consistent, single-digit millisecond latency at any scale. Secondly, it is a fully managed cloud database and supports both document and key-value store models. Lastly, it offers built-in security, backup and restore, and in-memory caching.
How can I set up Amazon DynamoDB for PHP session storage?
Setting up Amazon DynamoDB for PHP session storage involves a few steps. First, you need to create a DynamoDB table to store your session data. Then, you need to configure your PHP settings to use DynamoDB as your session handler. This involves setting the session.save_handler and session.save_path directives in your php.ini file. You also need to install and configure the AWS SDK for PHP, which provides the functionality to interact with DynamoDB.
How does session management work in AWS?
Session management in AWS is handled by the Elastic Load Balancing feature. This feature automatically distributes incoming application traffic across multiple targets, such as Amazon EC2 instances. It ensures that the session data is available to all instances, so even if one instance fails, the session data is not lost. This provides a seamless and uninterrupted user experience.
How can I troubleshoot issues with PHP sessions in DynamoDB?
If you’re experiencing issues with PHP sessions in DynamoDB, there are a few things you can do. First, check your PHP and AWS SDK for PHP configurations to ensure they are set up correctly. You can also use the AWS Management Console to view and manage your DynamoDB tables. If you’re still having issues, you can enable detailed error logging in your PHP settings to help identify the problem.
How secure is Amazon DynamoDB for storing PHP sessions?
Amazon DynamoDB provides robust security features for storing PHP sessions. It includes built-in encryption at rest, which helps secure your data from unauthorized access. It also provides fine-grained access control using AWS Identity and Access Management (IAM), allowing you to control who can access your DynamoDB resources.
Can I use Amazon DynamoDB for PHP session storage in a load-balanced environment?
Yes, Amazon DynamoDB is an excellent choice for PHP session storage in a load-balanced environment. Because the session data is stored in DynamoDB, it can be accessed from any server in the load-balanced environment. This ensures that the user’s session remains consistent, even if they are switched to a different server.
How does Amazon DynamoDB handle session expiration?
Amazon DynamoDB provides a feature called Time to Live (TTL) for managing session expiration. With TTL, you can define a specific duration for items to exist in the table. Once the specified duration has passed, DynamoDB automatically deletes the items. This helps manage storage costs and ensures that outdated session data is not retained.
Can I use other AWS services in conjunction with DynamoDB for PHP session storage?
Yes, you can use other AWS services in conjunction with DynamoDB for PHP session storage. For example, you can use AWS Lambda to automatically trigger actions based on changes to your DynamoDB tables. You can also use Amazon CloudWatch to monitor your DynamoDB tables and send alerts based on specific conditions.
How can I optimize the performance of Amazon DynamoDB for PHP session storage?
There are several ways to optimize the performance of Amazon DynamoDB for PHP session storage. One way is to use DynamoDB Accelerator (DAX), which provides a fully managed, highly available, in-memory cache for DynamoDB. This can significantly improve read performance. You can also optimize your table design by choosing the right primary key and using secondary indexes effectively.
 Vito Tardia
Vito Tardia (a.k.a. Ragman), is a web designer and full stack developer with 20+ years experience. He builds websites and applications in London, UK. Vito is also a skilled guitarist and music composer and enjoys writing music and jamming with local (hard) rock bands. In 2019 he started the BlueMelt instrumental guitar rock project.