In this article, we’ll develop an AI-powered research tool using JavaScript, focusing on leveraging the latest artificial intelligence (AI) advancements to sift through tons of data faster.
We’ll start by explaining basic AI concepts to help you understand how the research tool will work. We’ll also explore the limitations of the research tool and some available tools that will help us enhance our AI research tool’s capabilities in a way that allows it to access tailored information more efficiently.
At the end of the article, you’ll have created an advanced AI research assistant tool to help you gain insights quicker and make more informed research-backed decisions.
Background and Basics
Before we start building, it’s important we discuss some fundamental concepts that will help you better understand how popular AI-powered applications like Bard and ChatGPT work. Let’s begin with vector embeddings.
Vector embeddings
Vector embeddings are numerical representations of text-based data. They are essential because they allow AI models to understand the context of the text provided by the user and find the semantic relationship between the provided text and the tons of knowledge they’ve been trained on. These vector embeddings can then be stored in vector databases like Pinecone, allowing optimal search and retrieval of stored vectors.
Retrieval methods
AI models have been fine-tuned to provide satisfactory answers. To do that efficiently, they’ve been trained on vast amounts of data. They’ve also been built to rely on efficient retrieval techniques — like semantic similarity search — to quickly find the most relevant data chunks (vector embeddings) to the query provided.
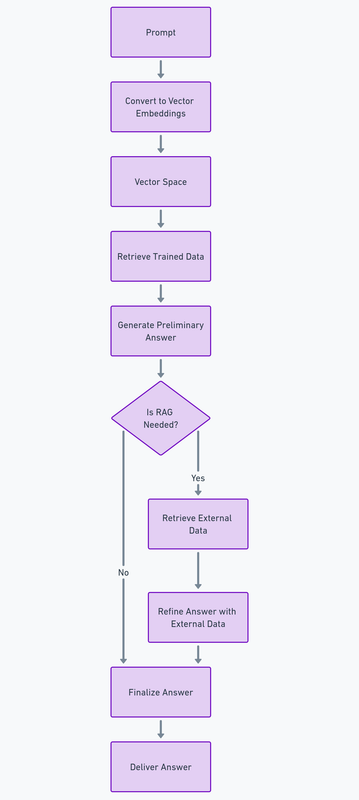
When we supply the model with external data, as we’ll do in subsequent steps, this process becomes retrieval-augmented generation. This method combines all we’ve learned so far, allowing us to enhance a model’s performance with external data and synthesize it with similar vector embeddings to provide more accurate and reliable data.
JavaScript’s role in AI development
JavaScript has been the most popular programming language for the past 11 years, according to the 2023 Stack Overflow survey. It powers most of the world’s web interfaces, has a robust developer ecosystem, and enjoys versatile cross-platform compatibility with other key web components like browsers.
In the early stages of the AI revolution, Python was the primary language used by AI researchers to train novel AI models. However, as these models become consumer-ready, there’s a growing need to create full-stack, dynamic, and interactive web applications to showcase the latest AI advancements to end-users.
This is where JavaScript shines. Combined with HTML and CSS, JavaScript is the best choice for web and (to some extent) mobile development. This is why AI companies like OpenAI and Mistral have been building developer kits that JavaScript developers can use to create AI-powered development accessible to a broader audience.
Introducing OpenAI’s Node SDK
The OpenAI’s Node SDK provides a toolkit that exposes a suite of APIs that JavaScript developers can use to interact with their AI models’ capabilities. The GPT 3.5 and GPT 4 model series, Dall-E, TTS (text to speech), and Whisper (speech-to-text models) are available via the SDK.
In the next section, we’ll use the latest GPT 4 model to build a simple example of our research assistant.
Building a Simple Research Assistant Tool
Note: you can review the GitHub Repo as you go through the steps below.
Prerequisites
- Basic JavaScript knowledge.
- Node.js Installed. Visit the official Node.js website to install or update the Node.js runtime on your local computer.
- OpenAI API Key. Grab your API keys, and if you don’t have one, sign up on their official website.
Step 1: Setting up your project
Run the command below to create a new project folder:
mkdir research-assistant
cd research-assistant
Step 2: Initialize a new Node.js project
The command below will create a new package.json in your folder:
npm init -y
Step 3: Install OpenAI Node SDK
Run the following command:
npm install openai
Step 4: Building the research assistant functionalities
Let’s create a new file named index.js in the folder and place the code below in it.
I’ll be adding inline comments to help you better understand the code block:
const { OpenAI } = require("openai");

const openai = new OpenAI({
      apiKey: "YOUR_OPENAI_API_KEY",
      dangerouslyAllowBrowser: true,
});

async function queryAIModel(question) {
  try {
    const completion = await openai.chat.completions.create({
      model: "gpt-4",
      messages: [
        { role: "system", content: "You are a helpful research assistant." },
        { role: "user", content: question }
      ],
    });
    return completion.choices[0].message.content.trim();
  } catch (error) {
    console.error("An error occurred while querying GPT-4:", error);
    return "Sorry, an error occurred. Please try again.";
  }
}

async function queryResearchAssistant() {
  const query = "What is the role of JavaScript in building AI Applications?";
  const answer = await queryAIModel(query);
  console.log(`Question: ${query}\nAnswer: ${answer}`);
}

queryResearchAssistant();
Run node index.js in the command line and you should get a result like that pictured below.

Please note that it’s not recommended to handle API keys directly in the frontend due to security concerns. This example is for learning purposes only. For production purposes, create a .env file and place your OPENAI_API_KEY in it. You can then initialize the OpenAI SDK like below:
const openai = new OpenAI({
  apiKey: process.env['OPENAI_API_KEY'], // This is the default and can be omitted
});
As we move to the next section, think of ways you can improve our current AI assistant setup.
Development of a Robust Research Assistant Tool
Our research assistant is an excellent example of how we can use the latest AI models to improve our research flow significantly. However, it comes with some limitations, which are covered below.
Limitations of the basic research tool
Poor user experience. Our current setup needs a better user experience in terms of input. We can use a JavaScript framework like React to create input fields to solve this. Additionally, it takes a few seconds before we receive any response from the model, which can be frustrating. This can be solved by using loaders and integrating OpenAI’s built-in streaming functionality to ensure we get responses as soon as the model generates them.
Limited knowledge base. The current version relies on the GPT-4’s pre-trained knowledge for an answer. While this dataset is massive, its knowledge cutoff date is April 2023 at the time of writing. This means it might not be able to provide relevant answers to research questions about current events. We’ll attempt to solve this limitation with our next tool version by adding external data.
Limited context. When we delegate research tasks to a human, we expect them to have enough context to process all queries efficiently. However, our current setup processes each query in isolation, which is unsuitable for more complex setups. To solve this, we need a system to store and concatenate previous answers to current ones to provide full context.
Introduction to OpenAI function calling
OpenAI’s function calling feature was released in June 2023, allowing developers to connect supported GPT models (3.5 and 4) with functions that can retrieve contextually relevant data external data from various sources like tools, APIs, and database queries. Integrating this feature can help us address some of the limitations of our AI assistant mentioned earlier.
Building an enhanced research assistant tool
Prerequisites
- NewsAPI key. Besides the prerequisites we mentioned for the current assistant version, we’ll need a free API Key from NewsAPI. They have a generous free developer tier that’s perfect for our needs.
Note: you can review the GitHub Repo as you go through the steps below and the OpenAI official Cookbook for integrating function calls into GPT models.
I’ve also added relevant inline code comments so you can follow through.
Step 1: Set up the NewsAPI fetch function for external data
Note: you can look at the API documentation to see how the response is structured.
First, we’ll create a function to fetch the latest news based on your provided query:
// Function to fetch the latest news based on a query using the NewsAPI
async function fetchLatestNews(query) {
    const apiKey = 'your_newsapi_api_key';
    const url = `https://newsapi.org/v2/everything?q=${encodeURIComponent(query)}&from=2024-02-9&sortBy=popularity&apiKey=${apiKey}`;

    try {
        const response = await fetch(url);
        const data = await response.json();

        // Fetch 5 articles and their sources
        const first5Articles = data.articles && data.articles.length > 0
            ? data.articles.slice(0, 5)
            : [];

        //Convert the first 5 articles as a JSON
        const resultJson = JSON.stringify({ articles: first5Articles });

        return resultJson
    } catch (error) {
        console.error('Error fetching data:', error);
    }
}
Step 2: Describe our function
Next, we’ll implement a tooling setup describing the composition of our external data function so the AI model knows what type of data to expect. This should include name, description, and parameters:
const tools = [
    // Add the news fetching function as a tool
    {
      type: "function",
      function: {
        name: "fetchLatestNews",
        description: "Fetch the latest news based on a query",
        parameters: {
          type: "object",
          properties: {
            query: {
              type: "string",
            },
          },
          required: ["query"],
        },
      }
    },
  ];

  const availableTools = {
    fetchLatestNews, // Add the news fetching function here
  };
Step 3: Integrating external tools into our AI assistant
In this step, we’ll create a function called researchAssistant. It will prompt a conversation with OpenAI’s GPT-4 model, execute the specified external data function in tools, and integrate the responses dynamically.
To start with, we’ll define an array that keeps track of all our conversations with the AI Assistant, providing a detailed context when a new request is made:
const messages = [
    {
      role: "system",
      content: `You are a helpful assistant. Only use the functions you have been provided with.`,
    },
  ];
Once this is done, we’ll set up the core functionality for the assistant. This involves processing the responses from external functions to generate a comprehensive and relevant report for you:
async function researchAssistant(userInput) {
    // Add user input to the messages array as a 'user' role message
    messages.push({
      role: "user",
      content: userInput,
    });

    // Iterate up to 5 times to handle conversation turns or tool calls
        // necessary for cases where API response might not be relevant enough at first.
    //We reduced ours to just 5
    for (let i = 0; i < 5; i++) {
      // Create a chat completion request to the OpenAI API with the current conversation state
      const response = await openai.chat.completions.create({
        model: "gpt-4", // Specify the GPT model
        messages: messages, // Include the conversation history
        tools: tools, // Specify the external tools available for the AI to use
        max_tokens: 4096 // Set the maximum length of the AI's response
      });

      // Destructure the AI response to get the finish reason and the message
      const { finish_reason, message } = response.choices[0];

      // Check if the AI's response was to make a tool call
      if (finish_reason === "tool_calls" && message.tool_calls) {
        // Get the name of the function the AI wants to call
        const functionName = message.tool_calls[0].function.name;
        // Find the corresponding function in the availableTools
        const functionToCall = availableTools[functionName];
        // Parse the arguments for the function call
        const functionArgs = JSON.parse(message.tool_calls[0].function.arguments);
        // Call the function with the parsed arguments and await its response
        const functionResponse = await functionToCall.apply(null, [functionArgs.query]);

        // Add the function response to the conversation as a 'function' role message
        messages.push({
          role: "function",
          name: functionName,
          content: `
                The result of the last function was this: ${JSON.stringify(
                  functionResponse
                )}
                `,
        });
      } else if (finish_reason === "stop") {
        // If the AI decides to stop, add its last message to the conversation
        messages.push(message);
        // Return the AI's last message as the function's output
        return message.content;
      }
    }
    // If the maximum number of iterations (i.e, 5) is reached without a 'stop', return the default message below
    return "The maximum number of iterations has been met without a relevant answer. Please try again.";
}
Step 4: Run our AI assistant
Our final step is to create a function that supplies the researchAssistant function query parameter with our research query and processes its execution:
async function main() {
    const response = await researchAssistant("I have a presentation to make. Write a market research report on Apple Vision Pro and summarize the key points.");

    console.log("Response:", response);
 }
  main();
Run node index.js in your terminal, and you should see a response similar to the one below.

Interestingly, the knowledge cutoff of the GPT-4 model was in April 2023, which was before the release of Apple’s Vision Pro in February 2024. Despite that limitation, the model provided a relevant research report because we supplemented our query with external data.
Other APIs you can integrate into your AI Assistant can be TimeAPI, Location API, or any other API with structured responses you have access to.
Conclusion
What an exciting journey it’s been! This tutorial explored key concepts that have aided our understanding of how popular AI-powered applications work.
We then built an AI research assistant capable of understanding our queries and generating human-like responses using the OpenAI’s SDK.
To further enhance our basic example, we incorporated external data sources via function calls, ensuring our AI model got access to the most current and relevant information from the Web. With all these efforts, in the end, we built a sophisticated AI-powered research assistant.
The possibilities are endless with AI, and you can build on this foundation to build exciting tools and applications that leverage state-of-the-art AI models and, of course, JavaScript to automate daily tasks, saving us precious time and money.
 Mahmud Adeleye
Mahmud is a software engineer with extensive experience architecting AI software applications.