Advanced Pebble Watch Configuration

Key Takeaways
- Update the `appinfo.json` file to enable a configuration page in your Pebble app by adding “configurable” to the capabilities array, allowing users to customize settings like location type directly within the Pebble interface.
- Create a user-friendly settings page hosted online, which includes a form for users to specify their preferred location type (e.g., Starbucks, gelato). This page communicates with the Pebble app via JavaScript to save settings locally on the device.
- Utilize JavaScript’s localStorage API within the PebbleKit JavaScript framework to save and retrieve user settings, enhancing the app’s ability to remember user preferences like location type.
- Adjust the `pebble-js-app.js` to handle new settings from the configuration page by fetching and storing the settings in local storage, ensuring the app respects user preferences on startup and during operation.
- Modify the C code in the Pebble app (`find_me_anything.c`) to handle changes in settings, specifically accommodating a new key for the type of location being searched, thereby updating the display dynamically based on user preferences.
- Implement error handling in JavaScript to manage undefined or missing data from external APIs, ensuring the app remains robust and provides user-friendly notifications or fallbacks.
For anyone who watched Power Rangers as a kid and dreamed of having a fancy watch that made them feel like a superhero, smartwatches are a dream come true. I may be one of the aforementioned Power Ranger dreamers. Combine that with the developer urges that fill my veins and you’ve got a child of the 90s who is soon to become a grey, mad scientist like Doctor Emmett Brown from “Back to the Future.”
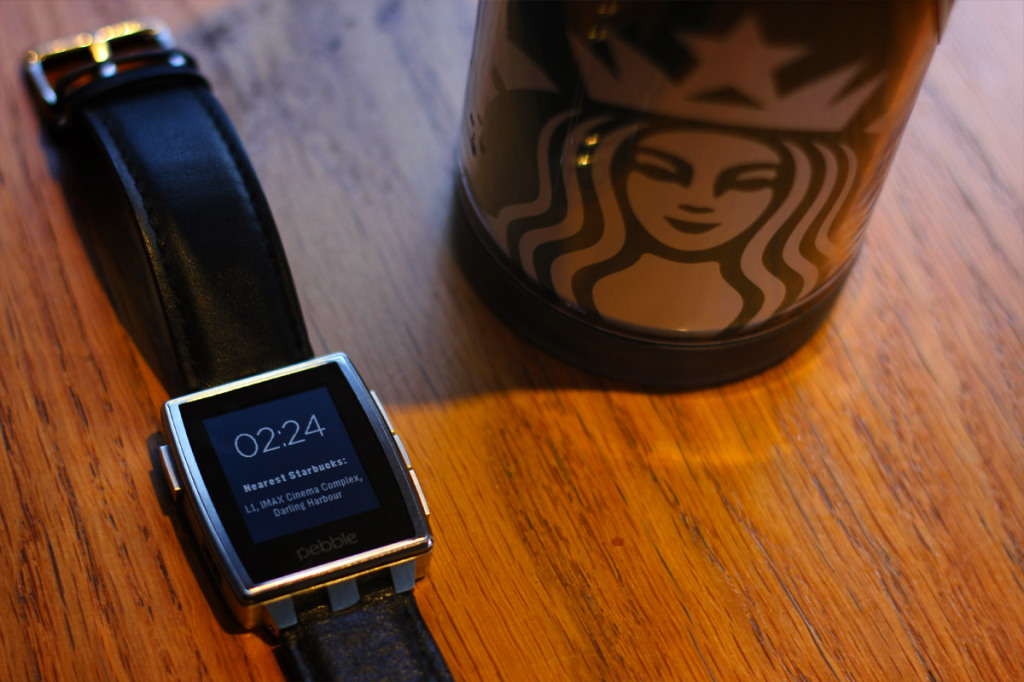
I recently wrote an article on the basics of Pebble Watch development with JavaScript. In summary, we made a watchface that used the Foursquare API to tell the user where their nearest Starbucks was at all times. This is what it looked like in action:
I mentioned that there was a bit more that was possible with JavaScript which I couldn’t cover in that article. This is my follow up that’ll cover the other features of the PebbleKit JavaScript framework.
In this article, I’ll be covering how to expand the “Find Me Starbucks” app we developed in the previous article to allow the user to choose the type of location the app will find for them. Not everyone is as big a fan of Starbucks as I am! We’ll add a configuration screen that’ll allow them to type in their own place of interest and save that setting for them each time they use the app.
If you’re looking to follow along with this tutorial, you’ll need:
- Either an Android phone or an iPhone with the Pebble app installed and running.
- A Pebble watch.
- API credentials for the FourSquare API.
- An available Wi-Fi network to transfer your app to your mobile device and Pebble watch.
- A basic knowledge of JavaScript.
- The willingness to use a command line and experiment with C code.
- To preferably have gone through the previous tutorial or have a knowledge on the basics of Pebble app development with the PebbleKit JavaScript framework.
- An online web host to store a single file online that’ll be your configuration page.
Full Code for This Tutorial
Rather than throw in all of the code from our last tutorial into this article, you can check out the code for “Find Me Starbucks” on GitHub or read through the previous tutorial. The code for our updated app is also available over at “Find me Anything” on GitHub, so if you’d like to download the code and follow along – feel free!
How Configuration Works in the World of Pebble Apps
Prior to the introduction of the PebbleKit JavaScript Framework in version 2.0 of the SDK, Pebble apps needed to have a companion app installed onto the user’s phone in order to accept any custom settings. If a user wanted a weather app to show them the weather in Celsius rather than Fahrenheit, they’d need to install the companion app first and open that to change the settings (or have a crude settings window on the watchface app itself).
JavaScript Enabled Settings Page
With the new SDK, we can now define a configuration page that’ll be accessible within Pebble’s Android/iOS app itself. Settings are accessed in the same spot as the place the user goes to install and arrange their watch apps. Cleaner and more logical from a user’s standpoint.
JavaScript Enabled Local Storage
The new SDK’s JavaScript also uses the W3C recommendation for Web Storage, allowing you to store settings within the app for future use. If the user asks to have that Celsius/Fahreinheit setting, we can use web storage to remember the user’s preference. In our case, we want to store the type of location the user is interested in.
How it Works
The settings page is a single page on the web that contains a form to toggle your app’s settings. The JavaScript in your app waits for any adjusted settings to be submitted through the form back to your app’s JavaScript and stores the settings it receives in local storage.
Sound confusing? It’s not an ideal set up for some cases, as it means that you’ve got to host your own settings page somewhere on the web for others to access. It seems that Pebble plans on having the ability to bundle this settings page up with the app in the future which would be great for some apps out there. The current setup does come with benefits – if you want to reskin or adjust something on the settings page alone, there’s no need to update the app itself as the settings page is independent.
Update Your appinfo.json
First, to enable the settings page on your application, we add "configurable" to the capabilities array that we previously used to define access to the geolocation API via the "location" keyword:
"capabilities": ["location", "configurable"]We also add in one extra key for our app to use called "searchingFor", this will be the string that’ll either be “Starbucks” or a custom type of location that the user requests:
"appKeys": {
  "location": 0,
  "searchingFor": 1
}
Creating Your Settings Page
As mentioned above, you’ll need to host a webpage with a form for the user to change what they’re searching for. My one looks like so:
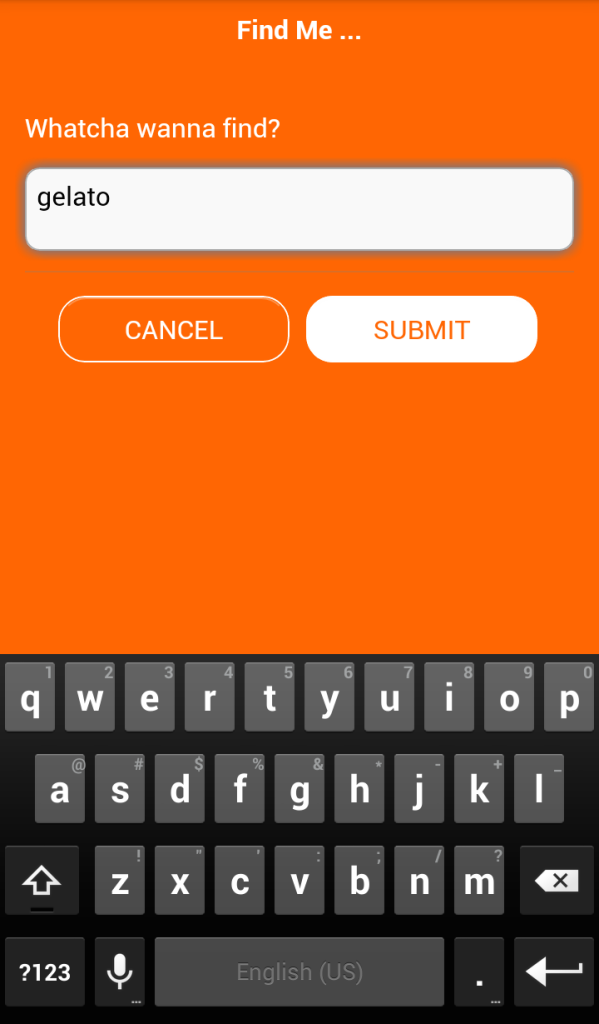
The basic HTML you’ll need looks like so (I’ve removed my styling and framework related markup for simplicity):
<label for="searchingFor">Whatcha wanna find?</label>
<textarea cols="40" rows="8" name="searchingFor" id="searchingFor"></textarea>
<button type="submit" id="b-cancel">Cancel</button>
<button type="submit" id="b-submit">Submit</button>
We then use JavaScript on our settings page to submit any changes back to our Pebble’s JavaScript and to prefill in the user’s current settings.
Cancelling or Submitting Settings
We provide two options, they can cancel – preventing any of their changes from saving or they can submit the form which passes those changes into the app to be saved.
To cancel their changes we set the document.location to pebblejs://close. That’ll send an empty response to our Pebble JavaScript code which won’t change anything:
$('#b-cancel').click(function() {
  document.location = 'pebblejs://close';
});
If they choose to submit their changes, we pass in the input from the textarea into a string. The saveOptions() function below puts the value from the textarea into an object:
function saveOptions() {
  var options = {
    searchingFor: $('#searchingFor').val()
  }
  return options;
}
Our click function submits our data by turning the object into a string and encoding its characters so that we can place it in the URL we target with document.location (any single spaces will be encoded into %20, any other special characters will also change):
$('#b-submit').click(function() {
  var location = 'pebblejs://close#' + encodeURIComponent(JSON.stringify(saveOptions()));
  document.location = location;
});
That’ll successfully send the settings we want to the Pebble JavaScript.
What If the User Already Chose Something?
If the user already has made a change to the settings, say they’ve already asked for the app to find them gelato instead, we’ll want their previous setting of “gelato” to appear in the textfield when they open the settings. To do this, we’ll send the config HTML page a variable in the URL called searchingFor. An example of this would be the URL http://www.yourpebbleappsettingpage.com?searchingFor=gelato.
I’ve got a function I found a long time ago which I reuse quite a bit for getting variables from URLs:
function getURLVariable(name)  {
  name = name.replace(/[\[]/,"\\\[").replace(/[\]]/,"\\\]");
  var regexS = "[\\?&]"+name+"=([^&#]*)",
      regex = new RegExp(regexS),
      results = regex.exec(window.location.href);
  if (results == null) return "";
  else return results[1];
}
When the page is ready, we check for a variable and place the text of that variable into our textfield. The variable is decoded so that any characters formatted to work in a URL string will appear correctly in the textarea. To do this, we use the decodeURI() function. That’ll turn our %20 and other special characters back into their actual characters for display:
$(document).ready(function() {
  var priorSearch = getURLVariable('searchingFor');
  priorSearch = decodeURI(priorSearch);
  if (priorSearch) {
    $('#searchingFor').html(priorSearch);
  }
Feel free to style that screen to make it pretty and eye grabbing! You can structure it and style it however you’d prefer as it’s a flat HTML page. The Pebble example settings page used jQuery Mobile, so I’ve stuck with that and just restyled a few things to make it neater. Use any front end framework or JavaScript validation you’d like. The power is yours!
Adjusting Our JavaScript to Accept Settings
Our Pebble app knows we’re wanting to allow for settings to be changed, we told it that in our appinfo.json file. We’ve even got a nice configuration page now for our app which is looking promising. Problem is – our Pebble app doesn’t know where to find this configuration screen we’ve promised it. It doesn’t even know where we want to use this searchingFor bit of data we’re sending back and forth – only that we intend on having one. This is where we update our pebble-js-app.js file to connect everything.
To start with, we’ll need a new variable in our JavaScript. Let’s call it searchingFor to match our key in the appinfo.json file (it isn’t necessary to name it the same but for consistency and clarity, I’ve done so). What this variable will need to do is store the user’s preference over the type of location we’ll be looking out for while they go about their day to day Pebble enhanced lives.
Web Storage in Pebble Apps
To save our user’s preferences in our app, we’ve got access to the localStorage API that Pebble provides us. Pebble is kind enough to follow the W3C recommendation for Web Storage, so the syntax hopefully won’t be too foreign to anyone who has worked with web storage in the past. To store something in local storage, we call:
window.localStorage.setItem('ourVariableName', 'Our variable contents');To retrieve it:
window.localStorage.getItem('ourVariableName');So in our case, we’ll want to store our searchingFor data in our Pebble app’s local storage. We’ll use a JavaScript variable to access it throughout our app but at times when we’re first loading the app or coming back from the config screen, we’ll set this searchingFor variable from our local storage.
We’ll look into our local storage the moment our JavaScript runs. If it doesn’t find our searchingFor data in the local storage then we set the default to “Starbucks”. This is neatly placed this after our locationOptions definition at the start of the pebble-js-app.js file.
var locationOptions = {timeout: 15000, maximumAge: 60000},
    searchingFor = window.localStorage.getItem('searchingFor') ? window.localStorage.getItem('searchingFor') : 'Starbucks';
We then add this variable to our AJAX request in place of the Starbucks mention:
req.open('GET', 'https://api.foursquare.com/v2/venues/search?client_id='+clientId+'&client_secret='+clientSecret+'&v='+version+'&ll='+latitude+','+longitude+'&query='+searchingFor, true);So far our app will do the same thing it did previously – find us Starbucks. We need to let it know what to do when a user presses that “Settings” button for your app. We do this with the showConfiguration event listener:
Pebble.addEventListener('showConfiguration', function() {
  Pebble.openURL('http://www.patrickcatanzariti.com/find_me_anything/configurable.html?searchingFor=' + searchingFor);
});
That’ll take the user to your page with the form to fill in those settings. When they submit their new settings (e.g. “gelato” as mentioned above), we’ll want our JavaScript in pebble-js-app.js to be ready and waiting for that data.
To do so, we use the webviewclosed event listener. Here we decode it back from our URI string (the encoded version with %20 for spaces and such) and parse it into a JSON object once more. We get the searchingFor value from that JSON object and encode it once more now it’s out of our JSON string. That last bit of encoding is storing it ready to be placed into the URL string for the Foursquare API call discussed earlier (the https://api.foursquare.com/v2/venues/search?client_id='+clientId+'&client_secret='+clientSecret+'&v='+version+'&ll='+latitude+','+longitude+'&query='+searchingFor request):
Pebble.addEventListener('webviewclosed', function(e) {
  var options = JSON.parse(decodeURIComponent(e.response));
  searchingFor = encodeURIComponent(options.searchingFor);
If our value comes through as undefined (there seems to be a number of reasons this might happen but they were edge cases), I’ve got a last resort of switching it back to “Starbucks”. There’d likely be a nicer way of handling this in future, potentially with an error, but to keep things simple for this demo I’ve gone to defaulting to Starbucks in a worst case scenario:
if (searchingFor == 'undefined') {
  searchingFor = 'Starbucks';
}
Once we’ve got the searchingFor request understood and ready to store, we store it in local storage using the window.localStorage.setItem() function mentioned above. This way it’ll still be there next time they open the app.
window.localStorage.setItem('searchingFor', searchingFor);Now we’ve received the new setting request, we run the window.navigator.geolocation.watchPosition() function again with our new value. This will run our geolocation search against the Foursquare API with their new requested setting the moment they close the settings window.
  locationWatcher = window.navigator.geolocation.watchPosition(fetch_location_data, fetch_location_error, locationOptions);
});
Our JavaScript now understands this new setting but there’s a little bit more to do.
A Few Additions to Our C Code
Our find_me_anything.c file doesn’t need to change too much. I made the following additions and changes.
Increasing the Message Buffer Size
I upped the size of the message buffer to 124 bytes. I believe this is the maximum you can bring it to on the Pebble watch. The extra buffer size was so that I could send through potentially larger location names and queries. We’ve got a greater variation of data lengths coming through with the new settings, so we’ll want to provide as much leeway for this as possible!
The change was made at the start of the file when sync_buffer was defined:
static AppSync sync;

static uint8_t sync_buffer[124];
It was also changed further down in our init() function when we open our message syncing:
app_message_open(124, 124);
Adding a New Key to Our App
We also need to add in our new key that’ll be passed between the Pebble JavaScript and the C code: the searchingFor setting. In the C code, I followed the convention and used capitalised letters with underscores for separating out the words. We define 1 as 0x1 in hexadecimal, meaning we can now refer to SEARCHING_FOR when mentioning the second key/value pair in our C code:
enum {

  OUR_LOCATION = 0x0,

  SEARCHING_FOR = 0x1

};
I updated the init_location_search() function so that it defines our initial value for the SEARCHING_FOR value as ''. It is blank as this will be filled in once our JavaScript kicks in and tells C what we’re looking for.
Tuplet initial_values[] = {

  TupletCString(OUR_LOCATION, "Loading..."),

  TupletCString(SEARCHING_FOR, "")

};
Finally, we update our sync_tuple_changed_callback() function so that it knows to respond when it receives an updated second key/value pair. When it does, all we need the C code to do is change the label on the watch to say “Nearest gelato” or whatever their new setting is, rather than “Nearest Starbucks”:
switch (key) {

  case OUR_LOCATION:

    text_layer_set_text(text_layer, new_tuple->value->cstring);

    break;

  case SEARCHING_FOR:

    text_layer_set_text(label_layer, new_tuple->value->cstring);

    break;

}
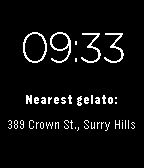
With that all in place, you should now be able to change the settings of your app using the config window. When you submit your settings, the Pebble app should update and you’ll have a customised app like so:
An Extra Addition to Our JavaScript Code
One thing I discovered while implementing this new feature is that sometimes the FourSquare API doesn’t actually have an address or the values we need in each venue. Some venues are missing that data. This returns “undefined” when we display it on the watch. Not good! So I rewrote a bit of our req.onload function to check through our entries and use the first one which had an address and city:
if (response && response.meta.code == '200' && response.response) {
  var venues = response.response.venues,
      venue = undefined,
      venueIndex = 0;
  // Look for the first instance of a venue with an address
  while (venues[venueIndex] !== undefined && venue === undefined) {
    if (venues[venueIndex] && venues[venueIndex].location.address !== undefined && venues[venueIndex].location.city !== undefined) {
      venue = venues[venueIndex];
    }
    venueIndex++;
  }
  if (venue && venue.location.address !== undefined && venue.location.city !== undefined) {
    Pebble.sendAppMessage(...);
What I’ve done above is set up a variable called venue which begins as undefined. I iterate through each item in the response.response.venues data that is returned from Foursquare and if I find one which includes the address and city, then I save that object in venue and we no longer search through the rest of the response.
We’re Now a Slightly More Exciting App!
Thanks to the power of the PebbleKit JavaScript Framework, we’re now letting Pebble watch owners decide how they’d like to use our app. It’s customised and more personal. We’re also now using local storage, so our app can remember things. It’s a much more valuable app than before and we’re using the full extent of what JavaScript can do on the Pebble watch.
Finally my users can now indulge in their own obsession, rather than my personal Starbucks one. Even if you’re not into making a clock which gives you addresses, hopefully this example has given some guidance on adding personalisation to your own apps. Try letting people change their background from black to white or letting them choose a different API or feed to pull in data from. Let them decide on small things which ultimately makes your app just that little bit more useful and engaging.
Take a weekend off to code like mad or code up something on your train ride home! Use that JavaScript knowledge for something you never thought possible and have a load of fun in the process!
Further resources
- Pebble Watch Development with JavaScript – My previous article where “Find Me Starbucks” was born. I’ve got a bunch of resources in this one for those just starting out.
- Working with the PebbleKit JavaScript Framework – Further info from the Pebble team on using their JavaScript framework
Frequently Asked Questions (FAQs) about Advanced Pebble Watch Configuration
How can I update my Pebble watch to the latest firmware?
Updating your Pebble watch to the latest firmware is a straightforward process. First, ensure your watch is connected to your smartphone via Bluetooth. Then, open the Pebble app on your smartphone. If an update is available, a notification will appear prompting you to install it. Simply follow the on-screen instructions to complete the update. Remember to keep your watch close to your smartphone during the update process to maintain a stable connection.
Can I customize the watch face on my Pebble watch?
Yes, you can customize the watch face on your Pebble watch. There are numerous watch faces available for download from the Pebble app store. Once you’ve chosen a watch face, you can install it on your watch via the Pebble app on your smartphone. Some watch faces also allow you to customize elements such as color and layout.
What is the battery life of a Pebble watch?
The battery life of a Pebble watch varies depending on the model and usage. However, most Pebble watches can last between 5 to 7 days on a single charge under normal usage. Factors such as the number of notifications you receive, the watch face you use, and the use of apps can affect battery life.
How can I extend the battery life of my Pebble watch?
There are several ways to extend the battery life of your Pebble watch. These include reducing the number of notifications you receive, using a simple watch face, and disabling features you don’t use often. Additionally, ensure your watch software is up to date, as updates often include optimizations to improve battery life.
Is the Pebble watch water-resistant?
Yes, all Pebble watches are water-resistant. They can withstand being submerged in water up to 30 meters deep. This makes them suitable for activities such as swimming and showering. However, they are not designed for deep-sea diving or high-impact water sports.
Can I use my Pebble watch with an iPhone?
Yes, Pebble watches are compatible with both Android and iOS devices. You can connect your Pebble watch to your iPhone via Bluetooth and use the Pebble app to manage settings, install watch faces, and more.
How do I reset my Pebble watch to factory settings?
To reset your Pebble watch to factory settings, go to the Settings menu on your watch, then select ‘System’, followed by ‘Factory Reset’. This will erase all data and settings on your watch. Note that this action cannot be undone.
Can I use apps on my Pebble watch?
Yes, you can use apps on your Pebble watch. There are many apps available for download from the Pebble app store, including fitness trackers, games, and productivity tools. You can install apps on your watch via the Pebble app on your smartphone.
What do I do if my Pebble watch is not syncing with my smartphone?
If your Pebble watch is not syncing with your smartphone, try the following steps: Ensure your watch and smartphone are within range of each other. Check that Bluetooth is enabled on both devices. Try restarting both your watch and smartphone. If the problem persists, try unpairing and then re-pairing your watch and smartphone.
How do I care for my Pebble watch?
To care for your Pebble watch, clean it regularly with a soft cloth and mild soap. Avoid exposing it to extreme temperatures or harsh chemicals. When not in use, store it in a cool, dry place. Regularly update the watch software to ensure it continues to function optimally.
PatCat is the founder of Dev Diner, a site that explores developing for emerging tech such as virtual and augmented reality, the Internet of Things, artificial intelligence and wearables. He is a SitePoint contributing editor for emerging tech, an instructor at SitePoint Premium and O'Reilly, a Meta Pioneer and freelance developer who loves every opportunity to tinker with something new in a tech demo.