This article was peer reviewed by Wern Ancheta. Thanks to all of SitePoint’s peer reviewers for making SitePoint content the best it can be!
Document and file storage has been essential to computing devices since their inception. Traditionally storage was local, but the past years have seen an increasing move to storing in the cloud. Cloud storage has it’s problems, but offers near infinite capacity and low cost.
In this tutorial I will explain how to store files from an Android app in Dropbox by using the Dropbox Core SDK for Java 6+ in Android. According to the SDK description this Core SDK is a Java library to access Dropbox’s HTTP-based Core API v2. This SDK also supports the older Core API v1, but that support will be removed at some point.
You can find the final code for this project on GitHub.
To connect with Dropbox, you need to have a dropbox account and use the Dropbox API. Create a new app in the App Console.
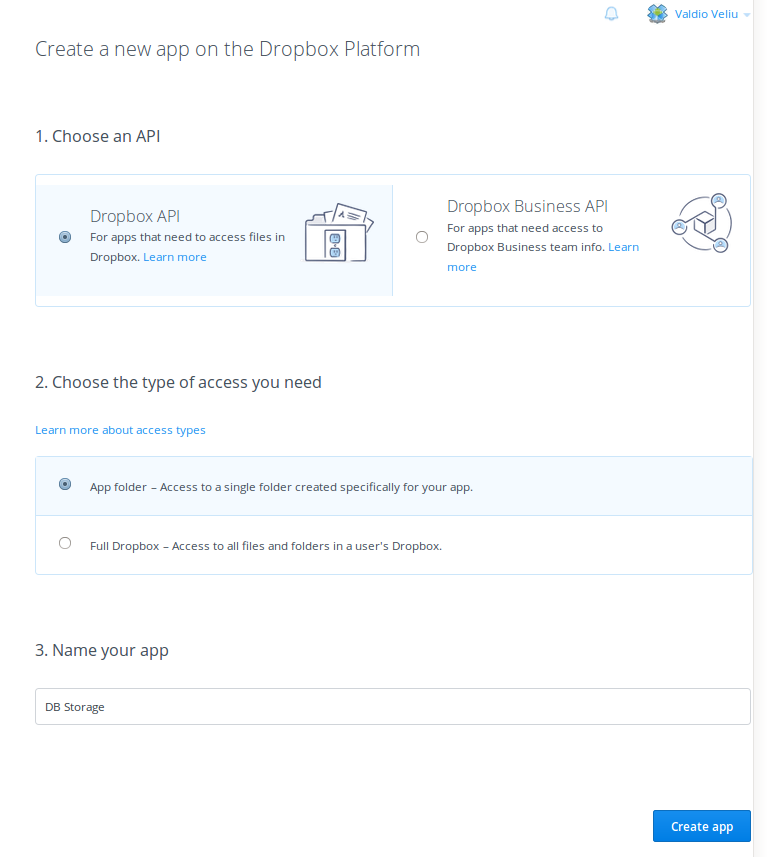
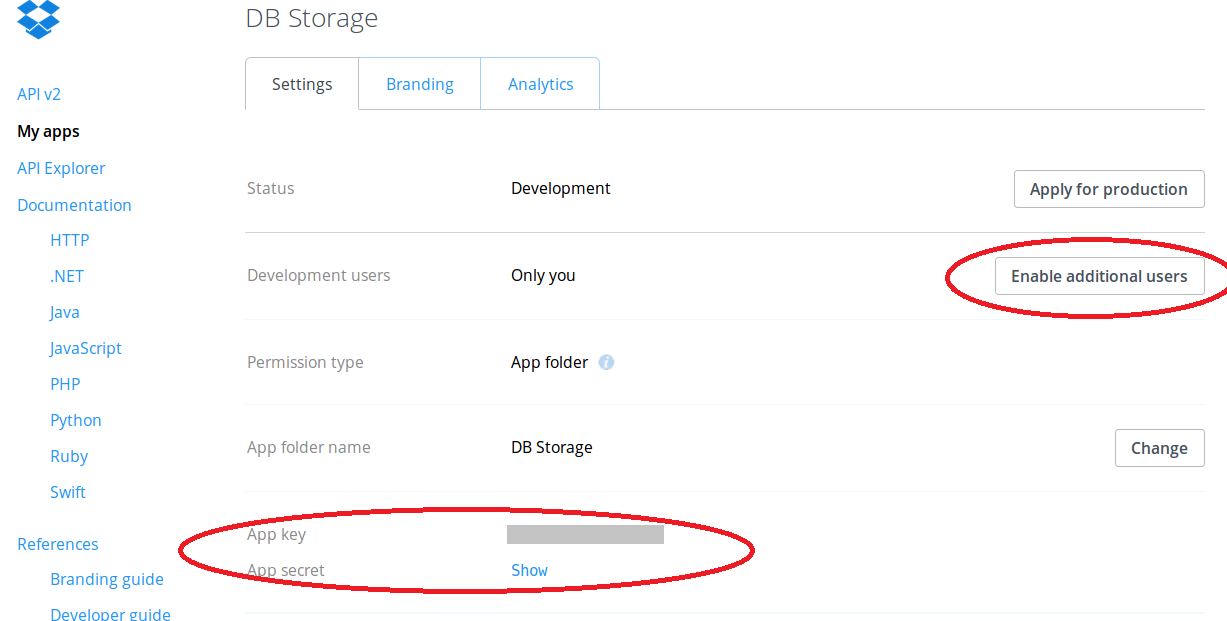
After the new app is created it will be set to development status. With this status the app can only be used by test users and if you Enable Additional Users these can be up to 100. When the app is ready you have to apply for production status.
The app console contains app info and you will need the App Key for the Android project.
Add Permissions
Create a project in Android Studio (With a Login Activity) and in AndroidManifest.xml add the following for internet and storage permissions. You can remove the auto-generated permissions added in AndroidManifest.xml by the LoginActivity. They are not required in this project.
<uses-permission android:name="android.permission.INTERNET" />
<uses-permission android:name="android.permission.WRITE_EXTERNAL_STORAGE" />
<uses-permission android:name="android.permission.READ_EXTERNAL_STORAGE" />
Add Dependencies
In build.gradle(Module: app) add the following:
dependencies {
    //...
    compile 'com.dropbox.core:dropbox-core-sdk:2.0.1'
    compile 'com.squareup.picasso:picasso:2.5.2'
}
Note: The first dependency is for the Dropbox Core API. The Picasso library is not mandatory, but is useful for loading images.
Add the Dropbox Activity
Open AndroidManifest.xml, and in the <application></application> section, add the AuthActivity.
<application>
...
    <!-- Dropbox AuthActivity -->
    <activity
        android:name="com.dropbox.core.android.AuthActivity"
        android:configChanges="orientation|keyboard"
        android:launchMode="singleTask">
        <intent-filter>

            <!-- Insert your app key after “db-  ...” -->
            <data android:scheme="db-APP_KEY" />

            <action android:name="android.intent.action.VIEW" />

            <category android:name="android.intent.category.BROWSABLE" />
            <category android:name="android.intent.category.DEFAULT" />
        </intent-filter>
    </activity>
</application>
Duplicate File Error
While testing the app I encountered an error that after reading this Stackoverflow answer was due to a conflict during build time of multiple License.txt or Notice.txt files. To avoid this conflict, in build.gradle(Module: app), in the android{…} section, exclude these files.
android {
...

  packagingOptions {
      exclude 'META-INF/LICENSE'
      exclude 'META-INF/LICENSE.txt'
      exclude 'META-INF/NOTICE'
      exclude 'META-INF/NOTICE.txt'
  }
}
App key
Add your app key to strings.xml:
<!-- Change this to your app key -->
<string name="APP_KEY">APP_KEY_HERE</string>
Now the Android project is configured to use the Dropbox API, add a new Activity to the project, with the File->New->Activity->Basic Activity menu item. Call it MainActivity.java.
Project Description
The sample app will consist of logging in to the user’s dropbox account, getting detailed information and performing a image upload to the app’s Dropbox folder. The project will have two activities, LoginActivity and MainActivity.
Login with Dropbox
The LoginActivity‘s task is straightforward. On a button click it performs a login task to generate an access token for the Dropbox app identified by the APP_KEY in the string resources.
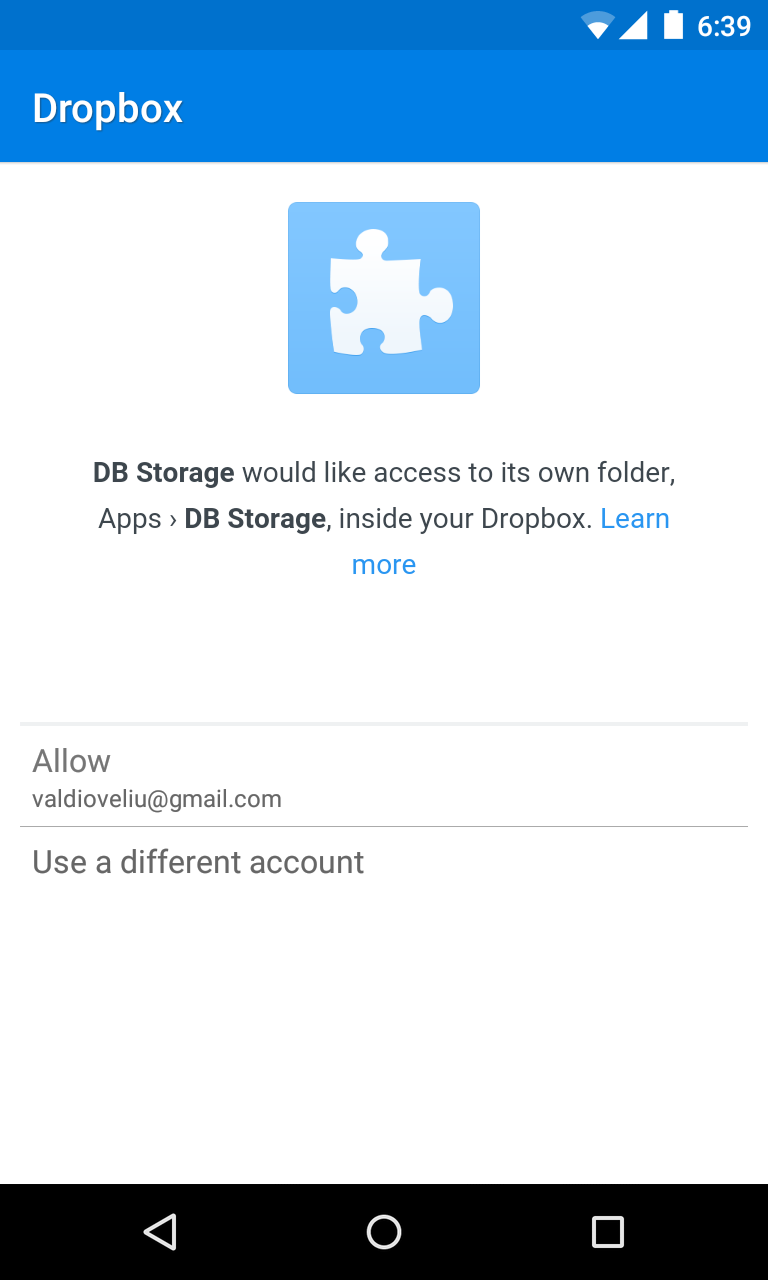
The startOAuth2Authentication() method will open the Dropbox AuthActivity, this is the activity added to the Manifest file. In the AuthActivity the user must confirm their Dropbox account. After the user has confirmed their Dropbox account, redirect them to the LoginActivity.
The startOAuth2Authentication() method doesn’t return any access Token, it only opens AuthActivity which is internally used for authentication. Now the user is authenticated, they need an access token.
AuthActivity
In LoginActivity replace all the auto-generated code, except the project package name, with the following:
public class LoginActivity extends AppCompatActivity {
    @Override
    protected void onCreate(Bundle savedInstanceState) {
        super.onCreate(savedInstanceState);
        setContentView(R.layout.activity_login);

        Button SignInButton = (Button) findViewById(R.id.sign_in_button);
        SignInButton.setOnClickListener(new OnClickListener() {
            @Override
            public void onClick(View view) {
                Auth.startOAuth2Authentication(getApplicationContext(), getString(R.string.APP_KEY));
            }
        });
    }

    @Override
    protected void onResume() {
        super.onResume();
        getAccessToken();
    }

    public void getAccessToken() {
        String accessToken = Auth.getOAuth2Token(); //generate Access Token
        if (accessToken != null) {
            //Store accessToken in SharedPreferences
            SharedPreferences prefs = getSharedPreferences("com.example.valdio.dropboxintegration", Context.MODE_PRIVATE);
            prefs.edit().putString("access-token", accessToken).apply();

            //Proceed to MainActivity
            Intent intent = new Intent(LoginActivity.this, MainActivity.class);
            startActivity(intent);
        }
    }
}
For the layout of this activity, update activity_login.xml to:
<RelativeLayout xmlns:android="http://schemas.android.com/apk/res/android"
    xmlns:tools="http://schemas.android.com/tools"
    android:layout_width="match_parent"
    android:layout_height="match_parent"
    tools:context="com.example.valdio.dropboxintegration.LoginActivity">
    <!-- Update package name -->

    <Button
        android:id="@+id/sign_in_button"
        android:layout_width="wrap_content"
        android:layout_height="wrap_content"
        android:text="@string/sign_in"
        android:layout_centerVertical="true"
        android:layout_centerHorizontal="true" />
</RelativeLayout>
Add the following to strings.xml for the sign in button text:
...
<string name="sign_in">Sign in</string>
The LoginActivity‘s onResume() lifecycle method requests the token by calling the getOAuth2Token() method. The token is stored in the app’s SharedPreferences data for later use, then MainActivity opened.
The onResume() lifecycle method was called before when the app opened for the first time. Why didn’t you get a token then?
This is because the user was not authenticated before. When redirecting from the AuthActivity with successful authentication, the onResume() method will be called once again and generate the access token.
Dropbox Client Is Now Logged In
In MainActivity declare the following variables:
public class MainActivity extends AppCompatActivity {

    private static final int IMAGE_REQUEST_CODE = 101;
    private String ACCESS_TOKEN;
    ...
}
In MainActivity‘s content_main.xml layout file replace the content with the following:
<?xml version="1.0" encoding="utf-8"?>
<RelativeLayout xmlns:android="http://schemas.android.com/apk/res/android"
    xmlns:app="http://schemas.android.com/apk/res-auto"
    xmlns:tools="http://schemas.android.com/tools"
    android:layout_width="match_parent"
    android:layout_height="match_parent"
    android:paddingBottom="@dimen/activity_vertical_margin"
    android:paddingLeft="@dimen/activity_horizontal_margin"
    android:paddingRight="@dimen/activity_horizontal_margin"
    android:paddingTop="@dimen/activity_vertical_margin"
    app:layout_behavior="@string/appbar_scrolling_view_behavior"
    tools:context="valdioveliu.valdio.com.dropboxintegration.MainActivity"
    tools:showIn="@layout/activity_main">

    <LinearLayout xmlns:android="http://schemas.android.com/apk/res/android"
        android:layout_width="match_parent"
        android:layout_height="wrap_content"
        android:orientation="vertical"
        android:id="@+id/accountData">

        <ImageView
            android:id="@+id/imageView"
            android:layout_width="match_parent"
            android:layout_height="wrap_content"
            android:layout_alignParentTop="true"
            android:layout_centerHorizontal="true" />

        <TextView
            android:id="@+id/textView3"
            android:layout_width="wrap_content"
            android:layout_height="wrap_content"
            android:layout_alignParentLeft="true"
            android:layout_alignParentStart="true"
            android:layout_below="@+id/imageView"
            android:layout_marginLeft="15dp"
            android:layout_marginTop="50dp"
            android:text="Name"
            android:textAppearance="?android:attr/textAppearanceLarge" />

        <TextView
            android:id="@+id/name_textView"
            android:layout_width="match_parent"
            android:layout_height="wrap_content"
            android:layout_alignParentLeft="true"
            android:layout_alignParentStart="true"
            android:gravity="center_horizontal"
            android:text=""
            android:textAppearance="?android:attr/textAppearanceLarge" />

        <TextView
            android:id="@+id/textView"
            android:layout_width="wrap_content"
            android:layout_height="wrap_content"
            android:layout_alignParentLeft="true"
            android:layout_alignParentStart="true"
            android:layout_below="@+id/textView3"
            android:layout_marginLeft="15dp"
            android:layout_marginTop="58dp"
            android:text="Email"
            android:textAppearance="?android:attr/textAppearanceLarge" />

        <TextView
            android:id="@+id/email_textView"
            android:layout_width="match_parent"
            android:layout_height="wrap_content"
            android:layout_alignParentLeft="true"
            android:layout_alignParentStart="true"
            android:layout_below="@+id/textView"
            android:gravity="center_horizontal"
            android:text=""
            android:textAppearance="?android:attr/textAppearanceLarge" />
    </LinearLayout>
</RelativeLayout>
Account Information
Getting user account information or accessing Dropbox in any way is a network request, and with Android, network requests are handled asynchronously. These network requests all require a Dropbox client.
Create DropboxClient.java and add the following code:
public class DropboxClient {

    public static DbxClientV2 getClient(String ACCESS_TOKEN) {
        // Create Dropbox client
        DbxRequestConfig config = new DbxRequestConfig("dropbox/sample-app", "en_US");
        DbxClientV2 client = new DbxClientV2(config, ACCESS_TOKEN);
        return client;
    }
}
The ACCESS_TOKEN string in the getClient() method is the token received during the user’s login.
The next task is getting the user’s account details. The UserAccountTask class represents the accounts details request. The constructor of this asynchronous class has an interface parameter of TaskDelegate used to return the accounts info back to the activity in which the task was executed.
Create UserAccountTask.java and add the following code:
public class UserAccountTask extends AsyncTask<Void, Void, FullAccount>  {

    private DbxClientV2 dbxClient;
    private TaskDelegate  delegate;
    private Exception error;

    public interface TaskDelegate {
        void onAccountReceived(FullAccount account);
        void onError(Exception error);
    }

    UserAccountTask(DbxClientV2 dbxClient, TaskDelegate delegate){
        this.dbxClient =dbxClient;
        this.delegate = delegate;
    }

    @Override
    protected FullAccount doInBackground(Void... params) {
        try {
            //get the users FullAccount
            return dbxClient.users().getCurrentAccount();
        } catch (DbxException e) {
            e.printStackTrace();
            error = e;
        }
        return null;
    }

    @Override
    protected void onPostExecute(FullAccount account) {
        super.onPostExecute(account);

        if (account != null && error == null){
            //User Account received successfully
            delegate.onAccountReceived(account);
        }
        else {
            // Something went wrong
            delegate.onError(error);
        }
    }
}
The getUserAccount method is an example of how the UserAcountTask class is executed in the MainActivity class.
Add the following method to the MainActivity class, you will use it later:
protected void getUserAccount() {
    if (ACCESS_TOKEN == null)return;
    new UserAccountTask(DropboxClient.getClient(ACCESS_TOKEN), new UserAccountTask.TaskDelegate() {
        @Override
        public void onAccountReceived(FullAccount account) {
            //Print account's info
            Log.d("User", account.getEmail());
            Log.d("User", account.getName().getDisplayName());
            Log.d("User", account.getAccountType().name());
            updateUI(account);
        }
        @Override
        public void onError(Exception error) {
            Log.d("User", "Error receiving account details.");
        }
    }).execute();
}
To display the user’s account details on the UI add the following function to MainActivity class:
private void updateUI(FullAccount account) {
  ImageView profile = (ImageView) findViewById(R.id.imageView);
  TextView name = (TextView) findViewById(R.id.name_textView);
  TextView email = (TextView) findViewById(R.id.email_textView);

  name.setText(account.getName().getDisplayName());
  email.setText(account.getEmail());
  Picasso.with(this)
          .load(account.getProfilePhotoUrl())
          .resize(200, 200)
          .into(profile);
}
Uploading to Dropbox
Upload tasks happen with the help of InputStream. A specified file is converted to InputStream and with the help of the Core SDK, the stream uploaded to the apps folder in Dropbox.
Create UploadTask.java and add the following code to it:
public class UploadTask extends AsyncTask {

    private DbxClientV2 dbxClient;
    private File file;
    private Context context;

    UploadTask(DbxClientV2 dbxClient, File file, Context context) {
        this.dbxClient = dbxClient;
        this.file = file;
        this.context = context;
    }

    @Override
    protected Object doInBackground(Object[] params) {
        try {
            // Upload to Dropbox
            InputStream inputStream = new FileInputStream(file);
            dbxClient.files().uploadBuilder("/" + file.getName()) //Path in the user's Dropbox to save the file.
                    .withMode(WriteMode.OVERWRITE) //always overwrite existing file
                    .uploadAndFinish(inputStream);
            Log.d("Upload Status", "Success");
        } catch (DbxException e) {
            e.printStackTrace();
        } catch (IOException e) {
            e.printStackTrace();
        }
        return null;
    }

    @Override
    protected void onPostExecute(Object o) {
        super.onPostExecute(o);
        Toast.makeText(context, "Image uploaded successfully", Toast.LENGTH_SHORT).show();
    }
}
Note: Android Studio will prompt you about conflicting imports, you need to import java.io.File for the File variable.
To perform an upload you first need something to upload, e.g. an image. You can get an image by starting another activity for receiving a result.
Add the following method to MainActivity:
private void upload() {
  if (ACCESS_TOKEN == null)return;
  //Select image to upload
  Intent intent = new Intent();
  intent.setType("image/*");
  intent.setAction(Intent.ACTION_GET_CONTENT);
  intent.putExtra(Intent.EXTRA_LOCAL_ONLY, true);
  startActivityForResult(Intent.createChooser(intent,
          "Upload to Dropbox"), IMAGE_REQUEST_CODE);
}
When calling startActivityForResult(), you need to implement the onActivityResult() method to handle results on MainActivity. When a valid image URI is received, construct a file and execute UploadTask.
Add the following method to MainActivity:
@Override
protected void onActivityResult(int requestCode, int resultCode, Intent data) {
  super.onActivityResult(requestCode, resultCode, data);
  if (resultCode != RESULT_OK || data == null) return;
  // Check which request we're responding to
  if (requestCode == IMAGE_REQUEST_CODE) {
      // Make sure the request was successful
      if (resultCode == RESULT_OK) {
          //Image URI received
          File file = new File(URI_to_Path.getPath(getApplication(), data.getData()));
          if (file != null) {
              //Initialize UploadTask
              new UploadTask(DropboxClient.getClient(ACCESS_TOKEN), file, getApplicationContext()).execute();
          }
      }
  }
}
In the onActivityResult() method is the parameter, URI_to_Path.getPath(getApplication(), data.getData()). The URI_to_Path java class is a helper class to convert file URIs into absolute paths. It’s based on this StackOverflow answer.
This is a large class and not directly related to this tutorial, so create URI_to_Path.java and add the code here to it. Make sure to change the package name to yours.
Finally comes the onCreate() method. Add the following code to MainActivity, replacing anything that already exists:
@Override
protected void onCreate(Bundle savedInstanceState) {
    super.onCreate(savedInstanceState);
    setContentView(R.layout.activity_main);
    Toolbar toolbar = (Toolbar) findViewById(R.id.toolbar);
    setSupportActionBar(toolbar);

    if (!tokenExists()) {
        //No token
        //Back to LoginActivity
        Intent intent = new Intent(MainActivity.this, LoginActivity.class);
        startActivity(intent);
    }

    ACCESS_TOKEN = retrieveAccessToken();
    getUserAccount();

    FloatingActionButton fab = (FloatingActionButton) findViewById(R.id.fab);
    fab.setOnClickListener(new View.OnClickListener() {
        @Override
        public void onClick(View view) {
            upload();
        }
    });
}
Every time the app opens you need to check if there is an access token. If the token exists, retrieve it from SharedPreferences. Add these methods to MainActivity to help with that:
private boolean tokenExists() {
    SharedPreferences prefs = getSharedPreferences("com.example.valdio.dropboxintegration", Context.MODE_PRIVATE);
    String accessToken = prefs.getString("access-token", null);
    return accessToken != null;
}

private String retrieveAccessToken() {
    //check if ACCESS_TOKEN is stored on previous app launches
    SharedPreferences prefs = getSharedPreferences("com.example.valdio.dropboxintegration", Context.MODE_PRIVATE);
    String accessToken = prefs.getString("access-token", null);
    if (accessToken == null) {
        Log.d("AccessToken Status", "No token found");
        return null;
    } else {
        //accessToken already exists
        Log.d("AccessToken Status", "Token exists");
        return accessToken;
    }
}
Conclusion
That’s all for the basics of Dropbox integration with the v2 API in Android. If you want to take a deeper look at this topic, read the Dropbox for Java documentation, the SDK source and examples.
Frequently Asked Questions (FAQs) about Adding the Dropbox API to an Android App
How do I get started with integrating Dropbox API into my Android app?
To start integrating the Dropbox API into your Android app, you first need to create a Dropbox account if you don’t have one. Then, go to the Dropbox developers page and create a new app. You will be provided with an app key and app secret, which are essential for the integration. After that, you can download the Dropbox SDK for Android and add it to your project. The SDK provides classes and methods that make it easier to interact with the Dropbox API.
What are the prerequisites for adding the Dropbox API to an Android app?
Before you can add the Dropbox API to your Android app, you need to have a basic understanding of Android development. You should be familiar with Java or Kotlin, the programming languages used for Android development. You also need to have Android Studio installed on your computer, which is the official IDE for Android development. Additionally, you need to have a Dropbox account and you need to create a new app in the Dropbox developers page to get the app key and app secret.
How do I handle Dropbox API authentication in my Android app?
Handling Dropbox API authentication in your Android app involves using the app key and app secret that you got when you created your app in the Dropbox developers page. You need to initialize a DropboxAPI object with an AndroidAuthSession, and then start the authentication process. After the user logs in, you need to finish the authentication process in your app’s onResume method. The DropboxAPI object will then be linked to the user’s account, and you can use it to make API calls.
How can I use the Dropbox API to upload files from my Android app?
To upload files from your Android app to Dropbox, you can use the putFile method of the DropboxAPI object. This method takes the path of the file in Dropbox, an InputStream of the file data, and the length of the file. It uploads the file data to Dropbox and returns a DropboxAPI.Entry object that represents the uploaded file. You can use this object to get information about the file, such as its path, size, and modification time.
How can I use the Dropbox API to download files to my Android app?
To download files from Dropbox to your Android app, you can use the getFile method of the DropboxAPI object. This method takes the path of the file in Dropbox and a File object where the downloaded file data should be written. It downloads the file data from Dropbox and returns a DropboxAPI.DropboxFileInfo object that contains information about the downloaded file. You can use this object to get the file’s metadata and the InputStream of the file data.
How can I handle errors when using the Dropbox API in my Android app?
When using the Dropbox API in your Android app, you can encounter various types of errors, such as network errors, authentication errors, and API call errors. These errors are represented by exceptions that are thrown by the methods of the DropboxAPI object. You should catch these exceptions and handle them appropriately in your app. For example, you can show an error message to the user, retry the API call, or perform some other action based on the type of error.
How can I use the Dropbox API to list files in a folder in my Android app?
To list the files in a Dropbox folder from your Android app, you can use the metadata method of the DropboxAPI object. This method takes the path of the folder in Dropbox and returns a DropboxAPI.Entry object that represents the folder. You can then call the contents method of this object to get a List of DropboxAPI.Entry objects that represent the files in the folder. You can use these objects to get information about the files, such as their paths, sizes, and modification times.
How can I use the Dropbox API to delete files in my Android app?
To delete files from Dropbox in your Android app, you can use the delete method of the DropboxAPI object. This method takes the path of the file in Dropbox and deletes the file. It returns a DropboxAPI.Entry object that represents the deleted file. You can use this object to confirm that the file has been deleted.
How can I use the Dropbox API to move or rename files in my Android app?
To move or rename files in Dropbox from your Android app, you can use the move method of the DropboxAPI object. This method takes the current path of the file in Dropbox and the new path of the file. It moves the file to the new path, which can be in a different folder or have a different name. It returns a DropboxAPI.Entry object that represents the moved or renamed file.
How can I use the Dropbox API to share files from my Android app?
To share files from Dropbox in your Android app, you can use the share method of the DropboxAPI object. This method takes the path of the file in Dropbox and creates a shared link to the file. It returns a DropboxAPI.SharedLink object that contains the URL of the shared link. You can use this URL to share the file with others.
 Valdio Veliu
Valdio recently graduated in Computer Engineering. He is a mobile developer, who is passionate about mobile technologies and learning new things. He has worked with languages such as C, Java, php and is currently focused on Java, mobile and web development